
A well-curated protein snack plate feels like a little victory in the chaos of the week. It’s not about perfection, but about pulling together good ingredients that invite you to graze and relax. I love how it turns a quick snack into a tiny, satisfying meal that’s both nourishing and fun to assemble.
What really makes a snack plate work is the balance—crisp, creamy, smoky, bright. It’s about textures that keep your mouth interested, flavors that surprise you, and enough variety to keep you coming back. Sometimes, I toss one together in a rush, and it’s those moments I realize how versatile and forgiving it can be.
This isn’t just a snack; it’s a little ritual. A moment to pause, pick at a few bites, and feel a bit more grounded. Whether you’re prepping for a busy night or just craving something different, a protein snack plate can be a spontaneous, satisfying fix—no fuss, just good ingredients and a bit of intention.
Focusing on how a well-curated protein snack plate can serve as a spontaneous yet thoughtfully assembled meal, perfect for busy weeknights or last-minute gatherings, emphasizing the balance of textures and flavors that make it satisfying and inviting.
The story behind this recipe
- This recipe came together on a chaotic Sunday afternoon when I needed something quick but satisfying. I was tired of the usual chips or fruit, craving something with a bit more substance and personality. It struck me how a plate with just a few good ingredients can turn into a little moment of calm amidst the mess.
- I started tossing together bits I had—salami, cheese, almonds—and realized how much I enjoyed the variety of textures and flavors. That moment of assembling it felt like a small act of self-care, turning a snack into a tiny celebration. Now, I keep this idea in my back pocket for nights when I want comfort with a little edge.
- heading: The story behind this recipe
Key ingredients and tips
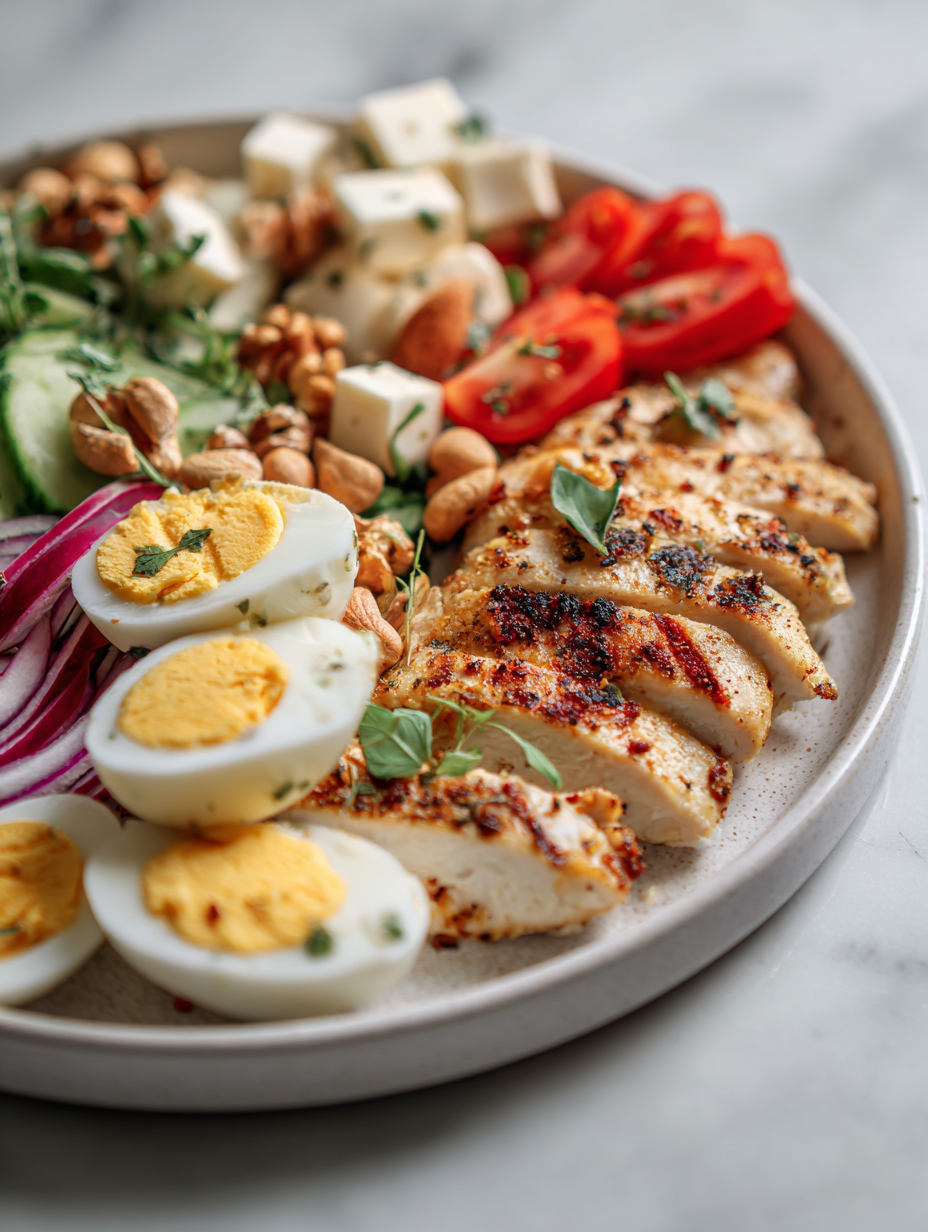
- Cheese: I prefer a firm, nutty cheese like manchego or aged cheddar—melts slightly but keeps its structure. Swap for a softer cheese if you want more creaminess, but you’ll lose that satisfying snap.
- Cured meats: Salami or prosciutto add a smoky, savory punch. If you’re vegetarian, try marinated tempeh strips—they bring a similar salty complexity with a chewy bite.
- Nuts: Almonds or walnuts bring crunch and richness. Toast them lightly to amplify their aroma. For a milder flavor, switch to roasted, salted cashews.
- Fresh vegetables: Cherry tomatoes and cucumber slices add brightness and freshness. For a bit of bite, include radishes or bell peppers—just wash and slice. Keep them crisp with a quick rinse before serving.
- Dips & spreads: Hummus or a mustard-based dip work well. For a tangy twist, add some lemon zest or a drizzle of honey. Use a good quality spread for a velvety texture that clings to everything.
- Olives & pickles: Briny and sharp, they cut through richer ingredients. Opt for pitted olives for easier snacking, or include a few pickled gherkins for a vinegary punch.
- Fresh herbs: A sprinkle of parsley or basil adds a pop of color and aroma. Gently tear before sprinkling to release their oils and brightness.
Spotlight on key ingredients
Cheese & cured meats:
- Cheese: I love a nutty, aged cheese like manchego—firm, crumbly, and fragrant. It holds its shape and adds a savory punch to every bite.
- Cured Meats: Salami or prosciutto bring smoky, salty richness. They’re forgiving, but watch for excess oil—less is more for balance.
Nuts & herbs:
- Nuts: Toasted almonds or walnuts add crunch and aroma. They’re best when golden and slightly oily, with a satisfying snap.
- Fresh herbs: Parsley or basil sprinkle vibrant, fragrant notes. Tear them gently to release oils and boost their lively aroma.
Notes for ingredient swaps
- Dairy-Free: Swap cheese for nut-based cheeses or avocado slices. Expect a creamier texture and milder flavor.
- Meat-Free: Replace cured meats with marinated tempeh or smoked paprika tofu. Adds a smoky, savory depth without the animal products.
- Nut Variations: Use cashews or pistachios instead of almonds or walnuts. Different crunch and a slightly different richness.
- Fresh Veggies: Bell peppers or snap peas can replace or add to cucumbers and tomatoes. For a sweeter crunch or more vibrant color.
- Olives & Pickles: Try artichoke hearts or pickled onions for new briny or tangy notes that refresh the palate.
- Herbs & Greens: Use arugula or cilantro instead of parsley or basil. Adds a different aromatic punch and visual contrast.
- Dips & Spreads: Swap hummus for tzatziki or baba ganoush. Offers a smoky or tangy alternative with a creamy bite.
Equipment & Tools
- Large platter or wooden board: Base for assembling and displaying everything.
- Cheese knife: Cut and serve cheeses cleanly.
- Small bowls or ramekins: Hold dips, olives, and small items.
- Tongs: Handle nuts, herbs, and sliced ingredients hygienically.
Step-by-step guide to assemble
- Gather all your ingredients: cheeses, cured meats, nuts, fresh veggies, dips, olives, herbs. Keep everything within arm’s reach for smooth assembly.
- Prepare your workspace: lay a large platter or board. Have small bowls or ramekins for dips and olives. Use a cheese knife, small spoon, and tongs for easy handling.
- Slice cheeses into uneven, rustic chunks. Aim for a variety of textures—firm, crumbly, semi-soft. Keep slices thick enough to hold their shape.
- Arrange cheeses on the platter, spacing them out. Follow with folded slices of cured meats, overlapping slightly for visual interest.
- Scatter nuts between the cheeses and meats. Lightly toast nuts beforehand for extra aroma and crunch. Fill small bowls with olives and dips.
- Add fresh veggies: cherry tomatoes halved, cucumber slices, radish rounds. Tuck them in empty spaces for color and freshness.
- Finish with herbs: sprinkle torn basil or parsley over the top. Drizzle a little honey or lemon juice over cheeses for a bright finish.
- Serve immediately or let sit at room temperature for 10-15 minutes to enhance flavors. Encourage grazing, not perfection.
Let the assembled plate rest at room temperature for 10-15 minutes. Serve with small tongs and spoons, encouraging guests to graze freely. No need to overthink the presentation—rustic charm wins here.
How to Know It’s Done
- Cheese edges should be slightly firm, not rubbery, with a fragrant aroma.
- Cured meats should be pliable, not greasy or stiff, with visible marbling.
- Nuts should be toasted golden, crunchy, and aromatic.
Protein Snack Plate
Ingredients
Equipment
Method
- Arrange your large platter or wooden board as the base for your snack display.
- Using a cheese knife, cut the cheeses into rustic chunks—aim for uneven pieces that showcase their natural texture and flavor.
- Fold or slice the cured meats into manageable pieces, then arrange them near the cheeses, overlapping slightly for visual interest.
- Lightly toast the nuts in a dry skillet over medium heat until fragrant and golden, about 3-4 minutes. Let them cool slightly before scattering over the platter.
- Fill small bowls or ramekins with hummus or mustard dip, placing them strategically on the platter for dipping options.
- Halve the cherry tomatoes and slice the cucumber into rounds, then tuck them into empty spaces on the platter to add fresh brightness and color.
- Scatter pitted olives and torn herbs over the entire arrangement for bursts of briny flavor and fresh aroma.
- Gently drizzle a little honey or olive oil over the cheeses and herbs for a glossy finish and added flavor dimension.
- Let the platter sit at room temperature for 10 minutes to allow flavors to meld and ingredients to soften slightly.
Pro tips for assembling
- Use a warm, non-stick pan for nuts—toast until golden and fragrant for richer flavor.
- Layer meats and cheeses unevenly—this creates visual interest and varied bites.
- Chill ingredients briefly before assembling—this helps everything stay fresh and firm.
- Drizzle dips with a light hand—just enough to add flavor without overwhelming other ingredients.
- Use a small offset spatula or butter knife—gives you better control when arranging delicate items.
- Let the plate sit at room temperature for 10 minutes—flavors meld and ingredients soften slightly.
- Swirl a little olive oil or honey over the plate—adds shine, aroma, and a touch of sweetness or richness.
Common mistakes and how to fix them
- FORGOT to check ingredient freshness → Use fresh, fragrant ingredients for vibrant flavors.
- DUMPED hot ingredients directly onto cold plates → Let items cool slightly for better texture and appearance.
- OVER-TORCHED nuts or meats → Keep a close eye, stir or flip regularly to avoid burning.
- MISSED balancing flavors → Add a touch of honey or lemon for brightness and harmony.
Quick fixes and pantry swaps
- When ingredients smell off, splash with a squeeze of lemon to refresh and brighten.
- If nuts are dull, toast them again briefly until fragrant and crunchy.
- DUMPED a little too much oil? Patch with a sprinkle of coarse sea salt for crunch and balance.
- When cheese is too soft, chill briefly to firm up before serving.
- Splash with water or vinegar if dips are too thick or dull in flavor, for a quick lift.
Prep, store, and reheat tips
- Pre-chop cheeses, cured meats, and vegetables a day ahead to save time and keep ingredients fresh. Keep wrapped tightly in the fridge; they’ll stay crisp and aromatic for 24 hours.
- Store nuts in an airtight container at room temperature or in the fridge for up to a week. Toasted nuts taste best within a day or two but can be refrigerated for longer, maintaining crunch and aroma.
- Assemble the plate just before serving to preserve the freshness of herbs and vegetables. If prepping in advance, keep ingredients separated and covered tightly to avoid moisture loss or flavor mingling.
- Dips and spreads like hummus or mustard can be made a day ahead. Cover and refrigerate for up to 3 days. Bring to room temperature before serving—watch for a dull, oily surface, which indicates it’s ready.
- Refrigerated ingredients tend to soften over time and can pick up fridge odors. Let everything sit at room temperature for 10–15 minutes before serving to restore vibrancy and enhance flavors. Watch for a fragrant aroma and slightly softened textures, signaling optimal freshness.
Top questions about protein snack plates
1. Should I serve a protein snack plate cold or at room temp?
A snack plate is best served at room temperature, so flavors can fully develop and ingredients stay firm.
2. Can I make this snack plate in advance?
Yes, you can prepare components like cheeses and meats ahead, but assemble the plate just before serving to keep everything fresh.
3. What should I include for a balanced snack plate?
Use a variety of textures—crisp crackers, creamy cheeses, chewy meats, crunchy nuts—to keep it interesting and satisfying.
4. How can I elevate the flavors on the plate?
Add fresh herbs or a drizzle of honey on top just before serving to enhance aroma and flavor complexity.
5. What cheeses work best for a snack plate?
Opt for bold-flavored cheeses like aged cheddar or blue cheese for a punch, or milder ones like mozzarella for a subtle touch.
6. How should I arrange the ingredients for visual appeal?
Arrange ingredients with some space between to make everything look inviting and easy to pick up.
7. What tools do I need to assemble a snack plate?
Use small bowls or ramekins for dips and olives, and tongs or toothpicks for easy handling and serving.
8. How long can I store leftovers from the snack plate?
Store leftovers in airtight containers, and consume within 2-3 days for best flavor and texture.
9. What if ingredients look a bit dry or dull?
If ingredients start to dry out, add a splash of olive oil or honey for moisture and shine.
10. How can I customize my protein snack plate?
Choose ingredients based on your favorite flavors—spicy, smoky, tangy—to match your mood or occasion.
This snack plate feels like a small act of rebellion—something you can throw together without fuss but still feel proud of. It’s perfect for those evenings when you want to graze, not cook, but still crave good flavors and textures. Sometimes, it’s the simplest ingredients that turn a busy night around.
And honestly, it’s the kind of thing I keep coming back to—an easy, satisfying way to make a moment feel a little more special. No matter the ingredients, it’s the balance and the chaos that make it memorable. A good protein snack plate is a little reminder that the best things come together when you keep it real.

Founded by Rachel Morgan, a proud home cook and foodie from Austin, Texas, this blog is all about transforming everyday meals into moments of joy.