
I’ve always thought of paneer as the blank canvas of Indian cooking—versatile but often overlooked for its potential to be crispy and crave-worthy. This recipe flips that idea, turning humble cubes into a golden, crunchy snack or side that somehow feels indulgent without any fuss. It’s a way to elevate everyday ingredients into something a little special, with a technique I keep coming back to.
What excites me about this method is how straightforward it is, yet how it transforms the texture completely. No marinating needed—just a quick toss and a hot pan, and suddenly the paneer’s exterior crackles with each bite, offering a satisfying contrast to its soft inside. It’s perfect for those nights when I want something crispy and flavorful without turning on the oven or fussing over complicated sauces.
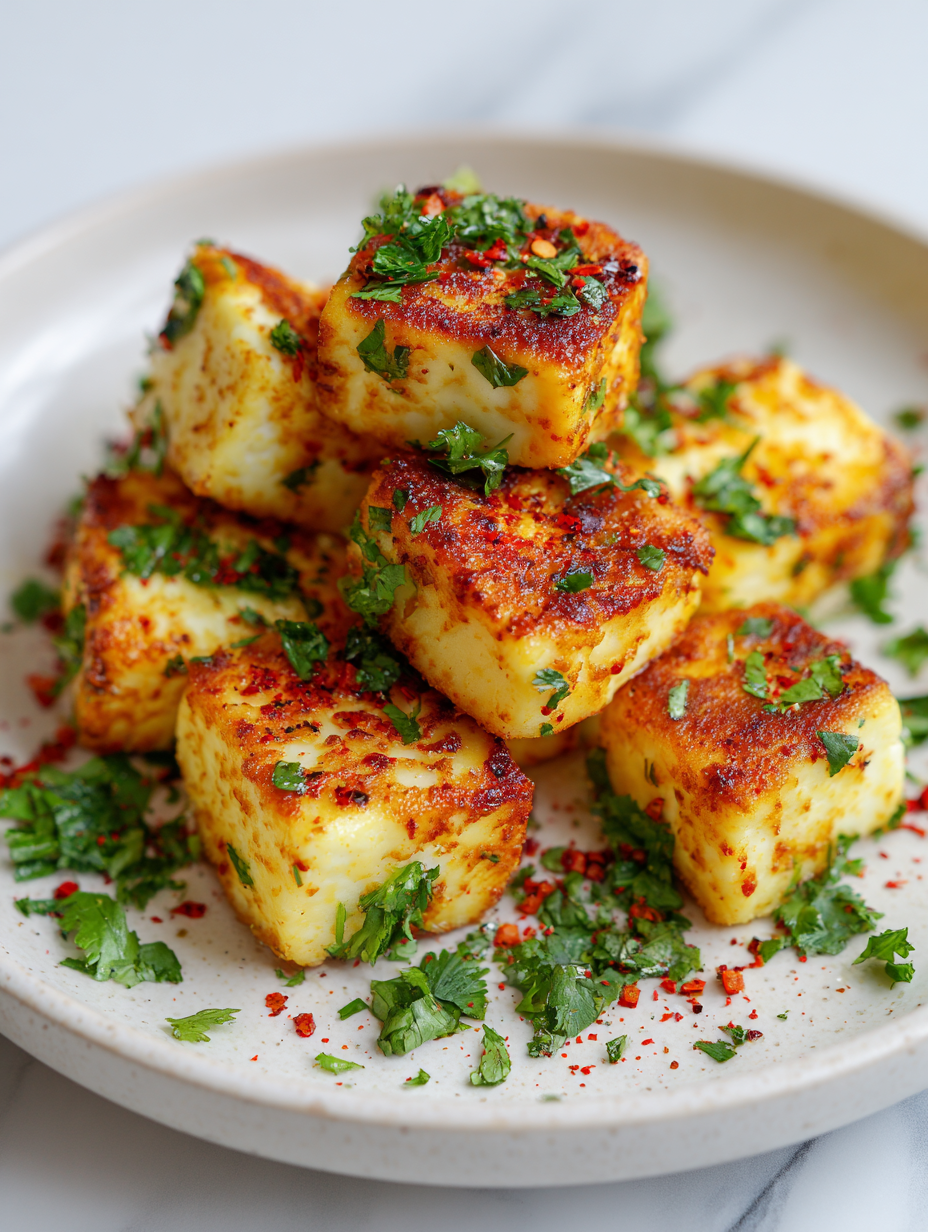
Transforming humble paneer cubes into a crispy, golden delight using a simple, overlooked technique that emphasizes texture over flavor—making it the star of any vegetarian dish.
The story behind this recipe
- This recipe came from a lazy weekend experiment, trying to get that perfect crispy outside on paneer without frying. I remembered how my grandma used to just pan-fry her paneer cubes with a little salt and pepper, but I wanted crunch—something more satisfying. It’s funny how a simple idea like searing can turn humble ingredients into a snack I crave long after the pan’s cooled.
- One time, I was rushing to pull dinner together when I realized I’d run out of my usual spices. Just a sprinkle of salt and a hot pan, and the texture did all the talking. That moment made me appreciate how straightforward techniques can elevate everyday ingredients. Now, it’s my go-to for a quick snack or a side that actually feels special.
- heading
- story_type
Ingredient breakdown: key components
- Paneer: I prefer firm, fresh paneer with a slight squeak when pressed—makes for a better crisp. Swap with tofu if you want vegan, but expect a softer bite.
- Cornstarch: I always dust the paneer in cornstarch to get that crackly exterior. Use rice flour for a slightly lighter crunch, if you like.
- Oil: I use neutral oil with a high smoke point, like vegetable or canola. If you want more flavor, a touch of ghee can add richness, but watch the heat.
- Spices: A pinch of turmeric or smoked paprika in the coating adds color and depth. Skip if you prefer plain, but it’s worth a tiny splash for visual pop.
- Salt: I season the paneer generously—balances the crispy texture. Consider a sprinkle of black pepper or chili flakes for a bit of heat.
- Optional herbs: Fresh cilantro or mint can brighten the dish if added after cooking. I love the freshness that cuts through the richness.
- Lemon juice: A squeeze right after cooking gives a bright, zingy finish. Skip if you prefer a milder flavor, but it really lifts the dish.
Spotlight on key ingredients
Paneer:
- I prefer firm, fresh paneer with a slight squeak when pressed—makes for a better crisp. Swap with tofu if you want vegan, but expect a softer bite.
- Cornstarch: I always dust the paneer in cornstarch to get that crackly exterior. Use rice flour for a slightly lighter crunch, if you like.
Oil & Spices:
- Oil: I use neutral oil with a high smoke point, like vegetable or canola. If you want more flavor, a touch of ghee can add richness, but watch the heat.
- Spices: A pinch of turmeric or smoked paprika in the coating adds color and depth. Skip if you prefer plain, but it’s worth a tiny splash for visual pop.
Notes for ingredient swaps
- Dairy-Free: Use firm tofu instead of paneer. It absorbs flavors well but has a softer, less chewy texture.
- Gluten-Free: Swap cornstarch with rice flour or chickpea flour for a lighter, crisp coating with a slightly nutty flavor.
- Low-Sodium: Opt for a salt-free spice mix and reduce added salt. Keep in mind, the overall flavor will be milder.
- Extra Crispy: Incorporate a small amount of crushed cornflakes or panko breadcrumbs into your coating for added crunch.
- Flavor Boost: Mix smoked paprika or ground cumin into the coating for a smoky, earthy note that enhances the paneer’s richness.
- Oil Choice: Use coconut oil for a subtle sweetness and tropical aroma, or sesame oil for a nutty, toasted flavor—just don’t overheat to avoid burning.
- Acid Brightness: Instead of lemon juice, try a splash of apple cider vinegar or a drizzle of tamarind paste for a different tang.
Equipment & Tools
- Non-stick or cast-iron skillet: Provides even heat and helps achieve crispiness.
- Spatula or tongs: Handles flipping and turning the cubes gently.
- Small mixing bowl: Prepares coating mixture for easy tossing.
- Paper towels: Patting dry paneer to enhance crisping.
Step-by-step guide to paneer cubes
- Equipment & Tools: Gather a non-stick or cast-iron skillet (for even searing), a spatula or tongs (to handle the cubes), a small bowl (for coating), and a paper towel (for drying).
- Cut the paneer: Slice your paneer into uniform 1-inch cubes. Pat dry with a paper towel to remove excess moisture, which helps crispness.
- Prepare coating: In the small bowl, mix cornstarch, a pinch of salt, and optional spices like turmeric or paprika. Toss the cubes gently in this mixture until evenly coated.
- Heat the pan: Place the skillet over medium-high heat (about 190°C/375°F). Add a tablespoon of neutral oil—enough to coat the bottom and shimmer when hot.
- Cook the paneer: Lay the cubes in the hot pan, spaced apart. Let them cook undisturbed for 2-3 minutes until the underside is golden and crispy, then flip and repeat. Adjust heat if smoking or burning. You should hear a steady crackle as they sear.
- Check for doneness: The exterior should be deep golden, and the coating should be crackly. The interior remains soft but not runny.
- Finish and rest: Remove from heat, transfer to a paper towel-lined plate to drain excess oil. Let rest for 1-2 minutes to set the crisp exterior before serving.
- Serve immediately, or toss with fresh herbs or a squeeze of lemon for extra brightness.
Transfer the cooked paneer cubes to a paper towel-lined plate to drain excess oil. Serve hot immediately, optionally garnished with herbs or lemon for extra zest.
How to Know It’s Done
- Crispy exterior with golden color and crackle sound.
- Paneer should jiggle slightly but hold shape without sticking to the pan.
- No excess moisture or sogginess—look for a dry, firm coating.
Crispy Pan-Fried Paneer Cubes
Ingredients
Equipment
Method
- Pat the paneer cubes dry with paper towels to remove excess moisture, which helps them crisp better during cooking.
- In a small bowl, combine the cornstarch, salt, and smoked paprika for added color and flavor, then toss the paneer cubes gently in this mixture until evenly coated.
- Heat a non-stick or cast-iron skillet over medium-high heat and add a tablespoon of neutral oil, swirling to coat the bottom. Wait until the oil shimmers and you can smell a faint aroma—this indicates the pan is hot enough.
- Carefully place the coated paneer cubes in the hot pan, spacing them apart to allow even cooking. Let them cook undisturbed for 2-3 minutes until the bottom turns a deep golden brown and crackles as they sear.
- Use tongs or a spatula to gently flip each paneer cube, then cook for another 2-3 minutes until all sides are evenly golden and crispy. Adjust the heat if the coating starts to burn or smoke excessively.
- Once crisp and golden all over, transfer the paneer cubes onto a paper towel-lined plate to drain excess oil. Drizzle with fresh lemon juice if desired, to add a bright, tangy finish.
- Serve immediately while hot and crispy, garnished with herbs if you like, or add to salads, wraps, or curries for a satisfying crunch.
Notes
Pro tips for crispy paneer cubes
- Bolded mini-head: Use a hot pan → Ensures a quick sear, crackling exterior, and prevents sticking.
- Bolded mini-head: Pat dry paneer → Removes excess moisture for maximum crispness and even browning.
- Bolded mini-head: Dust with cornstarch → Creates a light, crackly coating that contrasts with the soft inside.
- Bolded mini-head: Maintain medium-high heat → Achieves golden color without burning the coating.
- Bolded mini-head: Flip gently → Prevents breaking apart and ensures even crisping on all sides.
- Bolded mini-head: Rest briefly after cooking → Sets the crust and keeps the paneer crispy when served.
- Bolded mini-head: Adjust heat if smoking → Reduces oil splatter and avoids burnt coating, keeping flavors clean.
Common mistakes and how to fix them
- FORGOT to dry paneer thoroughly → Moisture prevents crispness, pat dry before cooking.
- DUMPED excess oil into pan → Too much oil causes splatter; use just enough to coat the bottom.
- OVER-TORCHED the coating → Burnt coating turns bitter; adjust heat after initial sear.
- UNDER-COOKED at high heat → Not crispy enough; cook longer until golden and crackly.
Quick fixes and pantry swaps
- When in doubt, splash a little water to de-glaze and shimmer the oil.
- If sticking occurs, patch with a tiny more oil and gently loosen with a spatula.
- Splash lemon juice to brighten if the paneer feels dull or flat.
- Rescue burnt coating with a quick toss in fresh cornstarch and a hotter pan.
- Pan too dry? Swap in a splash of sesame or coconut oil for extra shimmer.
Prep, store, and reheat tips
- Prep the paneer: Cut into cubes and pat dry up to a day ahead. Keeps for 24 hours in the fridge, maintaining firmness and preventing moisture buildup.
- Coating mixture: Prepare the cornstarch and spice blend in advance. Store in an airtight container for up to 2 days; it stays dry and ready to use.
- Storage: Keep cooked paneer cubes in an airtight container in the fridge for up to 2 days. Reheat in a hot skillet until crackly again, about 2 minutes.
- Reheating: To restore crunch, reheat in a dry skillet over medium-high heat until sizzling and crispy. Avoid microwave, which makes them soggy.
- Taste and texture: The flavor stays bright, but the coating may lose some crispness after chilling. Best enjoyed fresh or reheated properly.
Top questions about paneer cubes
1. Can I use tofu instead of paneer?
Use firm, fresh paneer with a slight squeak when pressed for the best crisp. Tofu can be a vegan alternative, but it’s softer and less chewy.
2. What’s the best coating for crispiness?
Dusting the paneer in cornstarch creates a crackly, golden exterior. Rice flour offers a lighter crunch, but may be less crispy.
3. Which oil is best for frying the paneer?
Use a neutral oil like vegetable or canola with a high smoke point. For added richness, a small splash of ghee can be used, but keep heat moderate.
4. How can I tell when the paneer is crispy enough?
Cook the paneer over medium-high heat (around 190°C/375°F). Look for a deep golden color and listen for a steady crackle to know it’s done.
5. Should I dry the paneer before cooking?
Pat the paneer cubes dry before coating. Excess moisture prevents the coating from crisping properly, leading to sogginess.
6. How should I finish and serve the paneer?
Rest the cooked paneer on paper towels for a minute or two to drain excess oil and help set the crust.
7. How can I reheat leftover paneer to keep it crispy?
Reheat in a hot skillet for 2 minutes until crackly again. Avoid microwaving, as it makes the coating soggy.
8. What’s a good way to add flavor after cooking?
Add a squeeze of lemon or a splash of vinegar after cooking for a bright, fresh flavor that balances the richness.
9. How do I know when the pan is hot enough?
Ensure the pan is hot enough before adding paneer. A quick sizzle indicates the right temperature for searing.
10. What if the coating burns before it crisps?
If the coating burns too quickly, lower the heat slightly and cook more slowly to achieve even crispness.
There’s something satisfying about turning simple paneer into something crispy and golden, especially when it’s quick and relies on a technique I keep coming back to. It’s a reminder that you don’t need fancy ingredients or hours of prep to elevate a humble ingredient.
This recipe feels right for now—comforting, straightforward, with that perfect crunch that makes every bite interesting. Plus, it’s flexible enough to pair with whatever you’ve got in the fridge, making it a go-to for busy nights or last-minute cravings.

Founded by Rachel Morgan, a proud home cook and foodie from Austin, Texas, this blog is all about transforming everyday meals into moments of joy.