
Focusing on the importance of perfecting the sear for scallops, this recipe emphasizes the tactile and visual cues that signal when the scallops are just right—crusty outside, tender inside—and how that small detail transforms the dish from good to exceptional.
Getting that golden-brown crust requires attention not just to timing but to the way the scallops are handled and cooked. It’s a simple step that can feel tricky at first, but once you master it, every batch turns out beautifully caramelized and juicy.
I’ve spent years chasing that perfect sear, often overcooking or under-searing, but now I can spot the crackling sound and the change in color that tell me I’ve hit the sweet spot. It’s about respecting the scallops’ delicate nature while giving them a satisfying, crispy exterior.
Focusing on the importance of perfecting the sear for scallops, this recipe emphasizes the tactile and visual cues that signal when the scallops are just right—crusty outside, tender inside—and how that small detail transforms the dish from good to exceptional.
Mastering the art of the perfect sear isn’t just about technique; it’s about capturing that fleeting moment when the scallops develop a caramelized crust that promises tenderness inside. This dish turned from a simple seafood fix into a quiet celebration of texture and flavor, especially on evenings when I need a reminder that simplicity can be so profound. It’s a small, deliberate act—searing—yet it unlocks a world of sensory satisfaction that keeps me coming back to this recipe, season after season.
- Seared scallops remind me how a simple technique can elevate a humble ingredient into something special, especially when I hear that satisfying crackle in the pan.
- There’s a quiet joy in watching the golden crust form, knowing I’ve balanced patience and timing just right—it’s a small victory every time.
- Cooking scallops perfectly is a gentle dance between heat and patience, and nailing that sear always makes me feel a bit more confident in my kitchen skills.
- This dish has become my go-to for when I want something quick yet impressive, reminding me that simplicity often yields the best flavors.
The soul of a good sear
- Seared scallops became a culinary obsession after I tried them at a seaside bistro, where the chef’s mastery turned each bite into a textural revelation. I remember the moment vividly—the crackle of the crust, the aroma of caramelized shellfish, and the burst of sweet, tender meat. That experience sparked a desire to recreate that magic in my own kitchen, experimenting with different pan heats and timing until I found my rhythm.
- It’s one of those dishes that demands patience and attention to detail, but the payoff is worth every second. Achieving that perfect sear isn’t just about getting color; it’s about understanding the scallops’ delicate nature and respecting their need for a quick, hot cook that locks in their sweetness. Each successful sear feels like a small victory—an almost meditative moment of harmony between technique and instinct.
Contextual origin, trivia, or history in bullet list.
- Pan searing scallops became popular in French cuisine in the 19th century, emphasizing technique and presentation.
- The term ‘scallops’ refers to both the shellfish and the pattern of the shell’s ridges, which inspired many classic plating styles.
- In culinary history, mastering the sear was seen as a fundamental skill, symbolizing precision and respect for ingredients.
- Scallops were once considered a luxury item, often reserved for special occasions, thanks to their delicate flavor and texture.
- The art of searing seafood like scallops reflects a broader culinary tradition of balancing heat, timing, and ingredient quality.
Ingredient breakdown for perfect seared scallops
- Scallops: I look for those with a firm, slightly translucent look and a bright color—freshness is key here. Swap with other shellfish if needed, but nothing beats the sweet, briny pop of a good scallop.
- Salt: I use coarse sea salt to season just before searing; it helps draw out moisture and enhances that caramelized crust. If you prefer less salt, use a light hand or finish with a sprinkle after cooking.
- Black pepper: I like freshly cracked pepper for a bit of spicy heat and texture. Skip it if you’re aiming for a more delicate flavor, or try a pinch of smoked paprika for a subtle smoky note.
- Oil: I prefer a high-smoke-point oil like grapeseed or clarified butter to prevent burning and achieve a crisp sear. For a richer flavor, a splash of duck fat works beautifully but can be a little more delicate in temperature control.
- Lemon or acid: I keep lemon wedges nearby for that bright, zesty contrast—nothing like a squeeze of lemon to wake up the richness. You can substitute lime or a splash of vinegar if that’s what you’ve got.
- Optional herbs: I sometimes toss in a sprig of thyme or a bay leaf during the last seconds of searing for a subtle aromatic lift, but I usually keep it simple to let the scallops shine.
- Butter: I finish with a pat of butter right after searing for richness and a glossy finish. If you’re dairy-free, skip it or use a splash of olive oil—your scallops will still be tasty but less luscious.
Spotlight on 1–2 key ingredients
Scallops:
- I look for those with a firm, slightly translucent look and a bright color—freshness is key here. Swap with other shellfish if needed, but nothing beats the sweet, briny pop of a good scallop.
- Salt: I use coarse sea salt to season just before searing; it helps draw out moisture and enhances that caramelized crust. If you prefer less salt, use a light hand or finish with a sprinkle after cooking.
- Black pepper: I like freshly cracked pepper for a bit of spicy heat and texture. Skip it if you’re aiming for a more delicate flavor, or try a pinch of smoked paprika for a subtle smoky note.
Lemon or acid:
- Oil: I prefer a high-smoke-point oil like grapeseed or clarified butter to prevent burning and achieve a crisp sear. For a richer flavor, a splash of duck fat works beautifully but can be a little more delicate in temperature control.
- I keep lemon wedges nearby for that bright, zesty contrast—nothing like a squeeze of lemon to wake up the richness. You can substitute lime or a splash of vinegar if that’s what you’ve got.
Ingredient substitutes for seared scallops
- Seafood: Fresh scallops are best, but frozen can work if properly thawed and patted dry—just note they might release more moisture.
- Oil: Grape seed or canola oil are neutral choices with high smoke points; if you want extra flavor, try clarified butter, but watch the temperature.
- Salt: Coarse sea salt is ideal for seasoning before searing; if you prefer less salt, use a light sprinkle or finish with a flaky finishing salt.
- Pepper: Use freshly cracked black pepper for a sharp bite; for a smoky twist, try smoked paprika or a dash of cayenne.
- Lemon juice: Brightens the dish with citrus; if unavailable, a splash of vinegar or lime juice offers a similar tang, though less aromatic.
- Herbs: Thyme or bay leaf can add aroma during searing; skip if you want a pure scallop flavor or garnish after cooking instead.
- Butter: Finish with unsalted butter for richness; for dairy-free, use olive oil or a splash of avocado oil for gloss and flavor.
Equipment & Tools
- Heavy skillet (preferably cast iron): Provides even heat and develops a good sear
- Fish spatula or tongs: Handles delicate scallops without breaking them
- Paper towels: Thoroughly dries scallops for optimal searing
- Lemon or citrus wedges: Adds brightness and enhances flavor after cooking
Step-by-step guide to perfect seared scallops
- Select fresh, dry scallops—about 1.5 inches diameter. Pat them thoroughly dry with paper towels to remove excess moisture; moisture is the enemy of a good sear.
- Heat a heavy-bottomed skillet—preferably cast iron—over high heat until it’s shimmering hot, around 200°C (390°F). Add a thin layer of high-smoke-point oil like grapeseed or clarified butter, swirling to coat.
- While the pan heats, season the scallops generously with coarse sea salt and freshly cracked black pepper on all sides. Get ready to sizzle.
- Place the scallops in the hot pan, spacing them apart. Do not overcrowd—work in batches if needed. Hear that immediate crackle—this is your cue.
- Sear the scallops for about 1.5 to 2 minutes without moving them, until the underside develops a deep golden-brown crust. You should see a slight change in color and smell nutty and caramelized.
- Flip each scallop gently using tongs or a fish spatula. Sear the other side for another 1 to 1.5 minutes. The scallops are done when they are opaque and firm to the touch but still tender inside.
- For an extra touch, add a small pat of butter or a sprig of thyme during the last 30 seconds, spooning the melted butter over the scallops for richness.
- Remove scallops from the pan and let rest for about 1 minute. Resting allows the juices to settle, ensuring tenderness.
- Plate immediately, drizzling with lemon juice or a squeeze of fresh lemon for brightness. Garnish with herbs if desired. Serve hot, with that crispy exterior and tender inside.
Rest scallops for a minute to lock in juices. Plate them carefully, drizzle with lemon, and serve immediately while crispy and tender.
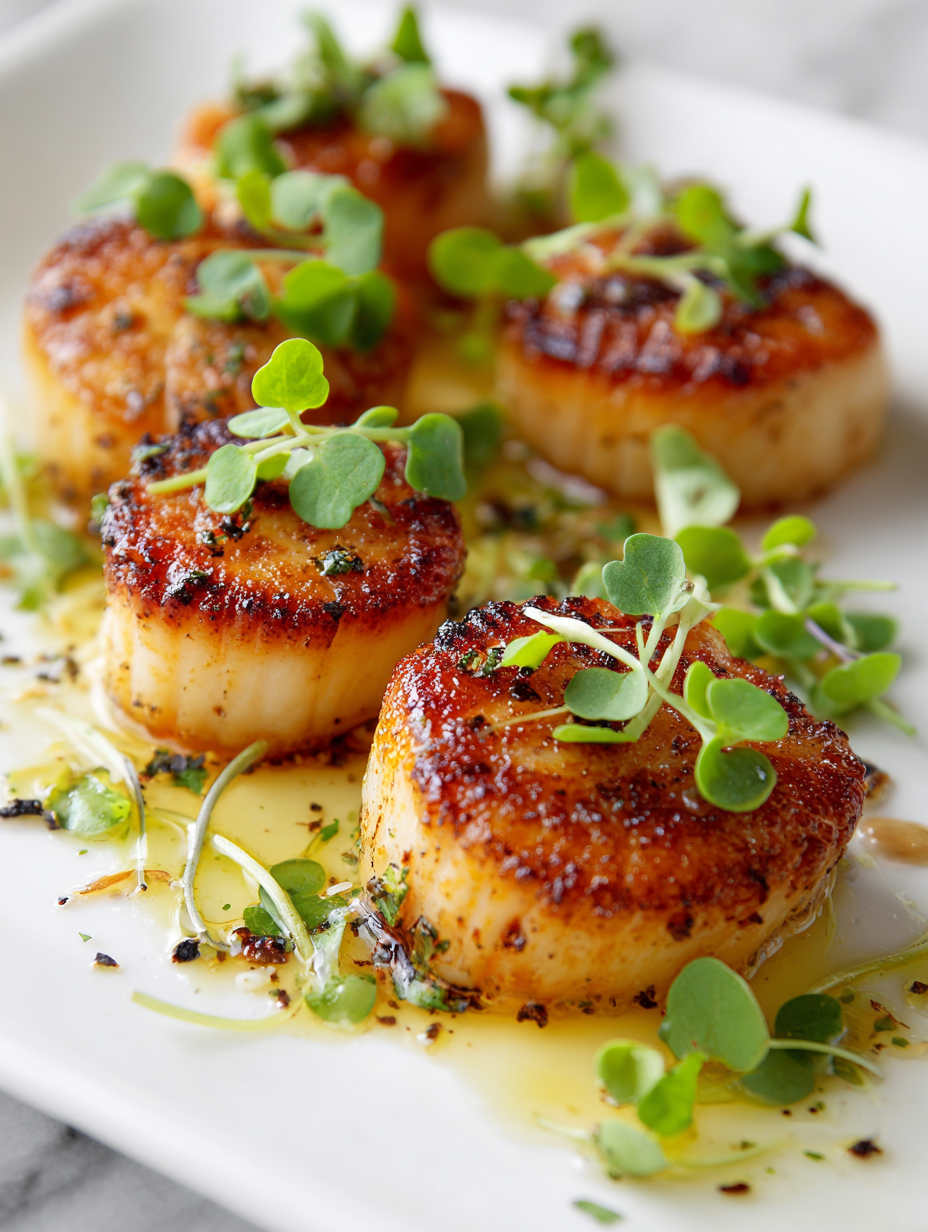
How to Know It’s Done
- The crust should be deep golden-brown and crispy, with a slight caramelized aroma.
- Scallops should be opaque and firm but still moist inside—test with gentle pressure or a probe, aiming for about 55°C (130°F).
- The surface should crackle when pressed, indicating proper sear and caramelization.
Perfectly Seared Scallops
Ingredients
Equipment
Method
- Start by gently patting the scallops dry with paper towels, ensuring all excess moisture is removed for a perfect sear.
- Preheat your heavy skillet over high heat until it’s shimmering hot—this helps create that crispy crust.
- While the pan heats, sprinkle the scallops generously with coarse sea salt and freshly cracked black pepper on all sides—this enhances flavor and aids in caramelization.
- Add a thin layer of high-smoke-point oil to the hot pan, swirling to coat the surface evenly.
- Carefully place the scallops in the pan, spacing them apart to avoid overcrowding—listen for that immediate crackle, a sign the pan is at the right temperature.
- Let the scallops sear undisturbed for about 1.5 to 2 minutes, until the underside develops a deep golden-brown crust and you smell a nutty aroma.
- Gently flip each scallop using tongs or a fish spatula, and sear the other side for another 1 to 1.5 minutes until opaque and firm but still moist inside.
- If desired, add a pat of butter during the last 30 seconds of searing, spooning the melted butter over the scallops for extra richness and shine.
- Remove the scallops from the pan and let them rest for about one minute—this helps juices redistribute for maximum tenderness.
- Arrange the scallops on a plate, squeeze fresh lemon over them, and serve immediately while the crust is crispy and the inside tender and juicy.
Notes
Cooking Tips & Tricks
- Bolded mini-head: Ensure dryness → Pat scallops thoroughly to avoid steaming and achieve a crisp sear.
- Bolded mini-head: Preheat pan → Make sure your skillet is shimmering hot before adding scallops for that perfect crust.
- Bolded mini-head: Don’t overcrowd → Space scallops well in the pan; overcrowding lowers temperature and hampers caramelization.
- Bolded mini-head: Resist moving → Let scallops sit undisturbed for about 1.5 minutes until a deep golden crust forms.
- Bolded mini-head: Finish with butter → Add a pat of butter in the last 30 seconds for richness and a glossy exterior.
- Bolded mini-head: Use high smoke point oil → Grape seed or clarified butter prevents burning and promotes crispness.
- Bolded mini-head: Serve immediately → Plate scallops right after cooking to enjoy the contrast of crispy exterior with tender inside.
Common mistakes and how to fix them
- TOO MUCH MOISTURE: Dried scallops thoroughly for a crisp sear; excess moisture causes steaming, not searing.
- DUMPED OIL: Use just enough to coat the pan lightly; excess oil can make scallops greasy and dull the crust.
- OVER-TORCHED: Keep heat high but not scorching; burnt scallops taste bitter and ruin the delicate flavor.
- UNDER-SEARED: Cook for full time until crust is deep golden-brown; undercooked scallops are rubbery and dull.
Small fixes for big searing success
- If scallops stick, splash a little more oil and gently loosen with a spatula.
- When scallops turn gray, they’ve overcooked—rescue with a quick squeeze of lemon and serve immediately.
- Dumped too much oil? Wipe pan and start with fresh oil to prevent greasy scallops.
- Over-torched? Lower the heat slightly and add a pat of butter for a softer crust.
- When in doubt, pantry swap: use vegetable broth instead of wine for a quick flavor boost, watch for shimmer.
Preparation, storage, and reheating tips
- Prep the scallops by thoroughly drying them with paper towels a few hours ahead; excess moisture hampers searing and can make the surface soggy.
- Store cleaned, dry scallops in an airtight container in the fridge for up to 24 hours; keep them on a bed of ice or in a chilled compartment for optimal freshness.
- Refrigerated scallops will lose some of their sweetness and become slightly rubbery if stored beyond 24 hours, so plan to cook them as close to serving time as possible.
- To reheat cooked scallops, gently warm in a skillet over low heat for about 1-2 minutes until just heated through; avoid overcooking to prevent rubberiness and preserve their delicate texture.
- Sensory note: reheated scallops should smell subtly sweet and briny, with a slight aroma of caramelized crust if reheated properly.
Practical Q&As about pan seared scallops
1. How do I ensure my scallops sear properly without steaming?
Use dry, fresh scallops and pat them thoroughly dry with paper towels. Excess moisture causes steaming, not searing.
2. How hot should my pan be before adding scallops?
Preheat your pan until it’s shimmering hot, around 200°C (390°F). This quick, hot start creates a crispy crust.
3. Should I overcrowd the pan when searing scallops?
Place scallops gently in the pan, spacing them out. Don’t overcrowd, or they’ll steam instead of sear.
4. How long should I sear scallops on each side?
Sear each side for about 1.5 to 2 minutes until deep golden-brown and crispy. They should be opaque and firm but tender inside.
5. When should I add butter or herbs during searing?
Add butter or herbs during the last 30 seconds of searing for extra richness and aroma.
6. How long should I let scallops rest after cooking?
Remove scallops promptly and let them rest for about a minute to retain juices and achieve perfect tenderness.
7. How do I know when my scallops are perfectly seared?
Look for a deep golden crust with a nutty aroma and make sure they are opaque and firm but still moist inside.
8. What kind of oil is best for searing scallops?
Use high-smoke-point oils like grapeseed or clarified butter to prevent burning and promote a crisp sear.
9. Should I add lemon or acid after cooking scallops?
Finish with a squeeze of lemon or a splash of vinegar to brighten the flavor and add freshness.
10. How should I store scallops before cooking?
Store scallops in the fridge in an airtight container for up to 24 hours. Pat dry before cooking for best results.
There’s something about the quick, sizzling sear that keeps me coming back to scallops. That crackling sound, the rich aroma, and the contrast between the crispy exterior and tender inside—it’s a small thrill every time I cook them. It feels like capturing a fleeting moment of perfection in my own kitchen, no matter how many times I do it.
In the end, searing scallops is about respect for the ingredient and patience in execution. When done right, each bite offers this perfect harmony of textures and flavors that’s hard to replicate with anything else. That simple, honest process reminds me why I love cooking—it’s about small details that make all the difference.

Founded by Rachel Morgan, a proud home cook and foodie from Austin, Texas, this blog is all about transforming everyday meals into moments of joy.