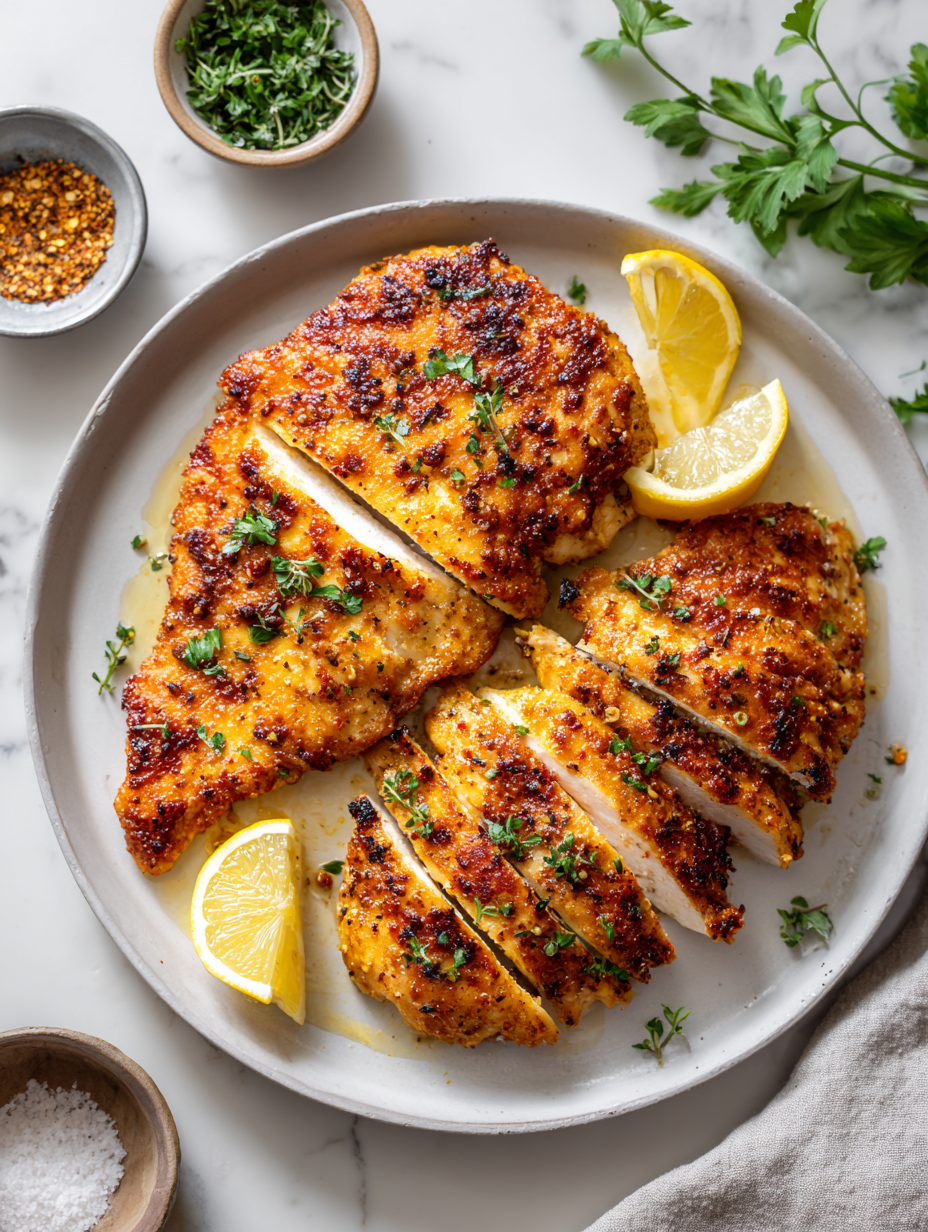
Blog

  • Autumn’s Secret: Pumpkin Spice Pancakes That Whisper Cozy Vibes

    Autumn’s Secret: Pumpkin Spice Pancakes That Whisper Cozy Vibes

    There’s something about the aroma of pumpkin and spice that instantly transports you to a crisp fall morning. When I whip up these pancakes, the kitchen fills with warm notes of cinnamon, nutmeg, and a hint of molasses, creating an inviting atmosphere even before the batter hits the griddle. It’s my quiet rebellion against the chaos of everyday mornings, a small luxury I gift myself.

    This recipe is crafted for those who crave a seasonal twist with every bite. The tender pancakes, kissed with pumpkin and crowned with whipped cream or maple syrup, balance sweetness and spice beautifully. They’re perfect for a lazy weekend breakfast or a festive brunch with friends.

    Pumpkin Spice Pancakes

    Pumpkin spice pancakes are tender, fluffy pancakes infused with pumpkin puree and warm spices like cinnamon and nutmeg. The batter is gently mixed and cooked on a griddle until golden brown, resulting in a visually appealing stack with a soft interior and slightly crispy edges, perfect for fall mornings.
    Prep Time 10 minutes
    Cook Time 15 minutes
    Total Time 25 minutes
    Servings: 4
    Course: Main Course
    Cuisine: American
    Calories: 340

    Ingredients
      

    • 1 1/2 cups all-purpose flour
    • 2 tablespoons granulated sugar
    • 1 teaspoon baking powder
    • 1/2 teaspoon baking soda
    • 1/2 teaspoon ground cinnamon
    • 1/4 teaspoon ground nutmeg
    • 1/4 teaspoon ground ginger
    • 1/4 teaspoon salt
    • 1 cup pumpkin puree
    • 1 cup buttermilk
    • 2 large eggs
    • 2 tablespoons unsalted butter melted

    Equipment

    • Mixing bowls
    • Whisk
    • Griddle or non-stick skillet
    • Spatula

    Method
     

    1. In a large mixing bowl, whisk together the flour, sugar, baking powder, baking soda, cinnamon, nutmeg, ginger, and salt until evenly combined.
    2. Add the pumpkin puree, buttermilk, eggs, and melted butter to the dry ingredients.
    3. Gently whisk everything together just until the batter is smooth; avoid overmixing to keep the pancakes fluffy.
    4. Preheat a griddle or non-stick skillet over medium heat and lightly grease with butter or oil.
    5. Pour 1/4 cup of batter onto the hot griddle for each pancake, allowing space for spreading.
    6. Cook the pancakes until bubbles form on the surface and the edges look set, about 2-3 minutes.
    7. Flip the pancakes carefully with a spatula and cook for another 2-3 minutes until golden brown and cooked through.
    8. Remove the cooked pancakes from the skillet and keep warm while repeating the process with remaining batter.
    9. Serve the pumpkin spice pancakes stacked on a plate, topped with whipped cream, syrup, or additional spices if desired.

    Notes

    For extra flavor, add a dash of vanilla extract or serve with toasted pecans.

    These pumpkin spice pancakes are more than just a seasonal treat—they’re a reminder to slow down and savor simple pleasures. The comforting scent and cozy flavor make mornings feel special, no matter the day.

    When the leaves turn and the air cools, these pancakes become a ritual—a way to embrace the season’s warmth from the first crackle of the griddle to the last sip of hot coffee. They’re a small celebration of fall’s bounty, one bite at a time.

  • Spooky Spider Web Cake: A Halloween Masterpiece

    Spooky Spider Web Cake: A Halloween Masterpiece

    Every October, I find myself craving a dessert that’s as visually haunting as it is delicious. The Halloween Spider Web Cake suddenly becomes my obsession, with its layers of rich chocolate and the eerie web pattern on top. It’s not just a cake—it’s a canvas for chaos and creativity in the kitchen.

    What excites me most is the chance to channel my inner baker and artist at the same time. The process of piping that perfect web can be oddly meditative, even if it sometimes turns into a spider’s nest rather than a masterpiece. When it’s done, though, the reaction—delight mixed with squeals—is absolutely worth every frantic minute.

    Halloween Spider Web Cake

    This spider web cake features multiple layers of rich chocolate cake paired with smooth chocolate frosting. The top is decorated with a detailed web pattern made from white icing, creating an eerie and striking appearance. Its final look is both decadent and visually haunting, perfect for Halloween celebrations.
    Prep Time 45 minutes
    Cook Time 25 minutes
    Total Time 1 hour 10 minutes
    Servings: 12
    Course: Main Course
    Cuisine: dessert
    Calories: 480

    Ingredients
      

    • 2 ½ cups all-purpose flour sifted
    • 2 cups granulated sugar
    • ¾ cup unsweetened cocoa powder unsweetened, sifted
    • 1 ½ teaspoons baking powder
    • 1 ½ teaspoons baking soda
    • 1 teaspoon salt
    • 2 large eggs at room temperature
    • 1 ¼ cups hot water

    Equipment

    • Mixing bowls
    • Hand or stand mixer
    • Cake pans
    • Cooling rack
    • Piping bag
    • Fine round piping tip
    • Offset spatula

    Method
     

    1. Preheat your oven to 350°F (175°C). Grease and flour three 8-inch round cake pans to ensure easy removal after baking.
    2. In a large mixing bowl, combine sifted flour, cocoa powder, baking powder, baking soda, and salt. Whisk until well mixed to ensure even distribution of dry ingredients.
    3. In another bowl, mix the buttermilk, vegetable oil, eggs, and vanilla extract until smooth and combined. This creates the wet mixture for your batter.
    4. Add the wet mixture to the dry ingredients gradually, mixing on low speed. Once combined, stir in the hot water slowly to thin the batter; it will be quite liquid.
    5. Divide the batter evenly among the prepared cake pans. Smooth the tops with an offset spatula for an even bake.
    6. Bake in the preheated oven for about 25 minutes, or until a toothpick inserted into the center comes out clean. Then, remove from oven and let the cakes cool in their pans for 10 minutes.
    7. Transfer the cakes to a wire rack and let them cool completely before frosting. This prevents melting and makes layering easier.
    8. Prepare the chocolate frosting by beating unsalted butter until creamy. Add powdered sugar gradually, then stir in cocoa powder. Mix until smooth and fluffy, adding milk as needed to reach a spreadable consistency.
    9. Place the first cake layer on your serving plate and spread an even layer of frosting on top. Repeat with the second layer, then smooth the outer surface of the assembled cake with a spatula.
    10. Apply a final thin layer of frosting over the entire cake to seal in crumbs. Chill in the fridge for 20 minutes if needed to set the frosting firmly.
    11. Fill a piping bag fitted with a round tip with white icing. Starting at the center of the top of the cake, pipe concentric circles, then connect the circles with radial lines to create a web pattern, covering the entire top surface.
    12. Carefully add more web lines, extending from the center to the edges and intersecting existing lines, to enhance the web effect. Observe the pattern come together with each piping stroke.
    13. Once finished, chill the decorated cake for about 15 minutes to set the web pattern. Slice and serve to reveal the beautifully spooky design with rich chocolate layers.

    This cake perfectly captures the spirit of Halloween—playful, spooky, and a little bit messy. Its rich, dark flavors stand out against the vivid web design, making it a centerpiece at any celebration. Plus, it’s a fun project that invites the whole family into the spooky kitchen.

    In these crisp autumn days, there’s something comforting about baking with seasonal spices and chocolate. This Spider Web Cake isn’t just a treat—it’s a memory in the making, ready to be shared and admired. And once it’s cut into, the delicious aroma of cocoa and vanilla will fill the air, sealing the evening with a sweet touch of chaos and charm.

  • A Cozy Twist on Chicken Noodle Soup for Cold Days

    A Cozy Twist on Chicken Noodle Soup for Cold Days

    As the weather shifts and the chill settles in, I find myself craving something more than just basic chicken noodle soup. This version incorporates a subtle hint of roasted garlic and a splash of lemon zest, adding layers of warmth and brightness that lift the soul. It’s a simple dish transformed into a comforting, vibrant bowl that makes being indoors feel special.

    What makes this recipe unique isn’t just the flavors, but the way it’s built to be forgiving—a perfect project for a busy day. I love how the aroma of simmering herbs and tender chicken fills the kitchen, turning an everyday meal into a small celebration. It’s a reminder that, sometimes, the simplest ingredients can stir the deepest memories.

    Lemon-Infused Chicken Noodle Soup

    This chicken noodle soup features tender shredded chicken and al dente noodles simmered in a clear broth flavored with roasted garlic and lemon zest. The final dish has a warm, comforting texture with vibrant citrus notes and a fragrant, savory aroma that enhances the classic soup experience.
    Prep Time 15 minutes
    Cook Time 30 minutes
    Total Time 45 minutes
    Servings: 4
    Course: Main Course
    Cuisine: Comfort Food
    Calories: 350

    Ingredients
      

    • 1 lb boneless, skinless chicken breasts or thighs, if preferred
    • 4 cups chicken broth
    • 3 cloves garlic roasted
    • 2 cups egg noodles or any pasta shape
    • 1 lemon lemon zested and juiced
    • 2 tablespoons olive oil for roasting garlic and cooking
    • 1 teaspoon dried thyme optional, adds herbal aroma
    • to taste salt and pepper

    Equipment

    • Large Stockpot
    • Chef’s knife
    • Cutting board
    • Slotted Spoon

    Method
     

    1. Preheat your oven to 400°F (200°C). Wrap the garlic cloves in foil with a teaspoon of olive oil and roast until soft and fragrant, about 20-25 minutes. Set aside to cool slightly.
    2. While the garlic roasts, season the chicken breasts with salt, pepper, and dried thyme. In a large stockpot, heat a tablespoon of olive oil over medium heat and sear the chicken until golden on both sides, about 3-4 minutes per side.
    3. Pour in the chicken broth and bring the mixture to a gentle simmer. Once simmering, add the roasted garlic cloves (squeeze their soft pulp out of the skins) and let the chicken cook through for about 10-12 minutes, allowing the flavors to meld.
    4. Remove the cooked chicken from the broth and shred it into bite-sized pieces with two forks. Return the shredded chicken to the pot.
    5. Add the egg noodles to the broth and cook until tender, about 7-8 minutes. During the last minute, add the lemon zest and juice to brighten the soup’s flavor.
    6. Stir the soup well, taste, and adjust seasoning with additional salt, pepper, or lemon juice if desired. The broth should be clear, with vibrant citrus aroma and a hearty, comforting consistency.
    7. Serve the soup hot, garnished with extra lemon zest or herbs if desired, and enjoy the warm, fragrant bowl of lemon-infused chicken noodle soup.

    Notes

    Roast the garlic until sweet and soft for maximum flavor. Feel free to squeeze in more lemon for extra brightness.

    This chicken noodle soup is ideal for quiet nights and busy mornings alike, offering instant comfort no matter the season. The customization options mean every bowl can be just right, whether you prefer your noodles thick or thin. It’s a recipe that welcomes improvisation and personal touches, making it a staple to return to.

    Enjoy the warm, familiar scent with every spoonful, knowing that it’s quick enough to whip up when life feels frantic. The rich broth and tender chicken provide a satisfying pause, a moment of peace in a hectic day. Sometimes, the best meals are those that come with a little extra heart and a lot of flavor.

  • Halloween Candy Corn Parfaits: A Nostalgic Twist with a Modern Bite

    Halloween Candy Corn Parfaits: A Nostalgic Twist with a Modern Bite

    As Halloween night approaches, I find myself craving something more than just candies and chocolates. This year, I decided to turn candy corn into a centerpiece that captures the festive spirit and adds a dash of elegance to the celebration. The idea of layered parfaits filled with bright, sweet flavors feels just right for the season.

    Transforming candy corn into a creamy, luscious dessert was my small rebellion against the usual. Every spoonful offers a nostalgic crunch with a silky finish, reminding me of childhood but dressed up for grown-up enjoyment. It’s the perfect mix of chaos and charm that embodies Halloween’s playful energy.

    Candy Corn Parfait

    This layered parfait combines sweet candy corn with creamy yogurt and whipped cream, creating a dessert that is colorful and textured. The dish features distinct layers of crunch, smoothness, and fluffiness, resulting in a visually appealing treat. It showcases bright seasonal flavors with a light, airy final presentation.
    Prep Time 15 minutes
    Total Time 15 minutes
    Servings: 4
    Course: Main Course
    Cuisine: American
    Calories: 250

    Ingredients
      

    • 1 cup plain Greek yogurt full-fat or low-fat
    • 1 cup whipped cream chilled
    • 1/2 cup candy corn small or mini pieces preferred
    • 1 tablespoon honey or maple syrup to sweeten the yogurt if desired

    Equipment

    • Clear glass jars or parfait glasses
    • Mixing bowls
    • Whisk
    • Spatula

    Method
     

    1. In a mixing bowl, gently fold the whipped cream into the Greek yogurt until smooth and combined, creating a light, fluffy mixture.
    2. Add honey or maple syrup to the yogurt mixture and whisk until evenly incorporated, adjusting sweetness to taste.
    3. Chop the candy corn into small pieces if they are large, to ensure easy layering and a balanced texture.
    4. Spoon a layer of the yogurt mixture into the bottom of each glass, filling about one-third of the way up.
    5. Sprinkle a handful of candy corn pieces over the yogurt layer for a burst of color and crunch.
    6. Add another layer of the yogurt mixture over the candy corn, smoothing the top with a spatula for a neat appearance.
    7. Top the parfait with a final generous sprinkle of candy corn for decoration and extra sweetness.
    8. Repeat the process for all glasses, then chill in the refrigerator for about 10-15 minutes to set slightly before serving.
    9. Serve the candy corn parfaits chilled, with a colorful and festive presentation perfect for Halloween celebrations.

    Notes

    Feel free to customize with other seasonal candies or add a graham cracker crumble for extra texture.

    These Candy Corn Parfaits are surprisingly simple yet visually stunning. Their vibrant layers bring a whimsical touch to any Halloween table, making them ideal for parties or a homemade treat for just family. Each bite is a sweet reminder of how a little creative twist can turn ordinary ingredients into something memorable.

    As the season shifts, these parfaits capture the fleeting magic of fall with every colorful spoonful. They’re a lively, playful alternative to traditional desserts, perfect for celebrating all things spooky and sweet. Enjoy crafting this little colorful masterpiece and watch it become a favorite in your Halloween repertoire.

  • Spooky Fun: Haunted Eyeball Pasta with Gory Meatball

    Spooky Fun: Haunted Eyeball Pasta with Gory Meatball

    Halloween is the perfect excuse to indulge in whimsical, slightly gruesome dishes. This Eyeball Pasta transforms ordinary comfort food into a playful nightmare, perfect for parties and quick family dinners alike. The sight of juicy meatballs with creepy, bloodshot eyes is guaranteed to spark giggles and shivers at the table.

    What makes this dish stand out is how surprisingly easy it is to create a creepy, creepy effect using simple ingredients from your pantry. The combo of savory meatballs, tender pasta, and edible eyes makes for a satisfyingly eerie vibe. Plus, the bubbling sauce smells irresistibly like cozy, fall evenings—rich garlic, earthy herbs, and a hint of spice.

    Whether you’re weaving this into a themed menu or just craving a bit of culinary chaos, it’s a fun way to celebrate Halloween with a deliciously spooky twist. Prepare for playful ooze, haunting flavors, and plenty of leftover giggles to go around.

    Eyeball Pasta

    Eyeball Pasta features tender spaghetti served with savory meatballs, each topped with a creepy, bloodshot eye made from olives or similar edible ingredients. The dish is prepared by cooking the pasta and shaping meatballs, then assembling everything with a flavorful tomato sauce that envelops the dish, giving it a spooky appearance and satisfying texture.
    Prep Time 20 minutes
    Cook Time 30 minutes
    Total Time 50 minutes
    Servings: 4
    Course: Main Course
    Cuisine: Halloween
    Calories: 550

    Ingredients
      

    • 400 g spaghetti uncooked
    • 500 g ground beef for meatballs
    • 1 cup breadcrumb for meatball binding
    • 1 egg egg to help bind meatballs
    • 2 cloves garlic minced
    • 2 cups tomato sauce for pasta and sauce
    • 0.5 cup parmesan cheese grated, for flavor
    • 12 green olives stuffed with pimentos for eyeball centers
    • 12 black olives sliced, for bloodshot effect
    • 2 tablespoons olive oil for cooking
    • to taste salt and pepper for seasoning

    Equipment

    • Large pot for boiling pasta
    • Mixing bowls
    • Baking sheet
    • Skillet or frying pan
    • Small spoon or piping bag

    Method
     

    1. Bring a large pot of salted water to a boil and cook the spaghetti according to package instructions until al dente. Drain and set aside.
    2. Preheat your oven to 200°C (400°F). In a mixing bowl, combine ground beef, breadcrumb, egg, half of the minced garlic, salt, and pepper. Mix until just combined but not overworked.
    3. Shape the mixture into roughly 12 small meatballs and place them on a baking sheet lined with parchment paper. Bake for about 15 minutes, or until browned and cooked through.
    4. While the meatballs bake, heat olive oil in a skillet over medium heat. Add the remaining garlic and cook until fragrant, about 1 minute. Pour in the tomato sauce and bring to a gentle simmer, then add cooked meatballs to the sauce, simmering for another 10 minutes to meld flavors.
    5. Slice black olives thinly to resemble bloodshot veins and set aside. Carefully cut the green olives stuffed with pimentos in half to form the eerie eyeball centers; reserve any excess stuffing in case you want to add more details.
    6. Drain the cooked pasta and toss it into the simmering sauce, coating evenly. Spoon the pasta onto serving plates.
    7. Top each serving with a meatball, then carefully place a pimento-stuffed green olive on top of each meatball as the eyeball. Surround the eyeballs with slices of black olives to give a bloodshot appearance.
    8. Sprinkle grated parmesan cheese over the pasta for added flavor. Optionally, drizzle a little extra olive oil and season with more salt and pepper to taste.
    9. Serve hot, enjoying the creepy presentation and flavorful, spooky pasta.

    Notes

    For extra gore, add a drizzle of tomato sauce to mimic blood or use red food coloring in the sauce.

    This creepy pasta is a perfect way to turn a simple dinner into a memorable, laugh-out-loud experience. It’s not just about the look; the rich, comforting flavors keep everyone coming back for more, hide-and-seek style.

    As the seasons change and spooky decorations go up, this dish offers a delightful break from traditional holiday fare. It’s a cheerful, gory, delicious hit that captures the spirit of Halloween—fun, chaos, and a little bit of gross-in-good-taste magic.

  • Chill Out: The Secret Art of Vanilla Slushies for Every Season

    Chill Out: The Secret Art of Vanilla Slushies for Every Season

    Most slushie recipes focus on bright, tropical flavors, but this vanilla version is my personal twist. It’s like sipping on frozen custard—a nostalgic treat that transports me back to summers by the old ice cream truck. The quiet creaminess combined with just a hint of vanilla turns a simple drink into a cooling masterpiece.

    What makes this vanilla slushie truly special is its versatility. It’s perfect for warm outdoor afternoons or cozy winter evenings when you crave a chilly comfort. Plus, it pairs effortlessly with almost any snack, from salty popcorn to flaky cookies, making it an instant crowd pleaser.

    Vanilla Slushie

    This vanilla slushie is made by blending frozen vanilla flavored ingredients into a smooth, icy mixture with a creamy texture. The process involves blending and freezing to achieve a soft, slushy consistency with a pale, appealing appearance. It offers a refreshingly cold treat that resembles frozen custard in a chilly beverage form.
    Prep Time 10 minutes
    Total Time 10 minutes
    Servings: 2
    Course: Main Course
    Cuisine: frozen dessert
    Calories: 180

    Ingredients
      

    • 2 cups vanilla ice cream or vanilla frozen yogurt preferably well chilled
    • 1 tbsp vanilla extract adds rich vanilla flavor
    • 1 tbsp sugar optional, for sweetness
    • ice as needed ice cubes enough to achieve slushy texture

    Equipment

    • Blender
    • Measuring cups and spoons
    • Freezer-safe container

    Method
     

    1. Gather all ingredients: vanilla ice cream, milk, vanilla extract, sugar (if using), and plenty of ice cubes.
    2. Add the vanilla ice cream and milk into the blender, along with the vanilla extract and sugar if you prefer a sweeter flavor. Secure the lid tightly.
    3. Blend on high speed until the mixture is smooth and creamy, about 30 seconds, with no lumps remaining.
    4. Gradually add ice cubes into the blender while blending, stopping occasionally to check the texture. Continue until it reaches a thick, slushy consistency.
    5. Stop blending once the mixture is smooth, cold, and has a scoopable, icy texture. It should look pale and creamy with visible ice crystals.
    6. Pour the vanilla slushie into glasses. Serve immediately with a straw or spoon for a refreshing treat.

    Notes

    For an extra creamy texture, use frozen vanilla yogurt instead of ice cream. Adjust the amount of ice to achieve your preferred slushiness.

    This recipe is a reminder that sometimes, the most beautiful treats are the simplest. No fancy gadgets or hard-to-find ingredients needed—just good vanilla, icy coldness, and a dash of patience. It’s an easy pleasure that fits into any busy schedule or relaxed weekend.

    In a world full of constant hustle, this vanilla slushie offers a moment of pause—a chilly, sweet breath of fresh air. Keep the blender ready, because once you’ve tasted this, it’s hard to go back. A small bowl of ice-cold vanilla goodness might just become your new favorite habit.

  • Mango Slushie: A Cool Twist for Unexpected Heatwaves

    Mango Slushie: A Cool Twist for Unexpected Heatwaves

    Resisting the typical mango smoothie, this slushie offers a frozen sensory experience, perfect for sweltering days. I stumbled upon this icy delight while experimenting with unconventional textures for fruit-based treats. It combines the luscious sweetness of ripe mango with a shock of chilled, crushed ice that feels like summer in a glass.

    Watching the icy bits melt slowly on the tongue, I realized this simple recipe taps into a nostalgic craving for childhood popsicles, but with grown-up flavor sophistication. The process is almost meditative, crushing ice while dreaming of tropical breezes, even in the coldest month. This recipe upgrades any hot afternoon into a mini escape.

    Mango Ice Slushie

    This mango ice slushie is made by blending ripe mango pieces with crushed ice to create a frozen, textured beverage. The mixture results in a vibrant, icy drink with a smooth yet chunky consistency, reminiscent of a tropical snow cone. It offers a refreshing, palate-pleasing experience perfect for hot days.
    Prep Time 10 minutes
    Total Time 10 minutes
    Servings: 2
    Course: Main Course
    Cuisine: Tropical
    Calories: 120

    Ingredients
      

    • 2 cups ripe mango chunks peeled and pitted
    • 2 cups crushed ice preferably finely crushed
    • 1 tablespoon honey or agave syrup optional sweetener

    Equipment

    • Blender
    • Ice crusher or sturdy zip-top bag and rolling pin

    Method
     

    1. Place the ripe mango chunks in your blender. Add the honey or agave syrup if you prefer extra sweetness.
    2. Pour in the crushed ice. This will give the slushie its frosty, textured appearance.
    3. Burst the ice and mango into a smooth, frozen mixture by blending on high until the texture is thick and slushy. You may need to stop and scrape down the sides occasionally.
    4. If the mixture is too thick to blend easily, add a splash of cold water or juice to help it along, then blend again until well combined.
    5. Once the mixture has a uniform, icy consistency—resembling a thick snow cone—pause the blender.
    6. Scoop the mango ice slushie into chilled glasses. You can garnish with a small mango slice or a sprig of mint if desired.
    7. Enjoy immediately with a spoon or straw for the full textured experience.

    Creating this mango slushie is a quick fix that transforms a basic fruit snack into a refreshing treat. It’s perfect for lazy weekends or spontaneous outdoor mornings when the sun demands extra cooling. The simplicity makes it easy to whip up in minutes, yet it feels indulgent and special.

    As the seasons shift and fruit becomes ripe at the market, this slushie emerges as my go-to cooling dessert. It calls for just a handful of ingredients, but the sensation it delivers is a reminder of simple joys. Sometimes, it’s the tiniest adjustments that turn a favorite fruit into a memory-making moment.

  • Tropical Twist: The Hidden Power of Pineapple Slushies in Your Summer Routine

    Tropical Twist: The Hidden Power of Pineapple Slushies in Your Summer Routine

    As a food explorer, I always crave those unexpected flavor combinations that awaken my senses. Lately, I’ve fallen for a pineapple slushie that feels like a sudden burst of sunshine in a glass. The way the cold pineapple bites into the tongue transports me straight to a tropical beach, even if I’m just in my kitchen.

    This drink isn’t just about cooling off; it’s about the joy of blending simple ingredients into something surprisingly complex. I love how the juicy sweetness contrasts with the icy chill, making every sip feel like a mini-vacation. It’s become my go-to refreshment on sweltering days or whenever I need a little escapism.

    Pineapple Slushie

    A pineapple slushie is a frozen beverage made by blending ripe pineapple chunks with ice until smooth and slushy. The mixture results in a vibrant, icy drink with a juicy, tropical flavor and a creamy texture. It’s visually bright yellow and served cold, perfect for hot days or a refreshing treat.
    Prep Time 10 minutes
    Total Time 10 minutes
    Servings: 2
    Course: Main Course
    Cuisine: Tropical
    Calories: 160

    Ingredients
      

    • 2 cups fresh pineapple chunks peeled and chopped
    • 1 cup ice cubes
    • 2 tbsp honey or simple syrup optional for added sweetness

    Equipment

    • Blender
    • Knife
    • Cutting board

    Method
     

    1. Prepare the pineapple by peeling, coring, and chopping it into small chunks. Measure out two cups of prepared pineapple.
    2. Add the pineapple chunks to the blender along with the ice cubes. Pour in honey or simple syrup if you want extra sweetness.
    3. Secure the lid on the blender and blend on high until the mixture is smooth and slushy, with a vibrant yellow color and a creamy texture that feels thick yet pourable.
    4. Stop the blender and check the consistency. If it’s too thick, add a splash of cold water or pineapple juice and blend briefly to loosen it up.
    5. Pour the pineapple slushie into chilled glasses, allowing the ice crystals to settle slightly for a thick, frosty presentation.
    6. Garnish with a small pineapple wedge or a fresh mint sprig for a colorful touch and extra fragrance.

    Notes

    For a creamier texture, blend in a splash of coconut milk or add frozen banana slices.

    Creating this pineapple slushie is about capturing that refreshing moment, especially as summer reaches its peak. The vibrant aroma of pineapple mixed with a hint of lime sparkles like a summer festival in your glass. It’s an easy treat that makes any day feel a little more special.

    Whether served with a colorful straw or garnished with a pineapple wedge, this drink is a carnival of flavors that brightens up any occasion. It’s a small reminder that simplicity often brings the biggest smiles. Cheers to cold, fruity bliss anytime you need it.

  • Enchanting Black Magic Margarita for Halloween

    Enchanting Black Magic Margarita for Halloween

    Imagine sipping on a cocktail that looks straight out of a mystical spellbook. The Black Magic Margarita uses activated charcoal to create a jet-black potion that sparks curiosity and excitement on Halloween night. It’s not just a drink; it’s an experience that combines a hint of smoky mystery with a zing of citrus.

    This recipe transforms the classic margarita into a daring, visual masterpiece. Perfect for parties, it unlocks a plot of eerie elegance with every sip. As the night deepens, your guests will be enchanted by its dark allure and refreshing tang.

    Black Magic Margarita

    The Black Magic Margarita is a striking cocktail that features a deep black hue achieved with activated charcoal, combined with fresh citrus flavors. It is prepared by shaking ingredients with ice until chilled and strained into a rimmed glass, resulting in a smooth, vibrant drink with a slightly smoky appearance and refreshing tang. The final cocktail has a glossy, opaque look with a lime wedge garnish, perfect for festive gatherings or Halloween celebrations.
    Prep Time 5 minutes
    Total Time 5 minutes
    Servings: 1
    Course: Main Course
    Cuisine: Cocktail
    Calories: 200

    Ingredients
      

    • 2 oz Tequila (preferably blanco)
    • 1 oz Fresh lime juice
    • 0.75 oz Simple syrup Adjust to taste
    • 1 pinch Activated charcoal powder Food grade, use sparingly

    Equipment

    • Cocktail shaker
    • Strainer
    • Rimming plate or shallow dish
    • Lime wedge for garnish

    Method
     

    1. Prepare a rimming plate with coarse salt or sugar and set aside. Cut a lime into wedges for garnishing and rimming the glass.
    2. Fill a cocktail shaker with ice, then pour in the tequila, fresh lime juice, simple syrup, and add a pinch of activated charcoal powder.
    3. Secure the lid and shake vigorously for about 15 seconds until the mixture is well chilled and the charcoal is evenly dispersed, giving the drink a glossy black appearance.
    4. Moisten the rim of your serving glass with a lime wedge and dip it into the rimming plate to coat evenly with salt or sugar.
    5. Strain the cocktail through the strainer into the prepared glass, avoiding ice chunks and ensuring a smooth, opaque black pour.
    6. Garnish the drink with a fresh lime wedge on the rim for a vibrant contrast against the dark liquid.
    7. This striking Black Magic Margarita is now ready to enjoy, displaying a sleek, jet-black color with a shimmering surface and a tangy aroma.
    As the last droplets of this hauntingly beautiful drink fade, you’ll realize how cleverly a simple ingredient like activated charcoal sparks a whole new level of Halloween fun. It’s a conversation starter and a photo magnet, turning your gathering into a memorable spectacle.

    Now that you’ve mastered the art of the Black Magic Margarita, you’re ready to impress with more spellbinding drinks. Embrace the chaos of the season and let your creativity run wild with every color, flavor, and fright. Cheers to a spooky, stunning celebration that lingers long after the glasses are empty.

  • Ghoulishly Refreshing: The Ultimate Halloween Vampire Punch (Red Juice Madness)

    Ghoulishly Refreshing: The Ultimate Halloween Vampire Punch (Red Juice Madness)

    Every October, I find myself craving drinks that are as spooky as they are delicious. This Vampire Punch does the trick with its vibrant red hue that looks like it’s been splashed with the blood of a midnight feast. It’s perfect for unwinding after a long day of trick-or-treating or setting a haunting mood at your party.

    The magic lies in the simple ingredients—berry juices, a splash of citrus, and a dash of fun. The bright red color immediately transports you to a graveyard or a vampire’s lair. Plus, it’s gluten-free and kid-friendly with just a little tweak, making it a crowd-pleaser for all ages.

    Vampire Punch

    Vampire Punch is a vibrant red beverage made from berry juices, citrus, and fun garnishes. It features a bright, striking appearance with a smooth, chilled texture, perfect for festive occasions. The recipe involves mixing juices and citrus, then serving over ice for a refreshing glow.
    Prep Time 10 minutes
    Total Time 10 minutes
    Servings: 8
    Course: Main Course
    Cuisine: Halloween
    Calories: 120

    Ingredients
      

    • 2 cups berry juice (such as blackberry or raspberry) preferably chilled
    • 1 cup orange juice fresh or store-bought
    • 0.5 cup lemon juice freshly squeezed
    • 2 tbsp simple syrup or honey adjust to taste

    Equipment

    • Uneven Glass Pitcher or Large Mixing Bowl
    • Measuring cups and spoons
    • Citrus Juicer or Reamer
    • Stirring spoon
    • Serving Glasses

    Method
     

    1. Pour the berry juice into a large pitcher or mixing bowl, creating a deep, vibrant red base.
    2. Add freshly squeezed orange juice to the berry mixture, observing the color darken to a rich, crimson hue.
    3. Include the lemon juice for a citrus tang, watching the mixture ripple and turn a lively shade of red.
    4. Stir in the simple syrup or honey until fully dissolved, smoothing out the mixture and balancing the tartness.
    5. Fill glasses with ice cubes, creating a chilled base for serving.
    6. Pour the prepared punch over the ice, ensuring each glass fills with vibrant, blood-red liquid that looks enticing and festive.
    7. Garnish each glass with a slice of citrus or a fun garnish like a raspberry or berry skewer, adding a spooky touch.
    8. Serve immediately, allowing guests to enjoy the cool, refreshing, and visually striking Vampire Punch.

    Notes

    For a non-alcoholic version, omit any spirits and adjust sweetness as desired. Can be made ahead and stored in the fridge for up to 2 hours before serving.

    This punch isn’t just for Halloween—it’s a vibe. When the kids are yelling ‘trick or treat,’ this drink quietly adds a splash of drama and fun to your night. It’s become my go-to for festive gatherings, evoking nostalgia with every glowing sip.

    As the season deepens, this Vampire Punch reminds me that the best recipes are the ones that mix a bit of chaos with a lot of charm. Its bold color and striking appearance spark conversations and smiles. Cheers to a hauntingly good time that’s as easy to make as it is to love.