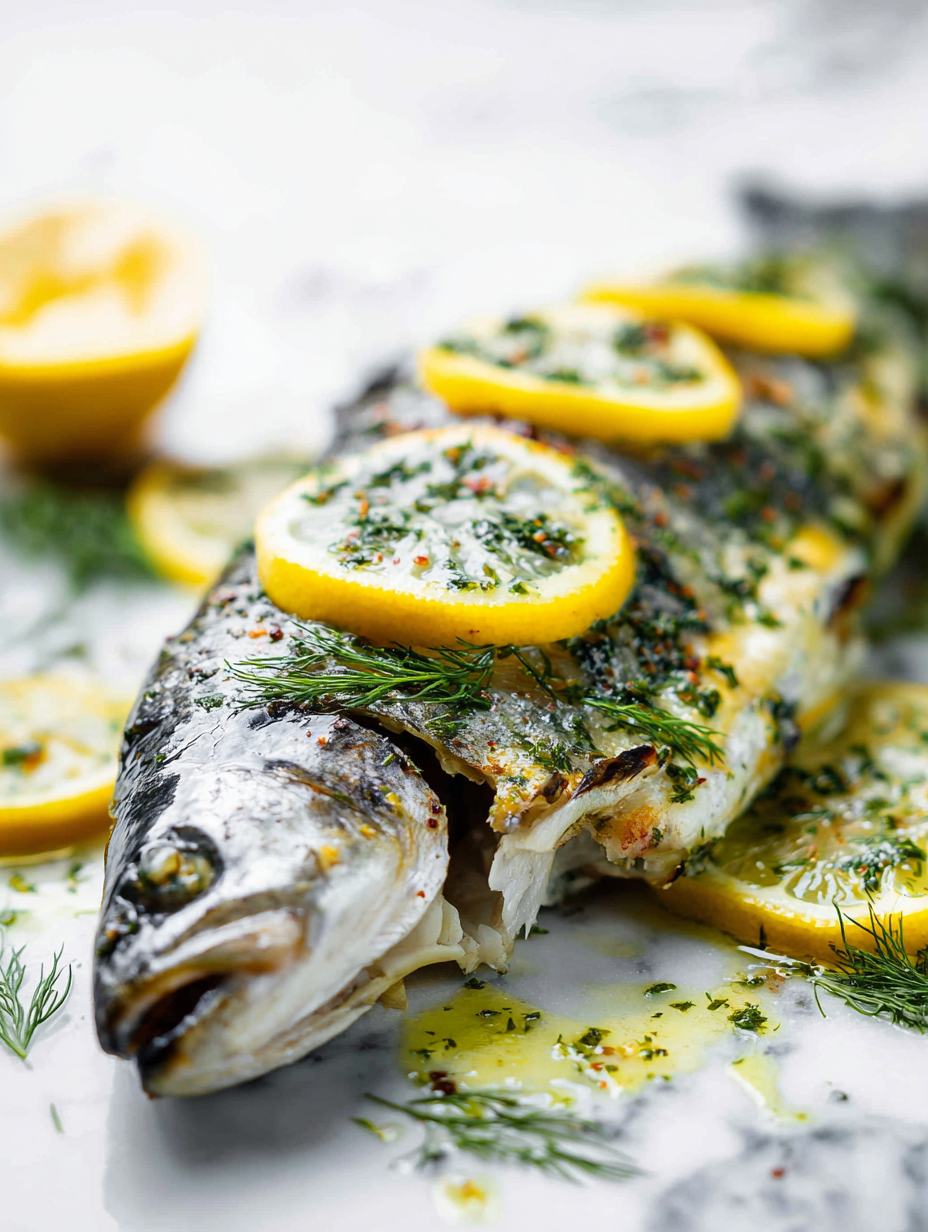
Blog

  • Pumpkin Oatmeal Magic: A Cozy Twist for Autumn Mornings

    Pumpkin Oatmeal Magic: A Cozy Twist for Autumn Mornings

    秋天的早晨,总带着一丝微妙的期待。想象一碗金黄的南瓜燕麦,散发着肉桂和姜的香味,温暖在手心,也暖在心里。这款食谱用意外的角度——加入南瓜泥,让传统燕麦变得既丰富又有嚼劲。它是我在忙碌早晨的小秘密,既健康又充满季节气息。

    我喜欢用烤南瓜制成的泥,带点焦糖化的香气,让这份普通的燕麦变得不同凡响。每一口都充满了南瓜的甜味和香料的温柔,好像秋天的缤纷画面在碗里慢慢展开。无论是清晨的静谧,或是闹市中的快节奏,这份燕麦都能让我感受到家乡的味道和节日的温暖。

    秋季南瓜燕麦

    这款南瓜燕麦采用烤制的南瓜泥与燕麦片结合,加入肉桂和姜等香料,呈现出金黄色的色泽和浓郁的香气。煮至浓稠的燕麦粥具有细腻的口感和丰富的南瓜味,是一道温暖舒适的早餐选择。
    Prep Time 10 minutes
    Cook Time 15 minutes
    Total Time 25 minutes
    Servings: 2
    Course: Main Course
    Cuisine: Fall
    Calories: 250

    Ingredients
      

    • 200 g 烤南瓜 去籽,切块后烤至软烂
    • 1 燕麦片
    • 1 茶匙 肉桂粉
    • 0.5 茶匙 姜粉
    • 2
    • 1

    Equipment

    • 烤箱

    Method
     

    1. 将烤好的南瓜用叉子压成细腻的泥,备用。
    2. 在锅中加入水和少许盐,煮沸后加入燕麦片,搅拌均匀。
    3. 用中火继续煮燕麦,偶尔搅拌,直到燕麦变得浓稠、略带粘稠感,大约5-7分钟。
    4. 加入南瓜泥、肉桂粉和姜粉,继续搅拌直至完全融合,散发出浓郁的香气。
    5. 调节火候,保持沸腾大约2分钟,让味道融合得更好。
    6. 关闭火源,把燕麦盛出,稍微放凉几秒钟后即可享用,表面可以撒上一点额外的肉桂粉进行装饰。

    这款南瓜燕麦适合任何想要在早晨启动满满能量的日子。它简单、快速,却充满了季节的魔法,提醒我们即使在忙碌中也要享受每一个温馨的时刻。每次煮这碗燕麦,厨房都会弥漫着令人沉醉的香气,仿佛一场秋天的盛宴刚刚开始。

    在这个快节奏的世界里,这份南瓜燕麦成为我的避风港。它让我在一碗热乎乎的食物中找到安慰,也让我期待着每一个新的早晨。希望你的早晨也能因为这份简单而温暖的食谱而变得不同凡响。

  • Spine-Chilling Halloween Monster Eyeball Cake Pops

    Spine-Chilling Halloween Monster Eyeball Cake Pops

    Halloween is the perfect time to embrace the playful and spooky side of baking. These Monster Eyeball Cake Pops turn a simple treat into a creepy delight that will have guests squealing with delight and a bit of dread. The combination of sweet cake, gooey icing, and gory details makes them irresistible on All Hallows’ Eve.

    What makes this recipe stand out is the creative chaos involved. From bloodshot eyeballs to ragged veins, every detail is a chance to bring out your inner monster. This project is as much about the fun and mess as it is about the chillingly cute results.

    Monster Eyeball Cake Pops

    This recipe features cake pops shaped like creepy eyeballs with detailed decorations to resemble bloodshot eyes and veins. The process involves baking a cake, crumbling and mixing with icing, shaping into spheres, and decorating with icing, candy, and edible details to create a spooky Halloween treat. The final cake pops have a smooth, round appearance with gory accents for a visual impact.
    Prep Time 30 minutes
    Cook Time 30 minutes
    Total Time 1 hour
    Servings: 10
    Course: Main Course
    Cuisine: Halloween
    Calories: 150

    Ingredients
      

    • 1 box cake mix your preferred flavor
    • 1 1/2 cups frosting ready-made or homemade, for mixing with cake crumbs
    • 12 oz candy melts white or red for decorating
    • 10 lollipop sticks
    • small food coloring red, black, or other desired colors
    • as needed edible decorations candy eyes, gel, icing, or mini chocolates

    Equipment

    • Baking pan
    • Mixing bowls
    • Rubber spatula
    • Cooling rack
    • Lollipop sticks
    • Melting pot or microwave-safe bowl
    • Piping bags and tips
    • Food coloring
    • Candy eyes or mini chocolates
    • Decorative piping tools

    Method
     

    1. Bake the cake according to the package instructions and let it cool completely on a wire rack.
    2. Crumble the cooled cake into fine crumbs using your hands or a fork, placing them in a large mixing bowl.
    3. Add frosting to the cake crumbs and gently fold until the mixture is firm enough to hold shape. The mixture should be moist but not sticky.
    4. Chill the mixture in the refrigerator for about 30 minutes to make it easier to work with.
    5. Scoop and roll the mixture into 1.5-inch diameter spheres, then insert a lollipop stick into each and place on a baking sheet lined with parchment paper.
    6. Refrigerate the shaped cake pops for at least 30 minutes to firm up before dipping.
    7. Melt the candy melts according to package instructions in a melting pot or microwave, stirring until smooth.
    8. Dip each cake pop into the melted candy, ensuring it’s fully coated. Tap gently to remove excess coating and place back on parchment to set.
    9. Use piping bags to add bloodshot veins with red gel or icing, creating thin lines across the eyeballs for a gory effect.
    10. Attach small candies or edible decorations to resemble bloodshot veins or gory details, positioning them as desired for a creepy effect.
    11. Place edible googly eyes or mini chocolates onto the center of each eyeball to complete the spooky look.
    12. Once decorated and the coating is hardened, serve your Monster Eyeball Cake Pops on a platter for a fun and frightening Halloween treat.
    As the night winds down, these eyeball cake pops become a fun conversation starter for any Halloween gathering. They’re as delightfully disturbing in appearance as they are delicious in taste, blending nostalgia with a touch of the grotesque. Plus, they’re surprisingly simple to make, perfect for a last-minute spooky treat.

    Enjoy the process of turning ordinary cake pops into hauntingly realistic eyeballs. Whether you’re hosting a party or just indulging in some seasonal baking, these treats add a perfect splash of holiday horror to your table.

  • A Cozy Twist: Ginger-Infused Butternut Squash Soup

    A Cozy Twist: Ginger-Infused Butternut Squash Soup

    Imagine a bowl of velvety butternut squash soup that doesn’t just warm you up but also awakens your senses with a fiery twist of ginger. This recipe is perfect for those chilly evenings when comfort food with a zing is just what you need. Its vibrant color and bold flavors turn everyday ingredients into a culinary hug.

    Ginger adds not only a punch of spice but also a hint of brightness that balances the sweet earthiness of the squash. I love experimenting with unusual flavor pairings, and ginger in soup is a secret I can’t keep anymore. Plus, it’s surprisingly simple to make, even on a weeknight crunch.

    Creamy Ginger Butternut Squash Soup

    This soup features pureed roasted butternut squash blended into a smooth, velvety texture, enhanced by fresh ginger for a spicy kick. The cooking process involves roasting, sautéing, and simmering to develop deep flavors, resulting in a vibrant orange-colored dish with a silky consistency and warming aroma.
    Prep Time 15 minutes
    Cook Time 40 minutes
    Total Time 55 minutes
    Servings: 4
    Course: Main Course
    Cuisine: Comfort Food
    Calories: 180

    Ingredients
      

    • 1 kg butternut squash peeled, seeded, and cut into chunks
    • 2 tbsp olive oil for roasting and sautéing
    • 1 inch fresh ginger peeled and minced
    • 1 small yellow onion chopped
    • 4 cups vegetable broth
    • 1/2 cup coconut milk for creaminess
    • to taste salt and pepper adjust as needed

    Equipment

    • Baking sheet
    • Blender or Immersion Blender
    • Large pot
    • Chef’s knife
    • Cutting board

    Method
     

    1. Preheat the oven to 400°F (200°C). Arrange the butternut squash chunks on a baking sheet, toss with some olive oil, and roast until soft and slightly caramelized, about 25-30 minutes.
    2. Meanwhile, heat a tablespoon of olive oil in a large pot over medium heat. Add chopped onion and minced ginger, sautéing until fragrant and the onion becomes translucent, about 5 minutes.
    3. Once the roasted squash is cool enough to handle, transfer it to the pot with sautéed onions and ginger. Pour in the vegetable broth and bring the mixture to a gentle simmer.
    4. Use an immersion blender to puree the soup until completely smooth, or transfer in batches to a blender, blending until silky.
    5. Stir in the coconut milk for added creaminess, and season with salt and pepper to taste. Let the soup simmer for another 5 minutes to meld the flavors.
    6. Taste and adjust the seasoning as needed. Serve the soup hot, garnished with a sprinkle of fresh ginger or herbs if desired.

    Notes

    For a richer flavor, add a dash of smoked paprika or a squeeze of lime before serving.
    This soup has become my go-to for transitional seasons when the weather swings from warm to cool. The way the ginger cuts through the sweetness of the squash makes each spoonful intriguing and satisfying. It’s a reminder that even the simplest ingredients can suddenly taste extraordinary.

    Whether you’re serving it as a starter or a light meal, this soup adapts beautifully. The recipe honors cozy traditions while adding just enough spice to keep things exciting. I find myself craving that warming, spicy aroma long after the last spoonful—an invitation to look forward to a bowl of comfort.

  • Chilling Secrets: The Unusual Art of the Iced Tea Slushie

    Chilling Secrets: The Unusual Art of the Iced Tea Slushie

    Imagine a summer afternoon where the sun is blazing and your favorite iced tea is just not enough to beat the heat. But what if I told you that turning that simple drink into a frosty, icy slushie can transform your entire day? This isn’t your typical chilled tea – it’s a chilly swirl of flavors and textures that revives and refreshes in ways you never expected.

    What makes this iced tea slushie so special isn’t just its icy crunch, but the unexpected flavor combinations you can explore. Think of it as a frozen playground where herbal infusions, fruit zest, and a hint of sweetness collide. It’s perfect for those who crave something cool but crave even more a little adventure in their cup.

    Iced Tea Slushie

    This iced tea slushie combines brewed herbal tea with fruit zest and sweeteners, then freezes the mixture into a frosty, textured treat. The final product has an icy, crunchy consistency with vibrant flavors that appear as a colorful, slushy beverage. It’s perfect for a refreshing summer snack or cooling dessert.
    Prep Time 10 minutes
    Cook Time 10 minutes
    Total Time 20 minutes
    Servings: 2
    Course: Main Course
    Cuisine: Modern
    Calories: 120

    Ingredients
      

    • 2 cups herbal tea bags flavor of your choice
    • 1 cup water
    • 2 tbsp honey or maple syrup, to taste
    • 1 zest lemon or orange for a bright citrus flavor
    • 1 cup ice cubes
    • 1/2 cup fruit juice or puree such as mango, berries, or peach

    Equipment

    • Saucepan
    • Mixing bowl
    • Blender
    • Freezer-safe container

    Method
     

    1. Brew the herbal tea by boiling water and steeping the tea bags for about 5-7 minutes until strongly infused. Remove the tea bags and stir in honey while the tea is still warm, then let it cool to room temperature. This step fills your kitchen with a fragrant aroma.
    2. Add the citrus zest and fruit juice or puree into the cooled tea, then whisk gently to combine. The zest will release its oils, infusing the tea with bright, fruity notes.
    3. Pour the flavored tea into a blender along with the ice cubes. Blend on high speed until the mixture becomes thick and slushy, with a smooth, icy texture that looks like a vibrant, frozen beverage.
    4. Transfer the blended slushie into a freezer-safe container and freeze for about 30 minutes, or until it’s firm enough to scoop but still scoopable with a spoon. Stir once halfway through to ensure even freezing and a consistent texture.
    5. Remove the container from the freezer and give the slushie a quick stir or shake to break up any ice crystals. The mixture should be icy but creamy, with vibrant color and a refreshing aroma.
    6. Scoop the icy slushie into glasses, garnish with additional fruit or citrus zest if desired, and serve immediately for a chilled, crunchy treat. Enjoy the refreshing burst of flavors with each sip and bite.

    Notes

    Feel free to experiment with different fruit purees or herbal tea flavors to customize your slushie. Using a variety of citrus or berries creates beautiful colors and flavors.
    Next time the thermometer hits record highs, reach for your blender and give this recipe a whirl. It’s a quick, satisfying way to stay cool while enjoying a layered flavor experience. Plus, it’s a fun twist on your usual iced tea routine that might just become your new summer staple.

    Embrace the chaos of blending, taste-test with joy, and never underestimate the power of a good chilled beverage during those sizzling days. Cheers to making your own little frozen oasis right in the glass!

  • The Nostalgic Chill: Kool Aid Slushie with a Twist

    The Nostalgic Chill: Kool Aid Slushie with a Twist

    Sliding into summer, I rediscovered a childhood favorite that feels like a splash of joy—kool aid slushies. But today, I tried a little chaos by mixing flavors I never dared to blend before, turning a simple drink into a vibrant adventure. The scent alone of icy fruit punch swirling with a hint of citrus instantly transports me to hot afternoons on the porch, no worries in sight.

    It’s not just about the sweet rush, but about reclaiming those carefree moments. As the ice crunches in the spoon, I realize how these frozen treats can be a perfect way to celebrate the small, perfect chaos of life. Plus, they’re fast, budget-friendly, and endlessly customizable—what’s not to love?

    Colorful Kool-Aid Slushies

    This recipe involves blending fruit punch Kool-Aid with ice to create a frozen, slushy beverage. The main ingredients are flavored Kool-Aid, water, sugar, and crushed ice, resulting in a vibrant, icy drink with a smooth, granular texture. The final appearance is a colorful, semi-frozen drink that is perfect for refreshing hot days.
    Prep Time 10 minutes
    Total Time 10 minutes
    Servings: 4
    Course: Main Course
    Cuisine: American
    Calories: 120

    Ingredients
      

    • 4 cups crushed ice preferably small ice chunks
    • 2 cups fruit punch Kool-Aid ready-made or prepared from powder
    • 1 cup cold water to mix with Kool-Aid powder if using powder
    • 0.5 cup sugar optional, for extra sweetness

    Equipment

    • Blender
    • Measuring cups
    • Large mixing bowl

    Method
     

    1. Measure out the crushed ice and set aside; it will be the base for your slush.
    2. If you’re using Kool-Aid powder, dissolve the powder and sugar into cold water in a large mixing bowl, stirring until fully combined. If using ready-made fruit punch, skip this step.
    3. Pour the Kool-Aid mixture over the crushed ice in the blender or directly into a large container if blending with ice.
    4. Blend the mixture on high speed for about 30-45 seconds until the ice is finely crushed and the mixture looks slushy, with a vibrant, slightly thickened consistency.
    5. Pause the blender and check the texture; it should be smooth yet still slightly granular. If needed, give it a few more pulses.
    6. Pour the slush into individual glasses or bowls, ensuring a colorful, icy mound with a slightly glossy appearance.
    7. Serve immediately with a straw or spoon, enjoying the icy, fruity burst of flavors and refreshing chill.

    Notes

    For a smoother texture, you can freeze the Kool-Aid mixture with ice beforehand or adjust the amount of ice for thicker or thinner slushes.

    So here’s to turning a childhood classic into a spontaneous summer masterpiece. This simple recipe reminds me that sometimes, the most satisfying moments come from leaning into your playful side. Whether you’re cooling off after a busy day or just craving a burst of nostalgia, this kool aid slushie fits the bill.

    As the weather heats up, I plan to experiment more with fruit additions and sparkling waters. This icy treat will be my go-to for spontaneous gatherings or solo lazy afternoons. Cheers to rediscovering joy, one slushie at a time.

  • Chill Out with a Caramel Slushie: A Nostalgic Summer Escape

    Chill Out with a Caramel Slushie: A Nostalgic Summer Escape

    Imagine biting into a caramel candy, then feeling that cool, refreshing wave wash over you—this is what a caramel slushie offers. The rich, buttery aroma of caramel combined with icy coldness creates an unexpected harmony that sparks joy in every sip. It’s an ode to childhood memories, now reimagined with a modern twist that’s perfect for hot days.

    This recipe transforms simple ingredients into a decadent, frosty treat you can whip up in minutes. Its versatility makes it ideal for picnics, late-night cravings, or just a spontaneous dance with flavor. Plus, it’s forgiving enough for novice blitzers and seasoned pros alike, welcoming everyone into the chill zone.

    Caramel Slushie

    A caramel slushie is a frozen beverage made by blending caramel-flavored syrup, ice, and milk until smooth. The mixture achieves a creamy, icy texture with a rich caramel aroma and a sweet, refreshing taste. It is served chilled, with a frosty appearance and silky consistency.
    Prep Time 5 minutes
    Total Time 5 minutes
    Servings: 2
    Course: Main Course
    Cuisine: American
    Calories: 180

    Ingredients
      

    • ½ cup caramel syrup store-bought or homemade
    • 2 cups ice cubes crushed or whole
    • 1 cup milk dairy or non-dairy

    Equipment

    • Blender
    • Measuring cups and spoons

    Method
     

    1. Pour the caramel syrup into the blender, allowing its rich aroma to fill the air.
      ½ cup caramel syrup
    2. Add the ice cubes to the blender, creating a mound that promises a frosty texture.
      2 cups ice cubes
    3. Pour in the milk, which will help achieve a creamy, smooth consistency once blended.
      1 cup milk
    4. Secure the lid tightly and blend everything on high speed until the mixture is completely smooth, icy, and velvety in texture, about 30-45 seconds.
    5. Stop the blender and check the consistency—if it’s too thick, add a splash more milk and blend again briefly.
    6. Pour the frosty caramel mixture into glasses, allowing the icy swirls to spill over slightly for a visual treat.
    7. Serve immediately, garnished with a drizzle of caramel or a small spoon for scooping if desired.

    Seasonal heat calls for something sweet, nostalgic, and irresistibly chill. The caramel slushie delivers that perfect little escape, whether you’re celebrating summer or just craving a sensory break. Its smooth, icy texture and deep caramel flavor make it a fun, satisfying finish to any day.

    Enjoy this recipe as a throwback to simpler times, dressed up with a modern flair. It’s more than a drink; it’s a quick mental getaway, a moment of sweet peace. Keep the blender handy, and let the cold, caramel goodness be your new favorite summer ritual.

  • The Secret Ingredient That Transforms Your Tomato Sauce

    The Secret Ingredient That Transforms Your Tomato Sauce

    Ever notice how some tomato sauces taste like they carry a thousand stories? It’s not just about ripe tomatoes or fancy herbs. Sometimes, it’s a simple, overlooked ingredient that tips the balance — a whisper of balsamic, a splash of good olive oil, or even a dash of red wine.

    Today, I want to share a tomato sauce recipe that’s rooted in my grandmother’s pantry secrets, but with a modern twist. It’s perfect for chilly evenings or when you want a comforting plate that mirrors your weekend laziness with a touch of elegance. This sauce isn’t just a topping — it’s a nostalgic trip combined with a fresh, bold punch.

    Imagine hot pasta swirling with a sauce that’s velvety, tangy, and slightly sweet — all from simple, everyday ingredients. Whether poured over spaghetti or used as a base for your next veggie casserole, this recipe is about celebrating the humble tomato in a way that’s both rustic and refined.

    Homemade Tomato Sauce

    This tomato sauce is made through simmering ripe tomatoes with aromatics, olive oil, and a touch of balsamic vinegar, resulting in a velvety, flavorful sauce. It features a balance of tangy, sweet, and savory notes with a smooth, thick texture, perfect for pasta or as a versatile base. The recipe emphasizes gentle simmering to develop deep flavor with a rustic yet refined appearance.
    Prep Time 10 minutes
    Cook Time 30 minutes
    Total Time 40 minutes
    Servings: 4
    Course: Main Course
    Cuisine: Italian
    Calories: 120

    Ingredients
      

    • 2 pounds ripe tomatoes chopped
    • 2 cloves garlic minced
    • 2 tablespoons olive oil
    • 1 tablespoon balsamic vinegar
    • 1 teaspoon salt to taste
    • 1/2 teaspoon black pepper freshly ground
    • 1 pinch red pepper flakes optional

    Equipment

    • Large saucepan
    • Wooden spoon

    Method
     

    1. Heat the olive oil in a large saucepan over medium heat until shimmering and fragrant.
    2. Add the minced garlic to the oil and sauté for about 30 seconds until fragrant, avoiding browning.
    3. Pour in the chopped ripe tomatoes and stir to coat them with the garlic and oil mixture.
    4. Bring the mixture to a gentle simmer and let it cook uncovered for 20-30 minutes, stirring occasionally, until the tomatoes break down and the sauce thickens.
    5. Stir in the balsamic vinegar, salt, black pepper, and red pepper flakes if using, then simmer for another 5 minutes to meld the flavors.
    6. Use a ladle to taste the sauce and adjust seasoning if needed, then remove from heat once it reaches a smooth, velvety consistency.

    Notes

    For an extra depth of flavor, let the sauce rest for 10 minutes after cooking before serving. Best enjoyed over freshly cooked pasta.

    There’s something undeniably satisfying about creating a sauce that feels both special and effortless. The beauty of this recipe is how adaptable it is, inviting you to add your personal touch each time. Plus, it’s a reminder that comfort food doesn’t have to be complicated.

    As the seasons shift and tomatoes flood markets, this sauce becomes your go-to for quick, flavorful meals. It’s a humble but mighty method to make everyday dinners feel like a special occasion. Sometimes, the best dishes are those born from simple ingredients infused with love and a little chef’s magic.

  • Frozen Vodka Slushies: A Chill Spin on Your Classics

    Frozen Vodka Slushies: A Chill Spin on Your Classics

    During the peak of summer, I crave something frozen, tart, and unexpectedly sophisticated. Vodka slushies offer that perfect cool blast without the heaviness of traditional cocktails. Their simplicity is deceptive, hiding a world of flavor possibilities that can turn an ordinary day into a mini celebration.

    What excites me most is how versatile these icy drinks are. They can be flavored with fresh fruits, herbs, or even a splash of soda, and each blend keeps the palate guessing. Plus, they’re incredibly easy to make — no fancy equipment needed, just a good freezer and imagination.

    WHY I LOVE THIS RECIPE?

    • I love how the tartness from citrus cuts through the sharpness of the vodka, creating a balanced sip.
    • There’s a nostalgic rush in blending these frozen treats, instantly bringing summer memories to life.
    • The chaos of pouring in different ingredients makes each batch unique and fun to experiment with.
    • Nothing beats that chilly crackle as you take your first sip on a hot day.
    • I pride myself on how quick these come together, perfect for spontaneous gatherings.

    AVOID MY DISASTER (You’re Welcome)

    • FORGOT to balance the sweet and sour? Too sour—add a splash of fruit juice. Sweet? Extra lemon zest.
    • DUMPED in too much alcohol? Dilute with more fruit puree or a splash of soda water.
    • OVER-TORCHED the sugar syrup? Quickly stir in cold water and a pinch of salt for balance.
    • FAILED to blend thoroughly? Use a sturdy spoon to mix the icy chunks until smooth.

    QUICK FIXES THAT SAVE YOUR DAY

    • When the ice isn’t blending smoothly, splash in a little warm water to loosen things up.
    • Splash some lemon juice if the flavor lacks brightness.
    • Patch icy patches with a quick pulse in the blender — shiny shards scream freshness.
    • Shield the mixture from freezer burn by covering tightly after blending.
    • When in doubt, grab a bottle of sparkling water to add a refreshing fizz.

    Vodka Fruit Slushies

    Vodka slushies are frozen cocktails made by blending vodka with fresh fruit and sweeteners until smooth and icy. The result is a vibrant, slushy beverage with a tangy and refreshing flavor, featuring a texture that’s both creamy and crystalline. They are simple to prepare and ideal for hot summer days.
    Prep Time 10 minutes
    Total Time 10 minutes
    Servings: 4
    Course: Main Course
    Cuisine: American
    Calories: 150

    Ingredients
      

    • 2 cups fresh fruit (e.g., strawberries, mango, or berries) chopped
    • 1/4 cup simple syrup or honey adjust sweetness to taste
    • 1/2 cup fresh lemon or lime juice for tartness
    • 1 cup vodka
    • 1 cup ice cubes

    Equipment

    • Blender
    • Measuring cups and spoons

    Method
     

    1. Combine the chopped fresh fruit, simple syrup, lemon or lime juice, and vodka in a blender.
    2. Add the ice cubes to the blender and secure the lid tightly.
    3. Blend on high speed until the mixture is smooth and slushy, with a thick but pourable texture, about 30-40 seconds.
    4. Scrape down the sides of the blender as needed and give a quick pulse to ensure everything is evenly blended.
    5. Check the consistency; it should feel icy but scoopable, with small ice shards visible throughout.
    6. Pour the chilled, icy slush into glasses, making sure each serving has a good mix of fruit and ice.
    7. Optionally, garnish with extra fruit slices or a sprig of mint for a festive look.
    8. Serve immediately to enjoy the refreshing, tart, and icy texture.

    As the sun dips lower, these vodka slushies become the perfect companion to warm evenings. They remind us that summer’s simple pleasures often come in the smallest, coolest packages. Sharing a chilled glass can create a moment of joy amidst the chaos of everyday life.

    In a season where refreshment is king, these slushies are a quick escape from the heat and a playful way to unwind. No matter how busy or underwhelmed the day’s felt, a splash of vodka and a handful of frozen fruit can reset the mood in seconds.

  • Spooky Good: Halloween Mummy Pizza You Can’t Resist!

    Spooky Good: Halloween Mummy Pizza You Can’t Resist!

    As autumn chills settle in, I find myself craving more than just pumpkin spice and apple cider. I get obsessed with eerie, playful foods that bring a dash of chaos to the kitchen, especially around Halloween. This year, I decided to craft something that’s fun, slightly spooky, and irresistibly cheesy—my Halloween Mummy Pizza.

    The trick was making it feel authentic yet easy for everyone to try at home. I love how the crispy pepperoni strips resemble ancient mummy wrappings, and the gooey melted cheese creates those haunting eyes. It’s a perfect way to turn a simple pizza into a conversation starter at any spooky gathering.

    Halloween Mummy Pizza

    This dish features individual mini pizzas topped with melted cheese and decorated with crispy pepperoni strips resembling ancient mummy wrappings. The eyes are crafted from small cheese or olive pieces, creating a spooky yet playful final appearance. The crispy pepperoni and gooey cheese provide contrasting textures in each bite.
    Prep Time 15 minutes
    Cook Time 15 minutes
    Total Time 30 minutes
    Servings: 4
    Course: Main Course
    Cuisine: American
    Calories: 250

    Ingredients
      

    • 1 package pre-made pizza dough or store-bought pizza crusts
    • 1 cup shredded mozzarella cheese
    • 24-30 slices pepperoni slices for creating mummy wrappings
    • 8 small black olives or small cheese balls for spooky eyes

    Equipment

    • Baking sheet
    • Oven
    • Rolling pin
    • Knife
    • Cutting board
    • Cooking parchment or baking paper

    Method
     

    1. Preheat your oven to 400°F (200°C) and line a baking sheet with parchment paper. Roll out the pizza dough on a lightly floured surface to your desired thickness and cut into 4 equal rounds or rectangles.
    2. Place the dough pieces on the prepared baking sheet and bake in the preheated oven for about 8-10 minutes until they start to turn golden around the edges. This helps the crust firm up before adding toppings.
    3. Remove the partially baked crusts from the oven and evenly sprinkle shredded mozzarella cheese over each. Cover the surface but avoid the edges to keep the crust crispy.
    4. Return the crusts to the oven and bake for another 5-7 minutes until the cheese is melted and bubbly. Keep an eye on them so the cheese doesn’t burn.
    5. Once out of the oven, start decorating the pizzas by arranging pepperoni slices in long strips across each to resemble mummification wrappings. Overlap pieces slightly to create a layered ‘bandage’ effect.
    6. Cut small segments of black olives or small cheese balls and place them on each pizza as eyes, positioning them in the center of the ‘mummy.’ Press gently to adhere to the melted cheese.
    7. Put the decorated pizzas back into the oven for 2-3 minutes if needed, just to slightly rewarm and set the toppings. Keep a close eye to prevent burning.
    8. Remove the pizzas from the oven, let them cool for a minute, then serve warm. The crispy pepperoni ‘wrappings’ and gooey cheese make a fun, spooky presentation perfect for Halloween gatherings.

    This Halloween, let the kids and adults alike gather around a plate of these mummy pizzas. They’re quick to make and full of flavors that evoke both nostalgia and a bit of chaos — exactly what the holiday demands.

    Nothing says fall like the scent of baked cheese mingling with smoky pepperoni, filling the house with warmth and anticipation. These pizzas remember us that fun in the kitchen can turn any night into a festive celebration, making lovely memories you’ll all laugh about long after October ends.

  • A Nostalgic Spin: The Secret Ingredient in My Pumpkin Muffins

    A Nostalgic Spin: The Secret Ingredient in My Pumpkin Muffins

    When autumn arrives, my kitchen fills with the scent of roasted pumpkins and warming spices. This year, I decided to take my pumpkin muffin recipe beyond the usual spices and add a surprising twist: a hint of toasted sesame seeds. It’s a small addition that creates a subtle nutty backdrop, making each bite more memorable.
    A good muffin should be more than just moist and fluffy; it should tell a story. Whether you’re seeking comfort after a long day or sharing a cozy breakfast with loved ones, these muffins can spark a moment of joy. Their slightly crusty tops and tender crumb balance the earthiness of pumpkin beautifully.

    Pumpkin Muffins with Toasted Sesame Seeds

    These pumpkin muffins are tender and moist with a slightly crusty top, featuring warm spices and a subtle nutty flavor from toasted sesame seeds. The batter is mixed until just combined, then baked to create a fluffy, visually appealing muffin with a golden-brown crust and a tender crumb.
    Prep Time 15 minutes
    Cook Time 20 minutes
    Total Time 35 minutes
    Servings: 12
    Course: Main Course
    Cuisine: American
    Calories: 180

    Ingredients
      

    • 1 1/2 cups all-purpose flour
    • 1/2 cup granulated sugar
    • 1 teaspoon baking soda
    • 1/2 teaspoon ground cinnamon
    • 1/4 teaspoon ground nutmeg
    • 1/4 teaspoon ground ginger
    • 1/2 teaspoon salt
    • 1/2 cup unsweetened pumpkin puree
    • 1/3 cup vegetable oil
    • 2 large eggs
    • 1 teaspoon vanilla extract
    • 1/4 cup toasted sesame seeds for topping

    Equipment

    • Mixing bowls
    • Whisk
    • Muffin tin
    • Spoon or ice cream scoop
    • Toaster or skillet for sesame seeds

    Method
     

    1. Preheat your oven to 375°F (190°C) and line a muffin tin with paper liners or lightly grease it.
    2. In a small skillet or toaster, toast the sesame seeds over medium heat until they become golden and aromatic, about 2-3 minutes. Set aside to cool.
    3. In a large mixing bowl, whisk together the flour, sugar, baking soda, spices, and salt until well combined.
    4. In another bowl, mix the pumpkin puree, vegetable oil, eggs, and vanilla extract until smooth and slightly frothy.
    5. Pour the wet mixture into the dry ingredients and gently fold with a spatula until just combined. Do not overmix; the batter should be lumpy.
    6. Spoon the batter evenly into the prepared muffin cups, filling each about two-thirds full.
    7. Sprinkle the toasted sesame seeds evenly over each muffin for added crunch and flavor.
    8. Bake for 18-20 minutes, or until the muffins are golden brown and a toothpick inserted into the center comes out clean.
    9. Remove the muffins from the oven and let them cool in the tin for a few minutes before transferring to a wire rack to cool completely.
    10. Once cooled, serve the muffins warm or at room temperature, enjoying their tender crumb and nutty flavor contrast.

    Notes

    For best flavor, toast the sesame seeds until fragrant. These muffins are delicious for breakfast or as a snack.
    These pumpkin muffins aren’t just a seasonal treat; they’re a little reminder of simple pleasures. As the days get shorter and the air turns crisper, baking something warm and familiar can bring unexpected comfort.
    Enjoy these muffins with a dash of butter or a smear of cream cheese, letting that nutty aroma linger. They’re perfect for sharing, and even better as a solitary indulgence, paired with a steaming cup of coffee or tea. Sometimes, food is just what we need to pause and savor the present.