
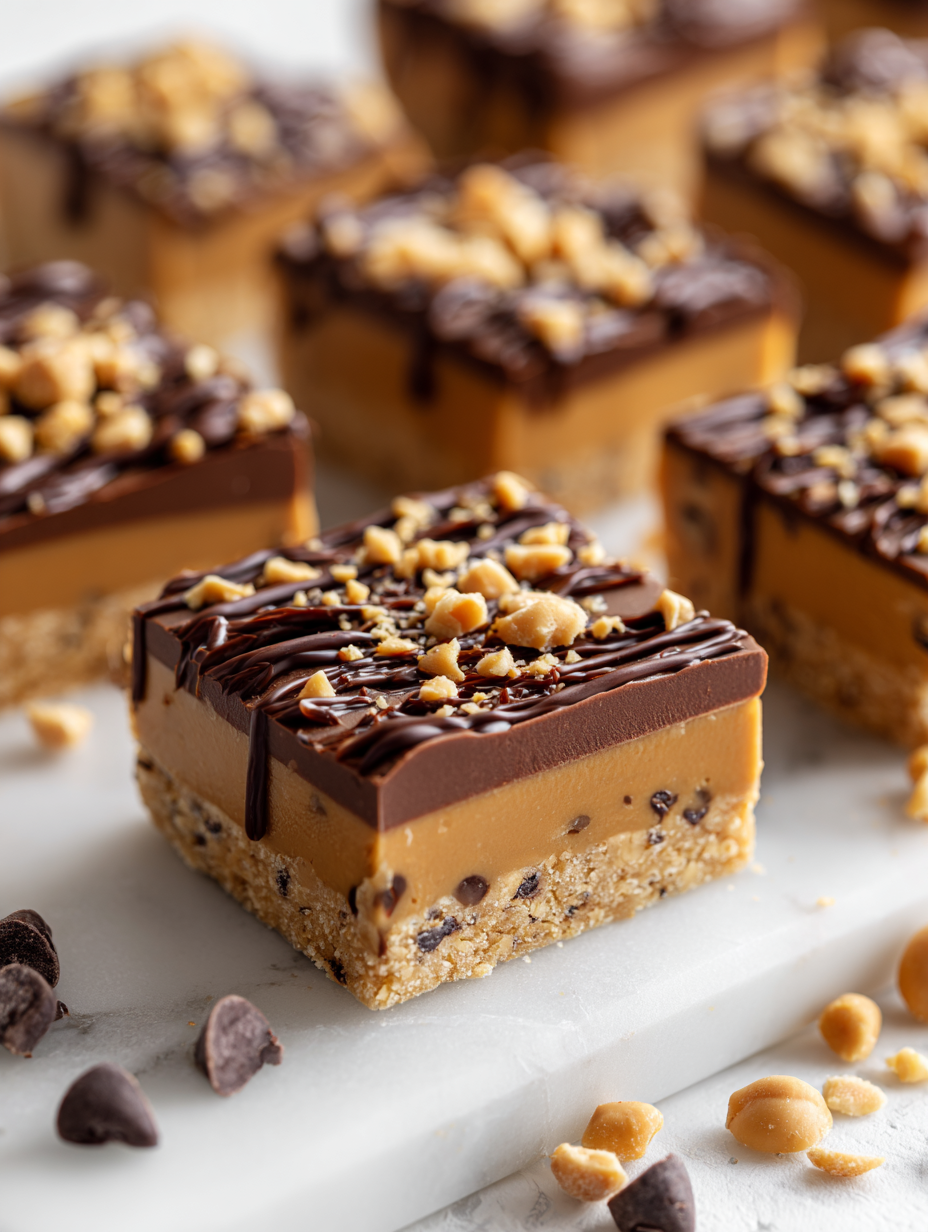
Sometimes the simplest recipes carry the most nostalgia. These no-bake peanut butter bars remind me of childhood afternoons, where the kitchen smelled of roasted peanuts and melted chocolate, and I’d sneak bites before they set. There’s something about the ease—just mixing, pressing, and chilling—that makes making treats feel accessible, even after a long day.
No oven required, they’re a lifesaver when you’re short on time but craving something sweet and satisfying. The peanut butter gives a rich, creamy base, while the chocolate topping adds just enough bittersweet crunch. It’s a recipe that’s as much about the process as it is about the final bite—messy, quick, and deeply comforting.
Focusing on the nostalgic comfort and simplicity of homemade treats that require no oven, making them perfect for busy days or last-minute cravings.
A Childhood Favorite Revisited
- This recipe takes me back to lazy summer afternoons at my grandma’s, where these bars were the highlight of every visit.
- I love how forgiving this treat is—no fancy tools needed, just a sturdy mixing bowl and a spatula, and you’re set.
- There’s a quiet satisfaction in pressing the crumbly peanut butter mixture into the pan, feeling the texture change under my fingers.
- These bars are my go-to when I need a quick, honest sweet fix without turning on the oven or fussing over complicated steps.
- Nothing beats the smell of melting chocolate mingling with peanut butter—pure comfort, right in my own kitchen.
The story behind this recipe
- This recipe was born out of a chaotic afternoon when I needed a quick sweet fix, but didn’t want to turn on the oven. I remembered how my grandma used to make simple no-bake treats with whatever was in the pantry—peanut butter, chocolate, and a bit of graham cracker crumbs. That nostalgic, messy, comforting process stuck with me, and I realized I could make it into something more structured yet still effortless.
- I love how these bars feel like a little act of rebellion against the fussiness of fancy desserts. They’re honest, straightforward, and perfect for when the kitchen is bustling or when I just want a treat that comes together in minutes. Every time I make them, I think about the quiet satisfaction of pressing the mixture into the pan, the smell of melting chocolate, and that first bite that’s both sticky and crunchy at once.
- heading
- The story behind this recipe
Contextual origin, trivia, or history
- These bars originated in the early 20th century as a quick, no-fuss treat during wartime rationing when fresh ingredients were scarce.
- Peanut butter became a popular ingredient in American homes during the 1930s, and recipes like these helped showcase its versatility.
- The combination of peanut butter and chocolate in layered treats dates back to the 1950s, influenced by growing confectionery innovations.
- No-bake desserts like these gained popularity in the 1970s with the rise of convenience foods and the desire for simple, quick recipes.
- Surprisingly, similar recipes appear in vintage community cookbooks from small towns, often shared at bake sales and church gatherings.
Key ingredients at a glance
- Creamy peanut butter: I prefer a natural, unsweetened variety for deeper flavor—your bars will be richer and less sweet, with a slight ooziness that clings to your fingers.
- Honey or maple syrup: A splash adds a touch of floral sweetness—skip if you want a less sticky texture, but don’t skip the flavor boost it provides.
- Graham cracker crumbs: I like fine crumbs for a smooth base, but coarser bits add a nice crunch—consider crushed cookies for a different twist.
- Chocolate chips: Use a good-quality semi-sweet or dark chocolate—melted, they create a glossy, slightly smoky topping that’s irresistible.
- Butter: A little melted butter helps everything come together—swap with coconut oil for a dairy-free version that still crisps up nicely.
- Salt: Just a pinch accentuates the peanut butter’s richness—don’t skip it or the bars might taste flat, especially if you’re using unsalted peanut butter.
- Optional add-ins: Chopped nuts or dried fruit can add texture and surprise—toss them in before pressing into the pan for bursts of flavor.
Spotlight on key ingredients
Peanut Butter:
- Creamy peanut butter: I prefer natural, unsweetened varieties for a richer, deeper flavor—your bars will be oozier and more intense, especially when warm.
- Peanut butter’s texture: It’s thick and sticky when cold, but gets silky and glossy as it warms, making mixing a tactile joy or a sticky mess if you’re not careful.
Chocolate Chips:
- They melt into a glossy, slightly smoky layer that crackles softly when you bite into the finished bar—use good quality for best flavor.
- Chocolate’s behavior: When melted, they become velvety and fluid, but if overheated, they seize or become grainy—stir in a splash of warm milk if needed.
Notes for ingredient swaps
- Dairy-Free: Swap traditional butter for coconut oil. It melts just as smoothly and adds a subtle tropical aroma, though the bars might be slightly less rich and more crisp when set.
- Nut Butter Options: Use almond or cashew butter if peanut allergies are a concern. These will alter the flavor profile but still provide creamy, binding goodness.
- Sweetener Choices: Replace honey with agave syrup or brown rice syrup for a vegan option. Expect a slightly different sweetness and texture—less sticky, more syrupy.
- Cracker Base: Substitute graham cracker crumbs with crushed cookies, digestive biscuits, or even crushed pretzels for added saltiness and crunch.
- Chocolate Topping: Dark or milk chocolate chips can be interchanged. For a richer, deeper flavor, try using chopped dark chocolate or melting a chocolate bar with higher cocoa content.
- Add-ins: Chopped nuts, dried fruit, or mini marshmallows can be folded into the peanut butter mixture for extra texture and flavor bursts.
- Salt: Use sea salt flakes or flavored salts for a more pronounced finish. A pinch can really elevate the overall taste, especially with unsalted peanut butter.
Equipment & Tools
- 20cm (8-inch) square pan: To hold and shape the bars.
- Spatula: To mix, spread, and flatten layers smoothly.
- Saucepan: To melt ingredients gently and control heat.
- Parchment paper: For easy removal and cleanup.
Step-by-step guide to no-bake bars
- Gather your equipment: a 20cm (8-inch) square pan, a spatula, a saucepan, and parchment paper for lining.
- Line the pan with parchment, leaving a slight overhang for easy removal.
- In the saucepan over low heat (about 60°C/140°F), melt 1 cup (250g) of peanut butter with 1/4 cup (60ml) honey or maple syrup, stirring until smooth and fragrant, about 2-3 minutes.
- Remove from heat. Stir in 1 1/2 cups (150g) of graham cracker crumbs or crushed cookies until fully coated, and a pinch of salt. The mixture should be sticky but manageable.
- Press the peanut butter mixture evenly into the prepared pan using the spatula or your fingers. Firmly press down to create an even layer, about 1 inch thick.
- In the same saucepan, melt 1 cup (175g) of chocolate chips over low heat, stirring constantly to prevent burning, about 2-3 minutes. If the chocolate seizes or becomes grainy, add a teaspoon of coconut oil or a splash of warm milk and stir until smooth.
- Pour the melted chocolate over the pressed peanut butter layer, spreading evenly with the spatula. Tap the pan gently on the counter to smooth out the surface.
- Place the pan in the fridge or freezer to set. Chill for at least 2 hours or until the chocolate is firm and the bars are solid when gently jiggled.
- Once set, lift the bars out using the parchment overhang. Cut into squares or rectangles with a sharp knife, cleaning the blade between cuts for clean edges.
- Serve immediately or store in an airtight container in the fridge for up to a week. For longer storage, freeze for up to a month, thawing at room temperature for 10-15 minutes before serving.
Chill the assembled bars in the fridge or freezer until firm. Cut into neat squares, then serve directly or store in an airtight container in the fridge for up to a week, or freeze for longer storage.
How to Know It’s Done
- Chocolate topping is glossy and firm, not sticky or grainy.
- Bars hold their shape when cut and pressed, not crumbling or melting excessively.
- The peanut butter layer is evenly pressed with a slight sheen, indicating proper compaction.
No-Bake Peanut Butter Bars
Ingredients
Equipment
Method
- Line your square pan with parchment paper, leaving a little overhang for easy lifting later.
- In a saucepan over low heat, gently warm the peanut butter and honey, stirring constantly until the mixture is smooth, fragrant, and just starting to bubble, about 2-3 minutes.
- Remove the saucepan from heat and stir in the graham cracker crumbs along with a pinch of salt until everything is well combined and sticky.
- Press the peanut butter mixture evenly into the prepared pan using a spatula or your fingers, pressing firmly to create a compact, even layer about an inch thick.
- In the same saucepan, melt the chocolate chips over low heat, stirring constantly until smooth and glossy. If the chocolate seizes, add a teaspoon of butter or warm milk to loosen it.
- Pour the melted chocolate over the peanut butter layer, spreading it evenly with a spatula. Gently tap the pan on the counter to settle the chocolate and smooth out the surface.
- Place the pan in the fridge or freezer and chill for at least 2 hours until the chocolate is firm and the bars are completely set.
- Once set, lift the bars out of the pan using the parchment overhang and cut into squares with a sharp knife, wiping the blade clean between cuts for neat edges.
- Serve immediately or store in an airtight container in the fridge for up to a week. For longer storage, wrap tightly and freeze, thawing briefly before enjoying.
Notes
Pro tips for perfect no-bake bars
- Use room temperature ingredients for easier mixing and a smoother texture.
- Melt chocolate gently over low heat to prevent seizing or burning.
- Press the mixture firmly into the pan to avoid crumbly bars.
- Chill the bars thoroughly until the chocolate is glossy and set.
- Use a sharp knife and clean blade for neat cuts, wiping between slices.
- For a shiny chocolate finish, let the melted chocolate cool slightly before pouring.
- Experiment with different toppings or mix-ins to customize your bars.
Common mistakes and how to fix them
- FORGOT to temper chocolate → Use low heat and stir constantly.
- DUMPED too much salt → Add salt gradually and taste as you go.
- OVER-TORCHED chocolate → Remove from heat immediately and add oil to smooth.
- MISSED chilling step → Chill until bars are firm and chocolate is set.
Quick fixes and pantry swaps
- When chocolate seizes, splash in a teaspoon of warm coconut oil to smooth.
- If bars stick to the pan, spray with non-stick and line with parchment first.
- Splash a bit of warm milk into melted chocolate if it becomes grainy or thick.
- Patch cracks by melting more chocolate and gently smoothing over the surface.
- Shield sticky hands with a piece of parchment when pressing mixture into the pan.
Prep, store, and reheat tips
- Prepare the peanut butter layer in advance; it keeps well in the fridge for up to 2 days, and the flavors meld beautifully overnight, enhancing that nutty aroma.
- Store the assembled bars in an airtight container in the fridge for up to a week; the cool temperature keeps the chocolate glossy and prevents melting.
- For longer storage, freeze the bars for up to a month, wrapped tightly in plastic wrap and then in foil; thaw at room temperature for about 10 minutes before slicing.
- Reheating isn’t necessary—these bars are best enjoyed cold or slightly softened; if you prefer them warmer, give a quick 10-second zap in the microwave, just until the chocolate softens, and check that lovely aroma of melted chocolate and peanut butter.
Top questions about no-bake peanut butter bars
1. Can I use any peanut butter?
Use natural peanut butter with minimal additives for a richer, oozier texture and full peanut flavor.
2. How long should I chill the bars?
Chill the bars for at least 2 hours until the chocolate is firm and the layers hold shape.
3. How do I melt chocolate smoothly?
Yes, melting chocolate over low heat and stirring constantly helps prevent burning and graininess.
4. Can I swap the chocolate topping?
You can substitute dark chocolate for semi-sweet or milk chocolate, depending on your preference for sweetness.
5. How do I store these bars long-term?
Wrap the bars tightly and freeze for up to a month. Thaw at room temperature for 10-15 minutes before serving.
6. Can I change the base ingredients?
Use crushed graham crackers or crushed cookies for different textures—coarser for crunch, finer for smoothness.
7. What if the chocolate becomes grainy?
If the chocolate seizes, stir in a teaspoon of warm coconut oil or milk to loosen it up.
8. How do I keep the bars from crumbling?
Press firmly when spreading the peanut butter mixture into the pan to prevent crumbling when cutting.
9. Are there vegan options?
For a vegan version, use coconut oil instead of butter and maple syrup instead of honey.
10. Should I serve these cold or warm?
Serve the bars chilled for a firm, satisfying bite or slightly warmed for a melty, gooey experience.
These bars are the kind of treat that sneaks up on you—simple, honest, and deeply satisfying. Making them without an oven means you can whip up a batch anytime the craving hits, no fuss, no fuss. They’re perfect for sharing or just keeping around for that quick peanut butter chocolate fix.
Plus, they remind me that sometimes, the best recipes are the ones that come together in a flash, with ingredients already in your pantry. Whether it’s a busy weekday or a lazy weekend, these bars fit right in, delivering a little moment of comfort whenever you need it.

Founded by Rachel Morgan, a proud home cook and foodie from Austin, Texas, this blog is all about transforming everyday meals into moments of joy.