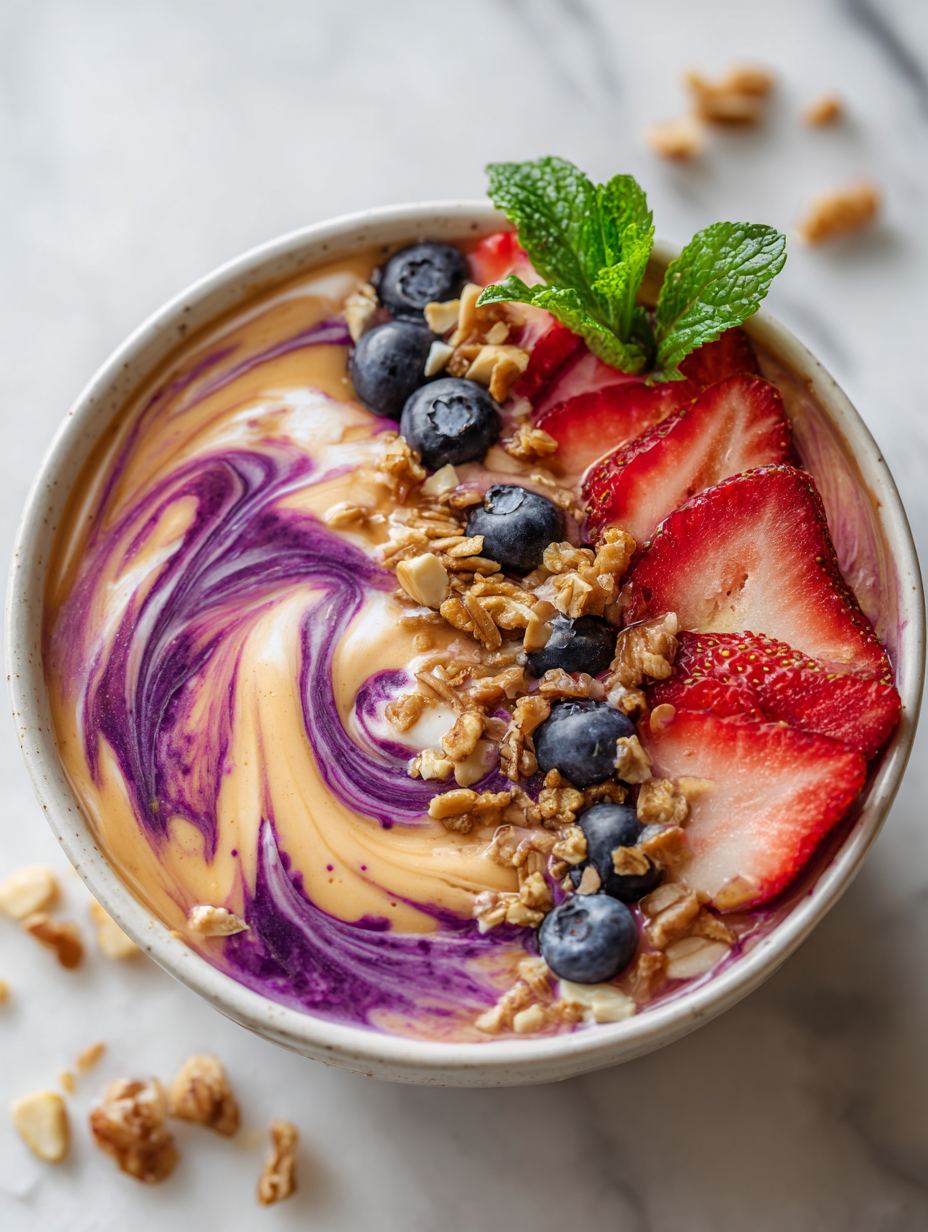
Category: Desserts

  • Spooky Glee: Haunted Dirt Cake with Gummy Worms

    Spooky Glee: Haunted Dirt Cake with Gummy Worms

    Halloween is the perfect time to embrace chaos in the kitchen, especially with a dessert that looks as wild as a backyard burrow. The Halloween Dirt Cake isn’t just about taste; it’s a visual adventure that transforms simple ingredients into a mini subterranean world. Each spoonful offers the crunch of chocolate crumbs and the surprise squish of gummy worms hiding beneath.

    This recipe taps into childhood nostalgia while adding a sinister Halloween twist. It’s an interactive treat perfect for parties or a fun family activity that sparks giggles and gleeful screams. Plus, it’s surprisingly easy to make—no complicated steps, just plenty of creative chaos.

    Halloween Dirt Cake

    Halloween Dirt Cake is a layered dessert that mimics a spooky underground scene, combining crushed cookies for dirt-like texture with creamy filling and playful gummy worms for surprises. It features a crunchy crumb topping contrasted with smooth, velvety layers, finished with gory decorations. The dessert is assembled in a clear dish to highlight its chaotic, earthy appearance.
    Prep Time 20 minutes
    Cook Time 10 minutes
    Total Time 30 minutes
    Servings: 8
    Course: Main Course
    Cuisine: American
    Calories: 410

    Ingredients
      

    • 2 cups vanilla wafers or chocolate cookies crushed into fine crumbs
    • 3 cups cream cheese softened
    • 1 cup powdered sugar sifted
    • 2 cups chilled heavy cream for whipping
    • 1 teaspoon vanilla extract
    • 1 cup chocolate chips melted and cooled slightly
    • 24 gummy worms gummy worms hiding beneath the dirt
    • additional crushed cookies for topping to simulate dirt

    Equipment

    • Electric mixer
    • 9×13-inch serving dish
    • Spatula
    • Food processor or plastic bag and rolling pin

    Method
     

    1. Place vanilla wafers or chocolate cookies in a food processor or inside a plastic bag and crush into fine crumbs using a rolling pin or the bottom of a heavy object.
    2. In a large mixing bowl, beat the softened cream cheese with powdered sugar until smooth and fluffy.
    3. Whip the chilled heavy cream and vanilla extract in a separate bowl until stiff peaks form.
    4. Gently fold the whipped cream into the cream cheese mixture until fully combined and smooth.
    5. Mix in the melted and cooled chocolate chips into the creamy filling for a rich chocolate flavor.
    6. Spread a layer of crushed cookies evenly in the bottom of the serving dish to resemble dirt.
    7. Pour half of the creamy filling over the cookie layer, smoothing it out with a spatula.
    8. Add gummy worms randomly on top of the filling, pressing them slightly into the layer so they stay hidden beneath the surface.
    9. Repeat the process with another layer of crushed cookies, followed by the remaining filling, creating a layered effect.
    10. Finish with a generous sprinkle of crushed cookies on top to resemble fresh dirt.
    11. Chill the assembled dirt cake in the refrigerator for at least 2 hours before serving to allow flavors to meld and for the dessert to set.
    12. Serve slices with extra gummy worms or spooky decorations if desired, and enjoy the chaotic, creepy treat!
    As the party winds down, this dirt cake remains a hit because of its playful appeal and easy clean-up. No matter if you’re a baking novice or a culinary chaos creator, this dessert invites everyone to dig in and get a little messy. It’s a reminder that sometimes, the best treats are the ones that let your imagination run wild.

    This recipe is ideal for those craving a festive snack that combines nostalgia with a touch of mischief. A little creation that brings smiles, laughs, and maybe even a few scares. Now, go ahead and unleash your inner kid—after all, Halloween comes but once a year.

  • The Secret Spark: Elevating Peach Crumble with a Unique Twist

    The Secret Spark: Elevating Peach Crumble with a Unique Twist

    Peach crumble often feels like a summer staple, but today I want to explore a different angle—a lingering aroma of toasted spices and a crumbly topping that’s almost savory in its complexity.

    With each bite, you’ll notice a dynamic play between the sweet, juicy peaches and the crunchy, buttery topping that whispers of nostalgic late summer afternoons. It’s more than just a dessert; it’s an experience that captures the fleeting essence of peaches at their peak.

    This recipe isn’t just about making something sweet; it’s about transforming a simple fruit into a symphony of textures and flavors that sing on your palate. Perfect for those lazy weekends or a spontaneous dinner with friends, it’s a dish that invites curiosity and comfort alike.

    Peach Crumble with Spiced Topping

    This peach crumble features ripe, juicy peaches topped with a buttery, crumbly mixture enriched with toasted spices, creating a harmonious blend of sweetness and savory warmth. The dish combines baked fruit and crispy topping, resulting in a tender interior with a crunchy, golden-brown crust.
    Prep Time 15 minutes
    Cook Time 40 minutes
    Total Time 55 minutes
    Servings: 4
    Course: Main Course
    Cuisine: American
    Calories: 250

    Ingredients
      

    • 4 cups ripe peaches, sliced pitted and peeled if desired
    • 1/4 cup granulated sugar
    • 1 tablespoon lemon juice freshly squeezed
    • 1 cup all-purpose flour
    • 1/2 cup old-fashioned rolled oats
    • 1/2 cup unsalted butter, cold cut into small pieces
    • 1/2 teaspoon ground cinnamon
    • 1/4 teaspoon ground ginger
    • 1/4 teaspoon ground cloves

    Equipment

    • Mixing bowls
    • Baking dish
    • Pastry cutter or forks
    • Measuring cups and spoons

    Method
     

    1. Preheat your oven to 375°F (190°C). In a large mixing bowl, gently toss sliced peaches with sugar and lemon juice until evenly coated. Spread the peach mixture into a baking dish, creating an even layer.
    2. In a separate bowl, combine flour, oats, cinnamon, ginger, and cloves. Add the cold butter pieces and use a pastry cutter or forks to cut the butter into the dry ingredients until the mixture resembles coarse crumbs with some pea-sized bits of butter remaining.
    3. Sprinkle the crumble topping evenly over the peaches in the baking dish, covering the fruit completely for a hearty crust.
    4. Bake in the preheated oven for about 40 minutes, or until the topping is golden brown and the peaches are bubbling around the edges.
    5. Remove from the oven and let cool slightly. The topping should be crisp and golden, and the peaches tender and juicy.
    6. Serve warm, optionally with a scoop of vanilla ice cream or a dollop of whipped cream for extra indulgence.

    As the last crumb is enjoyed, the warm, inviting scent lingers in the air—an olfactory reminder of how a simple dessert can evoke so many memories and joy. It’s a reminder that sometimes, the most unassuming recipes hold the deepest heart.

    Embracing this twist on peach crumble makes every summer moment just a bit brighter. Let each spoonful be a celebration of seasonal bounty and the comforting, imperfect magic of home baking.

  • Spine-Chilling Halloween Monster Eyeball Cake Pops

    Spine-Chilling Halloween Monster Eyeball Cake Pops

    Halloween is the perfect time to embrace the playful and spooky side of baking. These Monster Eyeball Cake Pops turn a simple treat into a creepy delight that will have guests squealing with delight and a bit of dread. The combination of sweet cake, gooey icing, and gory details makes them irresistible on All Hallows’ Eve.

    What makes this recipe stand out is the creative chaos involved. From bloodshot eyeballs to ragged veins, every detail is a chance to bring out your inner monster. This project is as much about the fun and mess as it is about the chillingly cute results.

    Monster Eyeball Cake Pops

    This recipe features cake pops shaped like creepy eyeballs with detailed decorations to resemble bloodshot eyes and veins. The process involves baking a cake, crumbling and mixing with icing, shaping into spheres, and decorating with icing, candy, and edible details to create a spooky Halloween treat. The final cake pops have a smooth, round appearance with gory accents for a visual impact.
    Prep Time 30 minutes
    Cook Time 30 minutes
    Total Time 1 hour
    Servings: 10
    Course: Main Course
    Cuisine: Halloween
    Calories: 150

    Ingredients
      

    • 1 box cake mix your preferred flavor
    • 1 1/2 cups frosting ready-made or homemade, for mixing with cake crumbs
    • 12 oz candy melts white or red for decorating
    • 10 lollipop sticks
    • small food coloring red, black, or other desired colors
    • as needed edible decorations candy eyes, gel, icing, or mini chocolates

    Equipment

    • Baking pan
    • Mixing bowls
    • Rubber spatula
    • Cooling rack
    • Lollipop sticks
    • Melting pot or microwave-safe bowl
    • Piping bags and tips
    • Food coloring
    • Candy eyes or mini chocolates
    • Decorative piping tools

    Method
     

    1. Bake the cake according to the package instructions and let it cool completely on a wire rack.
    2. Crumble the cooled cake into fine crumbs using your hands or a fork, placing them in a large mixing bowl.
    3. Add frosting to the cake crumbs and gently fold until the mixture is firm enough to hold shape. The mixture should be moist but not sticky.
    4. Chill the mixture in the refrigerator for about 30 minutes to make it easier to work with.
    5. Scoop and roll the mixture into 1.5-inch diameter spheres, then insert a lollipop stick into each and place on a baking sheet lined with parchment paper.
    6. Refrigerate the shaped cake pops for at least 30 minutes to firm up before dipping.
    7. Melt the candy melts according to package instructions in a melting pot or microwave, stirring until smooth.
    8. Dip each cake pop into the melted candy, ensuring it’s fully coated. Tap gently to remove excess coating and place back on parchment to set.
    9. Use piping bags to add bloodshot veins with red gel or icing, creating thin lines across the eyeballs for a gory effect.
    10. Attach small candies or edible decorations to resemble bloodshot veins or gory details, positioning them as desired for a creepy effect.
    11. Place edible googly eyes or mini chocolates onto the center of each eyeball to complete the spooky look.
    12. Once decorated and the coating is hardened, serve your Monster Eyeball Cake Pops on a platter for a fun and frightening Halloween treat.
    As the night winds down, these eyeball cake pops become a fun conversation starter for any Halloween gathering. They’re as delightfully disturbing in appearance as they are delicious in taste, blending nostalgia with a touch of the grotesque. Plus, they’re surprisingly simple to make, perfect for a last-minute spooky treat.

    Enjoy the process of turning ordinary cake pops into hauntingly realistic eyeballs. Whether you’re hosting a party or just indulging in some seasonal baking, these treats add a perfect splash of holiday horror to your table.

  • A Nostalgic Spin: The Secret Ingredient in My Pumpkin Muffins

    A Nostalgic Spin: The Secret Ingredient in My Pumpkin Muffins

    When autumn arrives, my kitchen fills with the scent of roasted pumpkins and warming spices. This year, I decided to take my pumpkin muffin recipe beyond the usual spices and add a surprising twist: a hint of toasted sesame seeds. It’s a small addition that creates a subtle nutty backdrop, making each bite more memorable.
    A good muffin should be more than just moist and fluffy; it should tell a story. Whether you’re seeking comfort after a long day or sharing a cozy breakfast with loved ones, these muffins can spark a moment of joy. Their slightly crusty tops and tender crumb balance the earthiness of pumpkin beautifully.

    Pumpkin Muffins with Toasted Sesame Seeds

    These pumpkin muffins are tender and moist with a slightly crusty top, featuring warm spices and a subtle nutty flavor from toasted sesame seeds. The batter is mixed until just combined, then baked to create a fluffy, visually appealing muffin with a golden-brown crust and a tender crumb.
    Prep Time 15 minutes
    Cook Time 20 minutes
    Total Time 35 minutes
    Servings: 12
    Course: Main Course
    Cuisine: American
    Calories: 180

    Ingredients
      

    • 1 1/2 cups all-purpose flour
    • 1/2 cup granulated sugar
    • 1 teaspoon baking soda
    • 1/2 teaspoon ground cinnamon
    • 1/4 teaspoon ground nutmeg
    • 1/4 teaspoon ground ginger
    • 1/2 teaspoon salt
    • 1/2 cup unsweetened pumpkin puree
    • 1/3 cup vegetable oil
    • 2 large eggs
    • 1 teaspoon vanilla extract
    • 1/4 cup toasted sesame seeds for topping

    Equipment

    • Mixing bowls
    • Whisk
    • Muffin tin
    • Spoon or ice cream scoop
    • Toaster or skillet for sesame seeds

    Method
     

    1. Preheat your oven to 375°F (190°C) and line a muffin tin with paper liners or lightly grease it.
    2. In a small skillet or toaster, toast the sesame seeds over medium heat until they become golden and aromatic, about 2-3 minutes. Set aside to cool.
    3. In a large mixing bowl, whisk together the flour, sugar, baking soda, spices, and salt until well combined.
    4. In another bowl, mix the pumpkin puree, vegetable oil, eggs, and vanilla extract until smooth and slightly frothy.
    5. Pour the wet mixture into the dry ingredients and gently fold with a spatula until just combined. Do not overmix; the batter should be lumpy.
    6. Spoon the batter evenly into the prepared muffin cups, filling each about two-thirds full.
    7. Sprinkle the toasted sesame seeds evenly over each muffin for added crunch and flavor.
    8. Bake for 18-20 minutes, or until the muffins are golden brown and a toothpick inserted into the center comes out clean.
    9. Remove the muffins from the oven and let them cool in the tin for a few minutes before transferring to a wire rack to cool completely.
    10. Once cooled, serve the muffins warm or at room temperature, enjoying their tender crumb and nutty flavor contrast.

    Notes

    For best flavor, toast the sesame seeds until fragrant. These muffins are delicious for breakfast or as a snack.
    These pumpkin muffins aren’t just a seasonal treat; they’re a little reminder of simple pleasures. As the days get shorter and the air turns crisper, baking something warm and familiar can bring unexpected comfort.
    Enjoy these muffins with a dash of butter or a smear of cream cheese, letting that nutty aroma linger. They’re perfect for sharing, and even better as a solitary indulgence, paired with a steaming cup of coffee or tea. Sometimes, food is just what we need to pause and savor the present.

  • Eerie Delight: How to Make Perfect Halloween Ghost Brownies

    Eerie Delight: How to Make Perfect Halloween Ghost Brownies

    Once October rolls around, I crave more than just candy—I want something that captures the spirit of Halloween in every bite. These Ghost Brownies bring a dash of spooky charm to your dessert table, with ghostly white faces floating atop rich, fudgy squares. It’s a celebration of chaos and creativity, all in one bite.

    What makes this recipe stand out isn’t just its creepy appearance. It’s how achievable it is to transform simple brownies into adorable ghostly figures with minimal effort. Watching little hands delight in decorating these spook-tacular treats is part of the charm. Plus, the smell of melting chocolate mingled with vanilla leaves the whole house feeling festive.

    Ghost Brownies

    Ghost Brownies are rich, fudgy chocolate squares decorated with white icing to resemble floating ghostly figures. They feature a dense, chewy texture with a creamy topping that creates a spooky yet delightful dessert perfect for Halloween celebrations.
    Prep Time 15 minutes
    Cook Time 30 minutes
    Total Time 45 minutes
    Servings: 12
    Course: Main Course
    Cuisine: American
    Calories: 210

    Ingredients
      

    • 1 cup unsalted butter melted
    • 1.5 cups granulated sugar
    • 3 large eggs beaten
    • 1 teaspoon vanilla extract
    • 0.75 cup unsweetened cocoa powder
    • 1.25 cups all-purpose flour
    • 0.5 teaspoon baking powder
    • 0.25 teaspoon salt
    • 1 cup white icing or royal icing for decorating ghosts

    Equipment

    • Mixing bowls
    • Rubber spatula
    • 9×9 inch baking pan
    • Parchment paper
    • Cooling rack
    • Piping bag or plastic sandwich bag
    • Small spatula or butter knife

    Method
     

    1. Preheat your oven to 350°F (175°C) and line a 9×9 inch baking pan with parchment paper, leaving an overhang for easy removal.
    2. In a large mixing bowl, whisk together the melted butter and sugar until smooth and glossy.
    3. Add the beaten eggs and vanilla extract to the mixture, stirring well to incorporate everything evenly.
    4. Sift the cocoa powder, flour, baking powder, and salt together in a separate bowl, then gradually fold these dry ingredients into the wet mixture using a spatula. Mix just until combined, and the batter becomes thick and shiny.
    5. Pour the batter into the prepared pan, spreading it evenly with a spatula to fill all sides and corners.
    6. Bake in the preheated oven for about 25-30 minutes, or until a toothpick inserted into the center comes out with just a few moist crumbs. Let the brownies cool completely on a wire rack.
    7. Once cooled, lift the brownies out of the pan using the parchment overhang and transfer to a clean surface.
    8. Using a piping bag filled with white icing, pipe ghostly faces onto the top of each brownie—these will resemble floating ghosts with rounded heads and little draping bodies.
    9. Optional: Use a small spatula or butter knife to smooth out or add details to the icing for more expressive ghost faces.
    10. Allow the decorated brownies to set for about 15 minutes until the icing firms up slightly.
    11. Slice the brownies into squares and serve the spooky treats, enjoying their rich, fudgy texture and playful ghostly decorations.

    Notes

    For a more flavorful touch, add a pinch of espresso powder to the brownie batter. Using royal icing helps create crisp, detailed ghost faces, but store-bought white icing works well too. Keep decorated brownies stored in an airtight container for up to 2 days.

    These Ghost Brownies are perfect for last-minute Halloween gatherings or when you want a sweet surprise that’s both fun and delicious. They combine ease with a touch of whimsy, making them a hit with kids and adults alike. In the end, it’s all about sharing laughter and spooky cheer over a batch of gooey, ghostly brownies.

    As the season of costumes and carved pumpkins unfolds, these treats remind us that simple ingredients can create magical moments. A little creativity turns ordinary brownies into a whimsical centerpiece. So, why not indulge in some ghostly fun that’ll linger in everyone’s memory long after October ends?

  • Hidden Gem Pumpkin Cookies That Will Surprise Your Taste Buds

    Hidden Gem Pumpkin Cookies That Will Surprise Your Taste Buds

    As the leaves turn orange and the air gains a crisp edge, I find myself craving pumpkin in its many forms. But these pumpkin cookies aren’t just another seasonal treat; they’re a journey into the heart of autumn’s cozy chaos. The scent of cinnamon and nutmeg wafting through my kitchen makes me feel like I’ve wrapped myself in a fuzzy blanket, ready for a comforting afternoon.

    What sets these cookies apart is their unexpected twist—adding a dash of salted caramel or a sprinkle of candied ginger transforms each batch into a small celebration. They’re perfect for anyone looking to shake up their cookie routine with a touch of autumnal magic. Trust me, these bites bring a delightful surprise to every gathering or quiet moment alone with a cup of chai.

    Autumn Pumpkin Cookies with Salted Caramel and Candied Ginger

    These pumpkin cookies are soft and tender with a spiced flavor profile featuring cinnamon and nutmeg. They are baked until golden with a slightly chewy center and a crisp edge, then enhanced with optional salted caramel or candied ginger for added richness and texture.
    Prep Time 20 minutes
    Cook Time 12 minutes
    Total Time 32 minutes
    Servings: 24
    Course: Main Course
    Cuisine: American
    Calories: 150

    Ingredients
      

    • 1 ½ cups all-purpose flour sifted
    • 1 cup pure pumpkin puree fresh or canned
    • ½ cup granulated sugar
    • ½ cup brown sugar packed
    • 1 large egg
    • ½ cup unsalted butter melted and cooled
    • 1 ½ teaspoons ground cinnamon
    • ½ teaspoon ground nutmeg
    • 1 teaspoon vanilla extract
    • ½ teaspoon baking soda
    • ¼ teaspoon salt
    • ½ cup candied ginger chopped
    • ½ cup salted caramel sauce optional drizzle

    Equipment

    • Mixing bowl
    • Baking sheet
    • Parchment paper
    • Whisk
    • Measuring cups and spoons
    • Cooling rack

    Method
     

    1. Preheat your oven to 350°F (175°C). Line a baking sheet with parchment paper to prevent sticking.
    2. In a large mixing bowl, whisk together the sifted flour, cinnamon, nutmeg, baking soda, and salt until well combined. This ensures even distribution of spices and leavening.
    3. In a separate bowl, whisk the egg with the granulated and brown sugars until the mixture is smooth and slightly frothy, releasing a sweet aroma.
    4. Add the melted butter, vanilla extract, and pumpkin puree to the egg mixture, whisking until the batter is uniform and slightly thickened.
    5. Gradually fold the dry ingredients into the wet mixture just until combined; do not overmix to keep the cookies tender.
    6. Stir in the chopped candied ginger for bursts of sweet spiciness throughout the batter.
    7. Using a tablespoon or cookie scoop, drop rounded spoonfuls of dough onto the prepared baking sheet, spacing them about 2 inches apart for spreading.
    8. Bake in the preheated oven for 12-15 minutes, or until the edges are golden brown and the centers look set but still soft.
    9. Remove the cookies from the oven and let them cool on the baking sheet for 5 minutes — this helps them set and makes transferring easier.
    10. Transfer the cookies to a wire rack to cool completely, which prevents excess moisture and keeps them crisp on the edges.
    11. If desired, drizzle salted caramel sauce over the cooled cookies for a rich, sweet finishing touch.
    12. Serve these cozy pumpkin cookies at room temperature, enjoying their tender crumb and spicy warmth with a cup of chai or your favorite hot beverage.

    These pumpkin cookies are more than just a seasonal fling; they’re comfort packed into a bite. The simple ingredients come together in a warm, inviting aroma that whispers home and memories. Even as the season shifts, this recipe will find a cozy spot on your baking list, ready for when the craving hits again.

    In the end, baking these cookies is a small act of joy, a way to slow down and enjoy the little things. Sharing them, tasting that first warm crumb—these moments remind us why the season feels so special. Sometimes, it’s the little traditions that turn fleeting moments into cherished memories.

  • Spooky Spider Web Cake: A Halloween Masterpiece

    Spooky Spider Web Cake: A Halloween Masterpiece

    Every October, I find myself craving a dessert that’s as visually haunting as it is delicious. The Halloween Spider Web Cake suddenly becomes my obsession, with its layers of rich chocolate and the eerie web pattern on top. It’s not just a cake—it’s a canvas for chaos and creativity in the kitchen.

    What excites me most is the chance to channel my inner baker and artist at the same time. The process of piping that perfect web can be oddly meditative, even if it sometimes turns into a spider’s nest rather than a masterpiece. When it’s done, though, the reaction—delight mixed with squeals—is absolutely worth every frantic minute.

    Halloween Spider Web Cake

    This spider web cake features multiple layers of rich chocolate cake paired with smooth chocolate frosting. The top is decorated with a detailed web pattern made from white icing, creating an eerie and striking appearance. Its final look is both decadent and visually haunting, perfect for Halloween celebrations.
    Prep Time 45 minutes
    Cook Time 25 minutes
    Total Time 1 hour 10 minutes
    Servings: 12
    Course: Main Course
    Cuisine: dessert
    Calories: 480

    Ingredients
      

    • 2 ½ cups all-purpose flour sifted
    • 2 cups granulated sugar
    • ¾ cup unsweetened cocoa powder unsweetened, sifted
    • 1 ½ teaspoons baking powder
    • 1 ½ teaspoons baking soda
    • 1 teaspoon salt
    • 2 large eggs at room temperature
    • 1 ¼ cups hot water

    Equipment

    • Mixing bowls
    • Hand or stand mixer
    • Cake pans
    • Cooling rack
    • Piping bag
    • Fine round piping tip
    • Offset spatula

    Method
     

    1. Preheat your oven to 350°F (175°C). Grease and flour three 8-inch round cake pans to ensure easy removal after baking.
    2. In a large mixing bowl, combine sifted flour, cocoa powder, baking powder, baking soda, and salt. Whisk until well mixed to ensure even distribution of dry ingredients.
    3. In another bowl, mix the buttermilk, vegetable oil, eggs, and vanilla extract until smooth and combined. This creates the wet mixture for your batter.
    4. Add the wet mixture to the dry ingredients gradually, mixing on low speed. Once combined, stir in the hot water slowly to thin the batter; it will be quite liquid.
    5. Divide the batter evenly among the prepared cake pans. Smooth the tops with an offset spatula for an even bake.
    6. Bake in the preheated oven for about 25 minutes, or until a toothpick inserted into the center comes out clean. Then, remove from oven and let the cakes cool in their pans for 10 minutes.
    7. Transfer the cakes to a wire rack and let them cool completely before frosting. This prevents melting and makes layering easier.
    8. Prepare the chocolate frosting by beating unsalted butter until creamy. Add powdered sugar gradually, then stir in cocoa powder. Mix until smooth and fluffy, adding milk as needed to reach a spreadable consistency.
    9. Place the first cake layer on your serving plate and spread an even layer of frosting on top. Repeat with the second layer, then smooth the outer surface of the assembled cake with a spatula.
    10. Apply a final thin layer of frosting over the entire cake to seal in crumbs. Chill in the fridge for 20 minutes if needed to set the frosting firmly.
    11. Fill a piping bag fitted with a round tip with white icing. Starting at the center of the top of the cake, pipe concentric circles, then connect the circles with radial lines to create a web pattern, covering the entire top surface.
    12. Carefully add more web lines, extending from the center to the edges and intersecting existing lines, to enhance the web effect. Observe the pattern come together with each piping stroke.
    13. Once finished, chill the decorated cake for about 15 minutes to set the web pattern. Slice and serve to reveal the beautifully spooky design with rich chocolate layers.

    This cake perfectly captures the spirit of Halloween—playful, spooky, and a little bit messy. Its rich, dark flavors stand out against the vivid web design, making it a centerpiece at any celebration. Plus, it’s a fun project that invites the whole family into the spooky kitchen.

    In these crisp autumn days, there’s something comforting about baking with seasonal spices and chocolate. This Spider Web Cake isn’t just a treat—it’s a memory in the making, ready to be shared and admired. And once it’s cut into, the delicious aroma of cocoa and vanilla will fill the air, sealing the evening with a sweet touch of chaos and charm.

  • Halloween Candy Corn Parfaits: A Nostalgic Twist with a Modern Bite

    Halloween Candy Corn Parfaits: A Nostalgic Twist with a Modern Bite

    As Halloween night approaches, I find myself craving something more than just candies and chocolates. This year, I decided to turn candy corn into a centerpiece that captures the festive spirit and adds a dash of elegance to the celebration. The idea of layered parfaits filled with bright, sweet flavors feels just right for the season.

    Transforming candy corn into a creamy, luscious dessert was my small rebellion against the usual. Every spoonful offers a nostalgic crunch with a silky finish, reminding me of childhood but dressed up for grown-up enjoyment. It’s the perfect mix of chaos and charm that embodies Halloween’s playful energy.

    Candy Corn Parfait

    This layered parfait combines sweet candy corn with creamy yogurt and whipped cream, creating a dessert that is colorful and textured. The dish features distinct layers of crunch, smoothness, and fluffiness, resulting in a visually appealing treat. It showcases bright seasonal flavors with a light, airy final presentation.
    Prep Time 15 minutes
    Total Time 15 minutes
    Servings: 4
    Course: Main Course
    Cuisine: American
    Calories: 250

    Ingredients
      

    • 1 cup plain Greek yogurt full-fat or low-fat
    • 1 cup whipped cream chilled
    • 1/2 cup candy corn small or mini pieces preferred
    • 1 tablespoon honey or maple syrup to sweeten the yogurt if desired

    Equipment

    • Clear glass jars or parfait glasses
    • Mixing bowls
    • Whisk
    • Spatula

    Method
     

    1. In a mixing bowl, gently fold the whipped cream into the Greek yogurt until smooth and combined, creating a light, fluffy mixture.
    2. Add honey or maple syrup to the yogurt mixture and whisk until evenly incorporated, adjusting sweetness to taste.
    3. Chop the candy corn into small pieces if they are large, to ensure easy layering and a balanced texture.
    4. Spoon a layer of the yogurt mixture into the bottom of each glass, filling about one-third of the way up.
    5. Sprinkle a handful of candy corn pieces over the yogurt layer for a burst of color and crunch.
    6. Add another layer of the yogurt mixture over the candy corn, smoothing the top with a spatula for a neat appearance.
    7. Top the parfait with a final generous sprinkle of candy corn for decoration and extra sweetness.
    8. Repeat the process for all glasses, then chill in the refrigerator for about 10-15 minutes to set slightly before serving.
    9. Serve the candy corn parfaits chilled, with a colorful and festive presentation perfect for Halloween celebrations.

    Notes

    Feel free to customize with other seasonal candies or add a graham cracker crumble for extra texture.

    These Candy Corn Parfaits are surprisingly simple yet visually stunning. Their vibrant layers bring a whimsical touch to any Halloween table, making them ideal for parties or a homemade treat for just family. Each bite is a sweet reminder of how a little creative twist can turn ordinary ingredients into something memorable.

    As the season shifts, these parfaits capture the fleeting magic of fall with every colorful spoonful. They’re a lively, playful alternative to traditional desserts, perfect for celebrating all things spooky and sweet. Enjoy crafting this little colorful masterpiece and watch it become a favorite in your Halloween repertoire.

  • The Secret to Making a Peach Crumble that Everyone Will Love

    The Secret to Making a Peach Crumble that Everyone Will Love

    There’s something magical about using ripe peaches in a crumble. It’s like capturing a fleeting summer moment and turning it into something that lingers on the palate. I can almost smell the sweet, slightly floral aroma wafting from the oven as the fruit tenderizes, promising a joyful burst with every bite.

    What sets this recipe apart is the way I intentionally add a pinch of ginger and a splash of vanilla—simple tricks that elevate the familiar into something special. It’s a reminder that even the most beloved classics can surprise and delight with a little twist. Plus, the process is so forgiving; everyone can create a perfect, bubbling masterpiece, regardless of experience.

    So, gather your freshest peaches and your trusty crumb topping. You’ll be surprised how a humble fruit dessert can brighten a day, spark conversations, and evoke memories. This isn’t just a dessert; it’s a small celebration of summer’s glow, ready to warm your heart and home.

    Peach Crumble with Ginger and Vanilla

    This peach crumble features ripe peaches baked under a buttery crumb topping, giving a tender fruit filling and crispy surface. The addition of ginger and vanilla enhances the natural sweetness and floral aroma, resulting in a warm, bubbling dessert with a golden-brown finish.
    Prep Time 15 minutes
    Cook Time 40 minutes
    Total Time 55 minutes
    Servings: 6
    Course: Main Course
    Cuisine: American
    Calories: 280

    Ingredients
      

    • 6 cups peach slices ripe and peeled
    • 1 tsp ground ginger freshly grated if possible
    • 1 tsp vanilla extract
    • 1/2 cup granulated sugar
    • 1 cup all-purpose flour
    • 1/2 cup old-fashioned rolled oats
    • 1/2 cup unsalted butter cold and cut into small pieces

    Equipment

    • Peeler
    • Mixing bowls
    • Baking dish
    • Measuring cups and spoons
    • Pastry Cutter or Fork
    • Oven

    Method
     

    1. Preheat your oven to 375°F (190°C) and butter your baking dish to prevent sticking.
    2. Peel the peaches with a peeler, then slice them into thin, even pieces. Place the slices in a large mixing bowl.
    3. Add the sliced peaches to the bowl, then sprinkle over the ground ginger, vanilla extract, and sugar. Gently toss to coat all the fruit evenly.
    4. Transfer the coated peach slices into your prepared baking dish, spreading them out into an even layer.
    5. In a separate bowl, combine the flour, oats, and a pinch of salt. Add the cold butter pieces and use a pastry cutter or fork to cut the butter into the dry ingredients until the mixture resembles coarse crumbs.
    6. Sprinkle the crumble mixture evenly over the peach filling, covering it fully and pressing it down lightly with your hands to ensure good contact.
    7. Bake in the preheated oven for about 40 minutes, or until the top is golden brown and bubbling around the edges.
    8. Remove from the oven and let cool slightly for about 10 minutes, allowing the juices to settle and the topping to firm up.
    9. Spoon warm servings onto plates, and enjoy the tender peaches with their crispy, buttery topping.

    As the golden topping crackles gently next to the caramelized peaches, I’m reminded why I keep this recipe in my back pocket. It’s versatile enough for a quick weeknight treat or a cheerful weekend gathering. The perfume of cinnamon and baked fruit is a small luxury I look forward to every peach season.

    Whenever life feels a little chaotic, baking this peach crumble provides a peaceful, sweet anchor. It’s a classic I return to, season after season, because it captures a moment of simple joy and makes it last just a little longer. As the warm juice escapes with each spoonful, I feel grateful for these tiny, delicious pauses.

  • Spooky Delight: Halloween Dirt Cake with Gummy Worms

    Spooky Delight: Halloween Dirt Cake with Gummy Worms

    What if I told you that the ultimate Halloween treat is more than just a sweet indulgence? This Dirt Cake with Gummy Worms plays on nostalgia while adding a ghoulish twist that delights kids and adults alike. The moment you scoop it, rich chocolate layers mingled with crunchy Oreos and vibrant gummies create a sensory experience that’s almost too fun to eat.

    Plus, its no-bake magic makes it perfect for last-minute parties or spooky movie nights. The combination of cool, creamy filling and playful wormy surprises makes this dessert a hassle-free hit. It’s a simple way to sprinkle a dash of chaos onto your Halloween spread.

    Halloween Dirt Cake with Gummy Worms

    This Dirt Cake with Gummy Worms is a no-bake dessert featuring layered chocolate pudding and crushed cookies, topped with colorful gummy worms for a playful, spooky presentation. The final dish has a crumbly, creamy texture with a chocolatey flavor and fun wormy surprises throughout, resembling a messy garden scene.
    Prep Time 20 minutes
    Total Time 20 minutes
    Servings: 8
    Course: Main Course
    Cuisine: American
    Calories: 350

    Ingredients
      

    • 1 package chocolate pudding mix instant variety
    • 2 cups cold milk
    • 1 31 Øreo cookies crushed
    • 8 oz cream cheese softened
    • 1 cup powdered sugar
    • 1 tsp vanilla extract
    • 1 bag gummy worms

    Equipment

    • Mixing bowls
    • Whisk
    • Rubber spatula
    • 8×8 inch dish or trifle bowl
    • Measuring cups and spoons

    Method
     

    1. In a mixing bowl, whisk the instant chocolate pudding mix with 2 cups of cold milk until the mixture thickens and is smooth, about 2 minutes. Set aside.
    2. In a separate large bowl, beat the softened cream cheese until creamy and smooth, using a hand or stand mixer on medium speed.
    3. Add the powdered sugar and vanilla extract to the cream cheese, then beat briefly until combined and smooth.
    4. Fold the prepared pudding into the cream cheese mixture using a spatula until fully incorporated and creamy.
    5. Crush the Oreo cookies into coarse crumbs. You can do this by placing them in a sealed plastic bag and gently crushing with a rolling pin or by pulsing in a food processor.
    6. Spread a layer of crushed Oreos at the bottom of your dish or trifle bowl, creating a crumbly base.
    7. Top the Oreo layer with a generous scoop of the chocolate pudding and cream cheese filling, spreading it evenly with a spatula.
    8. Add another layer of crushed Oreos over the pudding layer for added texture and flavor.
    9. Repeat the layering process — pudding mixture and Oreo crumbs — until you’ve used all ingredients, finishing with a crumb layer on top.
    10. Decorate the top with gummy worms, pushing some lightly into the crumb topping to resemble worms burrowing into the dirt.
    11. Cover the dish and refrigerate for at least 1 hour to allow the flavors to meld and the layers to set.
    12. Serve chilled, with gummy worms visible on top for a festive spooky effect. Enjoy this fun, no-bake Halloween treat!

    As the spooky season peaks, this Dirt Cake offers a playful way to enjoy the eerie atmosphere. Its earthy flavors combined with whimsical worms evoke childhood memories while fitting into your festive table. Plus, it’s a crowd-pleaser that doesn’t require much fuss, leaving more time to enjoy the screams and laughter.

    Whether you’re serving it for a Halloween bash or a cozy night in, this treat brings a mix of chaos and comfort. It’s a small reminder of how fun and messy celebrating can be, even in the most haunted moments.