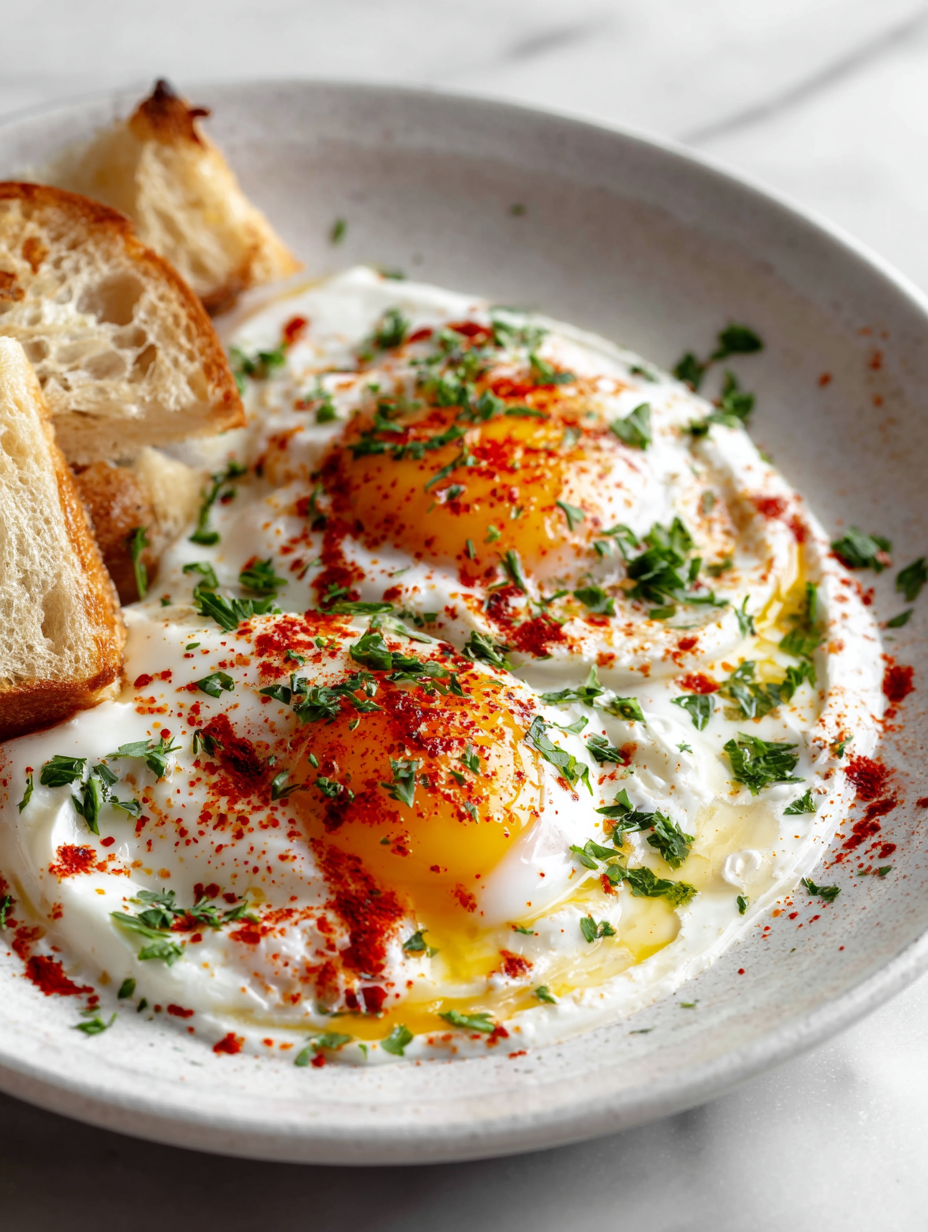
Author: BenjaminMills

  • Chill Out with the Unlikely Gatorade Slushie

    Chill Out with the Unlikely Gatorade Slushie

    Imagine standing in your kitchen, the kitchen smell of citrus and cold sweat of crushed ice filling the air. You grab a bottle of vibrant Gatorade, not just for the energy boost but as a secret ingredient for a summer treat. It’s a quick, playful way to cool down and inject a burst of flavor into your day.

    Why stick to regular popsicles or plain drinks when you can transform Gatorade into a slushie that feels both nostalgic and surprisingly refreshing? It’s an unconventional twist that’s perfect for spontaneous gatherings or a solo cooling session. Plus, it’s so simple, it’s almost like your childhood self made it.

    Gatorade Slushie

    This Gatorade slushie is made by freezing flavored sports drink and then blending it to create a crunchy, icy treat. The mixture transforms from a liquid into a semi-frozen consistency with a colorful, textured appearance. It’s a simple, refreshing dessert or cool-down beverage perfect for hot days.
    Prep Time 10 minutes
    Cook Time 4 minutes
    Total Time 14 minutes
    Servings: 2
    Course: Main Course
    Cuisine: Summer
    Calories: 100

    Ingredients
      

    • 2 cups Gatorade (preferably a vibrant flavor) chilled, for quick freezing

    Equipment

    • Freezer
    • Blender

    Method
     

    1. Pour the Gatorade into a shallow dish or a container suitable for freezing, spreading it out evenly.
    2. Place the container in the freezer and let it freeze for about 4 hours, or until the liquid is solid and has an icy texture.
    3. Remove the frozen Gatorade from the freezer and break it into smaller chunks using a spatula or spoon to loosen the ice.
    4. Transfer the chunks into a blender, adding a few pieces at a time to avoid overloading.
    5. Blend on high speed until the mixture is smooth and has a slushy, semi-icy consistency that looks like a thick snow cone or frozen drink.
    6. Pour the blended Gatorade slushie into glasses, letting the colorful, textured ice pile up invitingly.
    7. Serve immediately with a straw or spoon for a fun, cooling treat.

    This Gatorade slushie is more than a fun experiment; it’s a reminder that simplicity often leads to the best refreshment. It’s perfect for beating the heat and adding a splash of color and flavor to your summer days. No need for fancy ingredients—just that familiar, tangy Gatorade turned icy and delightful.

    In a world full of complicated recipes, this one keeps it light and joyful. Keep a bottle in the freezer for those unexpected cravings or quick refreshment moments. Sometimes, the simplest ideas make the biggest splash.

  • Frozen Rum Slushie: The Surprising Chill of Summer Nostalgia

    Frozen Rum Slushie: The Surprising Chill of Summer Nostalgia

    In the haze of summer heat, nothing beats a chilled drink that transports you straight to beachside days. But what if your frozen cocktail had a hidden twist—like a splash of unexpected spice or an aromatic herb? Rum slushies are classic, yet I love pushing the boundaries with flavors that tell stories beyond mere refreshment.

    This recipe isn’t just about blending ice and rum—it’s about capturing the chaotic beauty of a tropical getaway in a glass, served up on a muggy evening. Designing this drink felt like making a tiny island escape, one sip at a time. It’s the perfect way to turn an ordinary summer into a celebration of flavors and memories.

    Tropical Rum Slushie with a Spicy Twist

    This frozen cocktail combines rum, fruit juices, and ice blended into a smooth, icy texture with an inviting appearance. Incorporating unexpected spices or herbs adds layers of aromatic complexity, producing a refreshing drink that evokes a tropical getaway. The final product is a vibrant, slushy beverage with a frosted surface and a colorful, inviting presentation.
    Prep Time 10 minutes
    Total Time 10 minutes
    Servings: 2
    Course: Main Course
    Cuisine: Tropical
    Calories: 210

    Ingredients
      

    • 1 cup pineapple juice chilled
    • 1/2 cup coconut milk full-fat
    • 1/4 cup rum white or light rum
    • 2 cups ice cubes crushed or regular
    • 1 teaspoon ground ginger optional for spice
    • 1 pinch cayenne pepper optional for heat
    • fresh mint leaves a handful optional herbs for garnish and aroma

    Equipment

    • Blender
    • Measuring cups and spoons

    Method
     

    1. Add the pineapple juice, coconut milk, and rum to the blender pitcher, then sprinkle in ground ginger and a pinch of cayenne pepper if desired for a spicy kick.
    2. Toss in the ice cubes, then secure the lid firmly on the blender.
    3. Blend on high speed until the mixture is smooth and the ice is fully broken down, about 30-45 seconds. You should see a thick, frosty slush with a vibrant, slightly glossy surface.
    4. Stop the blender and check the consistency; if it’s too thick, add a splash more pineapple juice and blend briefly to loosen.
    5. Pour the slushie into chilled glasses, filling them nearly to the top to showcase the icy texture and inviting color.
    6. Garnish each glass with a few fresh mint leaves for aroma and visual appeal.
      1 cup pineapple juice

    Notes

    For an extra tropical touch, add diced fresh pineapple or a splash of pineapple liqueur. Adjust spice levels to taste for your preferred heat.

    Sharing this rum slushie has become my go-to for spontaneous gatherings or solo evenings when I need a mental getaway. The combination of icy chill and complex aromatics keeps my spirits high, no matter how hot the world gets. It’s a simple treat that reminds me summer’s joys come with a twist.

    As the season shifts and the days grow shorter, this frozen delight still calls out. It’s proof that even in the waning warmth, a little icy magic can make everything feel brighter. Cheers to keeping cool with a glass full of nostalgia and a splash of adventure.

  • Enchanting Fall: The Creamy Pumpkin Potion You Need Now

    Enchanting Fall: The Creamy Pumpkin Potion You Need Now

    As leaves swirl in shades of amber and scarlet, the air fills with a nostalgic scent of cinnamon and roasted squash. I love how pumpkin transforms from a simple vegetable to a symbol of cozy gatherings and chilly evenings. This season, I wanted a soup that’s not just comforting but also elevates those familiar fall flavors in a luscious, velvety way.

    What makes this creamy pumpkin soup truly special is its unexpected depth of flavor—layered with spices and topped with a crunchy sage garnish. It feels like wrapping yourself in a warm blanket while walking through an orchard at dawn. Perfect for a relaxed weekend or an impromptu autumn dinner party, it’s a reminder of the beauty in simple, seasonal ingredients.

    Creamy Pumpkin Soup with Sage Garnish

    This pumpkin soup is prepared by roasting fresh pumpkin chunks and then blending them with aromatic spices and broth to create a smooth, velvety texture. The finished soup is thick and creamy with a vibrant orange hue, topped with crispy sage leaves for added flavor and crunch.
    Prep Time 15 minutes
    Cook Time 45 minutes
    Total Time 1 hour
    Servings: 4
    Course: Main Course
    Cuisine: American
    Calories: 180

    Ingredients
      

    • 1 kg fresh pumpkin peeled and cubed
    • 2 tablespoons olive oil
    • 1 medium onion diced
    • 2 cloves garlic minced
    • 1 teaspoon ground cinnamon
    • 0.5 teaspoon ground nutmeg
    • 4 cups vegetable broth
    • 1 tablespoon lemon juice
    • to taste salt and pepper
    • 8 fresh sage leaves sage leaves for garnish
    • 1 tablespoon butter for frying sage

    Equipment

    • Baking sheet
    • Blender
    • Pot
    • Saucepan
    • Spoon
    • Fine mesh sieve

    Method
     

    1. Preheat the oven to 400°F (200°C). Spread the cubed pumpkin on a baking sheet, drizzle with olive oil, and toss to coat evenly. Roast for about 25-30 minutes until tender and caramelized around the edges.
    2. While the pumpkin roasts, heat a tablespoon of olive oil in a large pot over medium heat. Add the diced onion and cook, stirring occasionally, until soft and translucent, about 5 minutes. Add the minced garlic and cook for another minute until fragrant.
    3. Add the roasted pumpkin to the pot along with ground cinnamon and nutmeg. Stir to combine, allowing the spices to release their aroma.
    4. Pour in the vegetable broth, bring the mixture to a boil, then reduce the heat and simmer for 10 minutes, allowing flavors to meld and pumpkin to soften further.
    5. Remove the pot from heat and use an immersion blender or transfer the soup to a blender to puree until smooth and velvety, then return to low heat.
    6. Stir in lemon juice and season with salt and pepper to taste, adjusting the seasoning to your preference. Let the soup heat through for a couple of minutes.
    7. Meanwhile, melt butter in a small skillet over medium heat. Add the sage leaves and cook until crispy, about 1-2 minutes, until fragrant and browned around the edges.
    8. Ladle the hot soup into bowls and garnish each with the crispy sage leaves for added aroma and texture.

    Notes

    For a richer flavor, you can add a splash of cream or coconut milk before serving. The crispy sage adds a delightful contrast; be careful not to burn the leaves while frying.

    This soup is more than just a seasonal dish; it’s a celebration of fall’s bounty in a bowl. The velvety texture paired with fragrant herbs makes it a memorable starter or a satisfying main. It’s a warm, inviting recipe that feels like a quiet retreat from the busy days outside.

    Whenever the chill sets in, I find myself craving the rich, spicy notes of this pumpkin soup. It’s a dish that invites slow savoring and comfort, no matter how rushed life gets. Simply put, it turns ordinary autumn days into moments of contentment and joy.

    }

  • Chili with a Pumpkin Twist: Slow Cooker Comfort for Cooler Days

    Chili with a Pumpkin Twist: Slow Cooker Comfort for Cooler Days

    This recipe reminds me of lazy Sundays and pumpkin fields in the late afternoon sun. Every spoonful is a reminder of the season’s bounty, wrapped up in a bowl that’s both nourishing and indulgent. It’s a culinary celebration of fall’s riches, ready to be enjoyed anytime you crave something truly satisfying.

    Pumpkin Saffron Risotto

    This dish features arborio rice slowly cooked in flavorful broth, enriched with roasted pumpkin and infused with saffron threads. The final risotto has a creamy, velvety texture with tender rice grains and a warm, orange hue. It showcases the autumnal flavors and comforting consistency characteristic of classic Italian risotto.
    Prep Time 15 minutes
    Cook Time 30 minutes
    Total Time 45 minutes
    Servings: 4
    Course: Main Course
    Cuisine: Italian
    Calories: 340

    Ingredients
      

    • 1 cup arborio rice create a creamy base
    • 2 cups vegetable broth keep warm for cooking
    • 1 cup roasted pumpkin puree adds sweetness and color
    • 1/4 teaspoon saffron threads soaked in hot water
    • 1 onion, chopped for aromatic base
    • 2 tablespoons olive oil for sautéing
    • 1/2 cup dry white wine optional, for depth
    • to taste salt and pepper season to preference
    • 2 tablespoons unsalted butter for richness
    • 1/4 cup grated Parmesan cheese finishing touch

    Equipment

    • Large saucepan
    • Wooden spoon

    Method
     

    1. Heat the vegetable broth in a saucepan until just simmering, then remove from heat and keep warm.
    2. In a large pan, heat olive oil over medium heat and sauté the chopped onion until it becomes translucent and fragrant, about 3-4 minutes.
    3. Add the arborio rice to the pan, stirring constantly until it is lightly toasted and each grain is coated with oil, about 2 minutes.
    4. Pour in the white wine and cook, stirring, until most of it has evaporated, about 2 minutes.
    5. Carefully add a ladleful of warm broth and saffron, stirring constantly until the liquid is nearly absorbed.
    6. Continue adding broth one ladleful at a time, allowing each addition to be absorbed before adding the next, stirring regularly. This process takes about 20 minutes until the rice is tender and creamy.
    7. Stir in the roasted pumpkin puree, mixing well to incorporate the vibrant orange color and flavor evenly into the risotto.
    8. Add the butter and grated Parmesan cheese, stirring until melted and combined, creating a rich, velvety texture.
    9. Season with salt and pepper to taste, then remove from heat and let it rest for a minute to settle and thicken slightly.
    10. Serve the pumpkin saffron risotto hot, garnished with extra Parmesan if desired and accompanied by crusty bread or leafy greens.
    As the days grow colder, this dish offers a cozy retreat from the chill. Its rich, layered flavors make every meal a comforting occasion, a reminder of why we love seasonal cooking. Nothing beats a bowl of fall’s finest ingredients, slowly turned into something truly special.

  • The Cherry Slushie: A Frozen Berry Adventure

    The Cherry Slushie: A Frozen Berry Adventure

    Imagine biting into a mountain of icy freshness with bursts of ripe cherry flavor blazing through every sip. This recipe isn’t just about cooling down; it’s about rediscovering childhood joy in a glass, with a twist of nostalgia and modern flair. The vibrant red hue and tangy sweetness make it a perfect refreshment for any hot day.

    In this post, I’ll share a secret — how to transform simple cherries into a stunning icy treat that looks as good as it tastes. Whether you’re seeking a quick summer fix or a festive drink, this cherry slushie is surprisingly versatile. It’s a reason to celebrate the cherry season or just indulge when the dessert craving hits hard.

    Cherry Slushie

    This cherry slushie is a frozen beverage made by blending ripe cherries with sweetener and ice, resulting in a vibrant red, icy drink with a tangy and sweet flavor. The texture is smooth, refreshing, and slushy, perfect for hot days or summery gatherings.
    Prep Time 10 minutes
    Total Time 10 minutes
    Servings: 2
    Course: Main Course
    Cuisine: Summer
    Calories: 80

    Ingredients
      

    • 2 cups pitted cherries fresh or frozen
    • 2 tablespoons honey or sugar adjust to taste
    • 1 cup ice cubes more for thicker consistency
    • 1/2 cup water optional, to thin out

    Equipment

    • Blender
    • Measuring cups and spoons

    Method
     

    1. Place the cherries, sweetener, ice cubes, and water into the blender.
      2 cups pitted cherries, 2 tablespoons honey or sugar, 1 cup ice cubes, 1/2 cup water
    2. Blend on high until the mixture is smooth and ice is finely crushed, about 30-60 seconds. You should see a vibrant red, slushy texture with no large ice chunks.
    3. Stop the blender and check the consistency; add more ice if you’d like it thicker, then blend again briefly.
    4. Pour the cherry slushie into glasses, revealing an icy, ruby-red drink with a frosty surface.
    5. Garnish with a fresh cherry or a sprig of mint if desired for a pretty presentation.
    6. Serve immediately with a straw and enjoy the refreshing, icy burst of cherry flavor.
    As the summer sun blazes overhead, this cherry slushie becomes more than just a drink — it turns into a mini celebration. The bright, tart flavor cuts through the heat, offering a promise of cool relief with every sip. Plus, it’s so easy to make, you’ll want to keep it on hand for spontaneous refreshment.

    Remember, the best recipes are often born out of necessity or experimentation. This one was a happy accident involving too many cherries and a powerful blender. Now it’s a staple in my summer lineup, ready to serve up smiles whenever needed.

  • Spooky Elegance: Crafting the Perfect Halloween Graveyard Pudding Cups

    Spooky Elegance: Crafting the Perfect Halloween Graveyard Pudding Cups

    Each Halloween, I find myself enchanted by the blend of spooky and sweet, especially when it involves a dash of creative chaos in the kitchen. This year, I decided to bring a bit of storytelling into dessert with Graveyard Pudding Cups, a treat that doubles as a visual spectacle and a nostalgic journey back to childhood playtime. The moment the ingredients come together—chocolate crumbs, pudding, and gummy worms—there’s a scent of dark chocolate and a whisper of fun in the air.

    What excites me most is how this simple recipe transforms into a mini Halloween scene, perfect for parties or last-minute gatherings. It’s not just about eating, but about experiencing every spoonful as a tiny adventure into a haunted yard. Plus, it’s remarkably forgiving—an ideal chaos-friendly project for small hands or last-minute planners.

    Graveyard Pudding Cups

    Graveyard Pudding Cups are layered desserts made with chocolate pudding, crushed cookies, and gummy worms to evoke a spooky graveyard scene. They feature a creamy texture with crunchy cookie crumbs and playful gummy worms, assembled in individual cups for a visually striking presentation.
    Prep Time 15 minutes
    Total Time 15 minutes
    Servings: 4
    Course: Main Course
    Cuisine: Halloween
    Calories: 250

    Ingredients
      

    • 1 pack chocolate pudding mix or pre-made chocolate pudding
    • 1 1/2 cups milk for pudding preparation
    • 1 cup crushed chocolate cookies such as Oreo cookies, crushed into small crumbs
    • 8 gummy worms gummy worms for decoration and scene building

    Equipment

    • Small mixing bowls
    • Whisk
    • Pudding cups or small dessert glasses
    • Spoon or spatula

    Method
     

    1. Prepare the chocolate pudding according to the package instructions, whisking until smooth and no lumps remain. Chill in the refrigerator for about 10 minutes to set slightly.
    2. Spoon the slightly thickened pudding into individual serving cups or small glasses, filling each about three-quarters full. Smooth the tops with the back of a spoon.
    3. Add a generous layer of crushed cookies on top of each pudding layer to resemble dirt. Gently press the crumbs down to help them stick and create a textured surface.
    4. Insert gummy worms into the cookie crumb layer, angling some to look like emerging from the ‘dirt’ for a spooky effect.
    5. Add another layer of pudding if desired, then top with more crushed cookies to complete the scene. Decorate with additional gummy worms or small edible decorations if you’d like.
    6. Refrigerate the assembled pudding cups for at least 10 more minutes to set everything in place and allow flavors to meld.

    Creating these Graveyard Pudding Cups is about celebrating the fun of Halloween with a sprinkle of creativity. They’re easy to assemble, even easier to devour, and perfect for any spooky gathering. Whether you’re going for creepy or cute, this treat promises a memorable moment for everyone at the table.

    As the season shifts into full spooky mode, simple pleasures like these remind me why I cherish holiday traditions. They connect us through play, imagination, and a shared sense of delight. And when the last gummy worm disappears, I know the magic was just right.

  • Spook-tacularly Easy Halloween Mummy Meatballs

    Spook-tacularly Easy Halloween Mummy Meatballs

    Halloween is the perfect time to embrace a little chaos in the kitchen, especially with fun recipes like mummy meatballs. These are not just adorable—they’re nostalgic bites that remind me of childhood moments around the dinner table, but with a spooky twist. The smell of savory meat and the sight of silly, bandaged meatballs instantly bring a playful spirit to any Halloween gathering.

    Each bite is a blend of juicy meat and crispy cheese, wrapped in gooey, white strips that resemble mummy wrappings. This dish transforms a simple family-favorite into a conversation-starting, crowd-pleasing platter. It’s the kind of recipe that makes everyone giggle and grab seconds with hands still dusted in flour and cheese.

    ## WHY I LOVE THIS RECIPE?
    – It combines creativity with convenience, perfect for busy spooky nights.
    – The messy, playful look sparks joy and nostalgia.
    – It’s a great way to get kids involved in the kitchen.
    – The aroma of garlic and seasoned beef fills the house.
    – Makes a stunning centerpiece at any Halloween table.

    ## AVOID MY DISASTER (You’re Welcome)
    – FORGOT to spray the baking sheet; the meatballs stick terribly. Use parchment paper instead.
    – DUMPED cheese too early; it oozed everywhere. Wait until the last minute for topping.
    – OVER-TORTURED the cheese strips; they became brittle. Keep them soft for easy wrapping.
    – BURNED a batch; the tops turned dark and tough. Keep an eye on the oven and set a timer.

    ## QUICK FIXES THAT SAVE YOUR DAY
    – If meatballs stick, splash some oil under them before baking.
    – When cheese falls apart, patch with extra shredded cheese and bake briefly.
    – Shield overworked cheese strips with a damp cloth, then reheat slightly.
    – When buns are too dark, quick freeze to stop cooking, then serve.
    – When cheese isn’t melting well, sprinkle with a splash of milk and microwave gently.

    The charm of these mummy meatballs isn’t just in their look but their comfort-food essence when paired with a bright tomato sauce. Making them now is a perfect way to add a bit of whimsy and warmth to your Halloween feast. The smell of seasoned meat, baked cheese, and holiday spirit will linger long after the last mummy is eaten.

    Halloween Mummy Meatballs

    These mummy meatballs are made by shaping seasoned ground beef into balls, baking them until cooked through, and then wrapping them with strips of melted cheese to resemble bandages. The final dish features crispy edges with gooey cheese strips on top, creating a playful and spooky appearance suitable for Halloween gatherings.
    Prep Time 15 minutes
    Cook Time 20 minutes
    Total Time 35 minutes
    Servings: 8
    Course: Main Course
    Cuisine: American
    Calories: 350

    Ingredients
      

    • 1.5 pounds ground beef preferably 80% lean
    • 1 cup shredded cheese cheddar or mozzarella works well
    • 1 clove garlic minced
    • 1 tsp salt
    • 0.5 tsp black pepper
    • 1 tbsp olive oil for greasing

    Equipment

    • Baking sheet
    • Parchment paper
    • Mixing bowl
    • Skewers or toothpicks
    • Oven

    Method
     

    1. Preheat your oven to 400°F (200°C) and line a baking sheet with parchment paper. In a mixing bowl, combine the ground beef, minced garlic, salt, and pepper. Mix gently until evenly incorporated, avoiding overworking the meat.
    2. Shape the seasoned meat mixture into 1 to 1.5-inch meatballs using clean hands, rolling each into a smooth sphere. Arrange the meatballs on the prepared baking sheet, spacing them evenly apart.
    3. Bake the meatballs in the preheated oven for about 15-20 minutes, or until they are cooked through and browned on the outside, with juices running clear when pierced.
    4. Remove the meatballs from the oven and let them cool slightly until manageable. Carefully cut or tear the shredded cheese into thin strips, long enough to resemble mummy bandages.
    5. Wrap the top of each meatball with the cheese strips, starting from one side and gently pressing to adhere, creating a bandage-like appearance. Leave small gaps for the ‘eyes’ if desired, or add edible decorations later.
    6. Optionally, use small bits of cheese or edible decorations to create ‘eyes’ for the mummy. Place them gently on top of the cheese-wrapped meatballs.
    7. Serve the mummy meatballs warm, paired with a dipping sauce like marinara or pizza sauce for a fun, spooky presentation that’s perfect for Halloween parties.

    Notes

    For a more decorative touch, add small edible eyes made from olives or peppercorns. Keep cheese strips soft by briefly microwaving if they become brittle before wrapping.
    These mummy meatballs are more than just a festive appetizer; they’re a recipe that keeps the fun rolling through the season. The imperfect, sticky, cheesy moments are what make cooking memorable and lively.

    In a world where Halloween is all about playful surprises and spooky traditions, these meatballs capture the spirit perfectly. They turn an ordinary dinner into a deliberate mess of joy and flavor—potent reminders that sometimes, the best moments come from a little chaos in the kitchen.

  • Morning Sunshine: The Unconventional Charm of Healthy Pumpkin Pancakes

    Morning Sunshine: The Unconventional Charm of Healthy Pumpkin Pancakes

    Imagine waking up on a crisp fall morning, the aroma of cinnamon and roasted pumpkins filling your kitchen. These healthy pumpkin pancakes are not just a breakfast; they’re a little celebration of the season’s bounty in every bite. Using pureed pumpkin and warm spices, they bring a surprising depth of flavor that makes mornings feel special.

    What sets this recipe apart is its focus on nourishing your body without sacrificing flavor. The batter is quick to come together, yet the result feels indulgent and satisfying. It’s perfect for those who crave comforting mornings that also keep health at the forefront.

    Healthy Pumpkin Pancakes

    These pumpkin pancakes involve mixing a batter of pureed pumpkin, flour, baking powder, and warm spices, then cooking them on a griddle until golden brown. The final pancakes have a fluffy texture with a moist crumb and a warm orange hue, perfect for a cozy breakfast. They combine seasonal flavors with a tender, satisfying bite.
    Prep Time 10 minutes
    Cook Time 15 minutes
    Total Time 25 minutes
    Servings: 4
    Course: Main Course
    Cuisine: American
    Calories: 250

    Ingredients
      

    • 1 1/2 cups all-purpose flour preferably sifted
    • 1 tablespoon baking powder
    • 1 teaspoon ground cinnamon
    • 1/2 teaspoon ground ginger
    • 1/4 teaspoon ground nutmeg
    • 1/2 teaspoon salt
    • 1 cup pure pumpkin puree not pumpkin pie filling
    • 1 cup milk
    • 2 large eggs
    • 1/4 cup maple syrup or honey
    • 2 tablespoons melted butter

    Equipment

    • Mixing bowl
    • Whisk
    • Griddle or skillet
    • Spatula

    Method
     

    1. In a large mixing bowl, whisk together the sifted flour, baking powder, cinnamon, ginger, nutmeg, and salt to combine the dry ingredients evenly.
    2. Add the pumpkin puree, milk, eggs, maple syrup, and melted butter to the dry mixture.
    3. Whisk all the ingredients together until the batter is smooth and just combined, with no streaks of flour remaining. The batter should be slightly thick but pourable.
    4. Heat a griddle or non-stick skillet over medium heat until warm. Lightly grease with butter or oil to prevent sticking.
    5. Pour about 1/4 cup of batter onto the hot surface for each pancake. Cook until bubbles form on the surface and the edges look set, about 2-3 minutes.
    6. Flip the pancakes carefully using a spatula and cook for another 2-3 minutes until golden brown and cooked through.
    7. Repeat with the remaining batter, adjusting heat as needed to prevent burning while ensuring thorough cooking.
    8. Transfer the cooked pancakes to a plate and keep warm while you finish the rest. Serve immediately with your favorite toppings like syrup, nuts, or additional pumpkin if desired.

    Notes

    For fluffier pancakes, let the batter rest for 5 minutes before cooking. Adjust sweetness by varying the maple syrup to taste.
    As the days grow shorter and the air turns cooler, these pumpkin pancakes become a cozy ritual. They’re a simple way to embrace the seasonal shift while nourishing your body with wholesome ingredients.

    This recipe offers a balance of comfort and nourishment, reminding us that healthy food can be exciting and deeply satisfying. A little pumpkin, a touch of spice—every bite is an ode to the slow, flavorful mornings of autumn.

  • Chill Out with an Unusual Pi Colada Slushie Twist

    Chill Out with an Unusual Pi Colada Slushie Twist

    Imagine a summer afternoon where typical drinks feel too predictable. Instead, you stumble upon a hidden gem in your freezer: a frozen, creamy pi colada slushie that transports you straight to a tropical beach. This isn4t your average blender job; it4s a playful take on nostalgia, with a little chaos thrown in for good measure.

    What makes this slushie special isn4t just the flavor but the experience. The coconut and pineapple scent floods your senses as you sip through its icy, velvety texture. It4s perfect for unexpected guests or a self-care moment when you want something both fun and oddly sophisticated.

    Frozen Piña Colada Slushie

    This frozen piña colada slushie is a creamy, icy beverage made with coconut and pineapple ingredients blended to a velvety smooth consistency. Its appearance is a frosty, pale yellow mixture with a thick texture suitable for spooning or sipping through a straw. The combination of tropical flavors and icy texture creates a refreshing treat perfect for warm days or casual gatherings.
    Prep Time 10 minutes
    Total Time 10 minutes
    Servings: 2
    Course: Main Course
    Cuisine: Tropical
    Calories: 150

    Ingredients
      

    • 2 cups frozen pineapple chunks preferably unsweetened
    • 1 cup unsweetened shredded coconut for extra creaminess and flavor
    • 1 cup coconut milk full-fat for a richer texture
    • ½ cup pineapple juice adds pineapple flavor and liquid
    • 2 tablespoons sweetened condensed milk optional for extra sweetness

    Equipment

    • Blender
    • Measuring cups and spoons

    Method
     

    1. Add the frozen pineapple chunks, shredded coconut, coconut milk, pineapple juice, and sweetened condensed milk into your blender.
    2. Secure the lid and blend on high speed for about 30-45 seconds until the mixture is smooth, thick, and icy, with no chunks remaining.
    3. Stop the blender and check the texture; if it’s too thick, add a little more pineapple juice or coconut milk and blend again briefly.
    4. User a spatula to scrape down the sides of the blender, ensuring everything is evenly mixed and smooth.
    5. Pour the slushie into chilled glasses or bowls, revealing its pale yellow, frosty appearance.
    6. Serve immediately with a straw or a spoon, and enjoy the creamy, icy tropical flavors with a velvety texture.

    Notes

    For an extra fancy touch, garnish with pineapple slices or a maraschino cherry.

    This pi colada slushie feels like an unexpected vacation in every sip. As the heat of summer climbs, it offers a cool respite that balances creamy coconut with bright pineapple notes. It turns any ordinary day into an escape, even if just for a few moments.

    Keeping it simple makes this drink a go-to for last-minute gatherings or solo afternoons. No fancy equipment needed—just a good blender and a bit of daring. Sometimes, the best memories come from the unplanned and the perfectly imperfect.

  • Spooky Scarlet Sip: Halloween Vampire Punch with a Twist

    Spooky Scarlet Sip: Halloween Vampire Punch with a Twist

    Halloween parties are all about the unexpected, and this Vampire Punch proves it can be both creepy and captivating. The vibrant red hue of the juice reminiscent of spilled blood makes it a perfect centerpiece for your haunted gathering. I love how this punch transforms simple fruit juices into a mysterious, bubbling potion that delights kids and adults alike.

    The best part? No kooky ingredients needed—just a splash of imagination and some readily available supplies. Watching this punch shimmer and swirl with each added ice cube feels like conjuring magic in a glass. It’s a punch that invites you to embrace the chaos of the season while keeping things refreshingly simple.

    Vampire Punch

    Vampire Punch is a vibrant red beverage made from fruit juices that resembles spilled blood, creating a spooky atmosphere for Halloween parties. The punch is mixed with soda and ice to achieve a bubbly, swirling effect with a refreshing finish. Its bright color and fizzy texture make it both visually striking and delightful to drink.
    Prep Time 10 minutes
    Total Time 10 minutes
    Servings: 8
    Course: Main Course
    Cuisine: Halloween
    Calories: 80

    Ingredients
      

    • 2 cups orange juice chilled
    • 2 cups cranberry juice unsweetened for a deeper color
    • 1 cup lemon-lime soda well chilled
    • 1 cup water
    • 1/2 cup sugar optional, for extra sweetness
    • ice cubes ice cubes enough to fill serving glasses

    Equipment

    • Large pitcher
    • Measuring cups
    • Spoon or stirrer
    • Drinking glasses

    Method
     

    1. Pour the orange juice and cranberry juice into a large pitcher, then stir gently to combine, creating a deep, blood-red color.
    2. Add the water and optional sugar to the mixture, stirring until the sugar dissolves completely. This helps balance the tartness and enhances the flavor.
    3. Chill the mixture in the refrigerator for at least 10 minutes to ensure it’s cold and refreshing.
    4. Just before serving, pour in the lemon-lime soda, gently mixing to add fizz and a shimmering effect to the punch.
    5. Fill each glass with ice cubes to create a chilling base for the punch. Then, carefully pour the chilled mixture over the ice, allowing the color and bubbles to swirl together.
    6. For an extra spooky touch, scatter a few more ice cubes on top and garnish with gummy worms or Halloween-themed decorations if desired.

    Notes

    Serve immediately for the best fizz and visual effect. You can prepare the juice mixture ahead of time, but add the soda just before serving to keep the bubbles lively.

    Sharing this Vampire Punch isn’t just about the spooky look; it’s about creating a moment of fun that everyone remembers. As your guests sip on this eerie red potion, they’ll get a whiff of sweet fruitiness and a hint of citrus that keeps it lively. Plus, the ease of assembly means you can focus on the spooky details and not the kitchen chaos.

    So, whether you’re hosting a haunted house or just want a pop of color on your holiday table, this punch fits right in. It captures the spirit of Halloween—playful, a little chaotic, and surprisingly delightful in every sip.