
This chicken cubes recipe is all about making your life easier without sacrificing flavor. I love how these little pieces can be whipped up quickly and still taste like you’ve put some real effort in. It’s the kind of dish that feels like a small victory in my busy kitchen, especially when I need something reliable and satisfying.
What I really appreciate is how versatile these cubes are. Toss them into salads, stir-fry them with veggies, or just serve them with a quick dip — they adapt to whatever I’m craving that day. Plus, they store well, so I often batch-cook and keep some in the fridge for those rushed evenings when dinner needs to be simple but not boring.
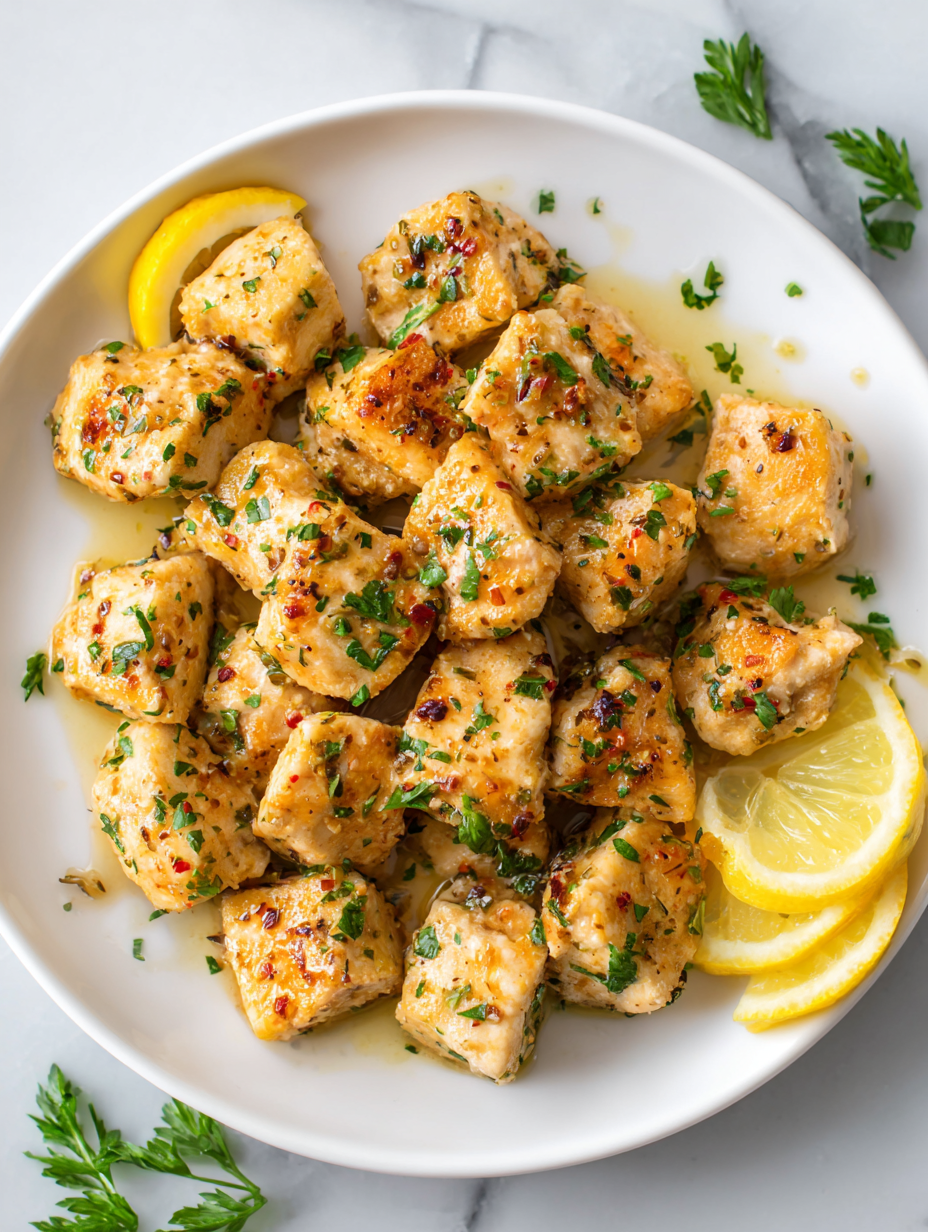
Focusing on the versatility of chicken cubes — how they can turn a quick snack into a full meal, or be the perfect addition to salads, wraps, or stir-fries, emphasizing their practical, everyday usefulness.
The story behind this recipe
- I stumbled on this chicken cubes idea during a hectic week when I needed quick protein but wanted something more than just boiled chicken. It reminded me of childhood snacks, but with a modern twist I could toss into salads or serve with rice. That moment of improvisation turned into a go-to recipe I keep coming back to.
- It’s funny how simple ingredients and a bit of patience can turn into something satisfying. I remember the smell of roasted chicken filling the kitchen, making everything feel calmer despite the chaos outside. Now, it’s my little trick for a quick, wholesome bite that’s dependable and flexible.
- heading: “The story behind this recipe”
Ingredient breakdown: key components
- Chicken breast: I prefer skinless, boneless strips for quick cooking and clean bites, but you can use thighs for juicier, richer flavor—just adjust cooking time slightly.
- Oil: A neutral oil like grapeseed or canola keeps the chicken from sticking and helps achieve a golden crust—skip the olive if you want a more delicate sear.
- Salt: I like to season generously here—salting early helps tenderize and boost flavor, but taste and adjust before cooking if using salty broths or marinades.
- Pepper: Freshly ground pepper adds a bright, spicy note—don’t skip it if you want that subtle depth, but feel free to add smoked paprika for a smoky kick.
- Optional herbs & spices: A pinch of thyme or garlic powder elevates the flavor—use sparingly at the start to build layers, or sprinkle fresh herbs at the end for brightness.
- Cornstarch (or flour): Light coating helps the chicken develop a crisp exterior—don’t overdo it to avoid a gummy texture, just a thin dusting.
- Lemon juice (or vinegar): Brightens the dish with a quick splash—add just before serving for that fresh zing, especially if the chicken sits for a bit.
Spotlight on Key Ingredients
Chicken breast:
- I prefer skinless, boneless strips for quick cooking and clean bites, but you can use thighs for juicier, richer flavor—just adjust cooking time slightly.
- ingredient
- Chicken breast
Oil:
- A neutral oil like grapeseed or canola keeps the chicken from sticking and helps achieve a golden crust—skip the olive if you want a more delicate sear.
- ingredient
- Oil
Notes for ingredient swaps
- Dairy-Free: Skip dairy-based marinades or sauces; use coconut aminos or olive oil for moisture, but expect a different richness.
- Low-Sodium: Use unsalted chicken and reduce added salt; flavors might be milder but still tasty with herbs and spices.
- Gluten-Free: Coating with rice flour or tapioca starch works well; avoid wheat flour to keep it gluten-free and light.
- Herb Variations: Swap thyme for rosemary or oregano—each adds a distinct aroma and flavor, so choose based on your mood.
- Acid Adjustments: If lemon juice is too sharp, substitute with a touch of apple cider vinegar for a milder tang.
- Sweet Touch: Add a teaspoon of honey or maple syrup in the marinade for a hint of sweetness that balances savory notes.
- Oil Choices: Use sesame or avocado oil instead of neutral oils for extra flavor, especially in stir-fries or Asian-inspired dishes.
Equipment & Tools
- Large cast-iron skillet: Provides even heat for a crispy exterior.
- Sharp knife: Quick, clean cuts into uniform cubes.
- Spatula or tongs: Turns chicken pieces without tearing.
- Measuring spoons: Accurate seasoning and oil measurement.
Step-by-step guide to chicken cubes
- Equipment setup: Use a large, heavy skillet—preferably cast iron—for even heat. Have a sharp knife and a cutting board ready for quick prep.
- Cut chicken into uniform 1-inch cubes. Season generously with salt, pepper, and a pinch of garlic powder. Let sit for 10 minutes while heating the pan.
- Heat the skillet over medium-high heat (about 190°C / 375°F). Add 1-2 tablespoons of oil until shimmering but not smoking.
- Add chicken cubes in a single layer. Don’t crowd the pan; cook in batches if needed. Sear for 2-3 minutes without moving, until edges turn golden.
- Flip the cubes using tongs or a spatula. Cook for another 2-3 minutes, watching for a nice brown crust and firm texture. If sticking, loosen gently with a spatula.
- (a) Check for doneness: Chicken should be opaque and slightly firm to the touch. (b) If juices run clear when pierced, it’s done. (c) For extra safety, probe temp should read 75°C / 165°F.
- Remove chicken cubes from heat. Optional: Toss with a squeeze of lemon or fresh herbs for brightness. Rest for 2 minutes before serving or adding to dishes.
Let the chicken rest for 2 minutes to redistribute juices. Serve as is or toss into salads, wraps, or stir-fries for quick meals.
How to Know It’s Done
- Golden crust forms on all sides, no sticking or burnt bits.
- Juices run clear when pierced, indicating doneness.
- Internal temperature reaches 75°C / 165°F for safety.
Simple Chicken Cubes
Ingredients
Equipment
Method
- Begin by cutting the chicken into uniform 1-inch cubes, ensuring they are roughly the same size for even cooking. Place the cubes in a bowl and sprinkle with salt, pepper, and garlic powder, then toss to coat evenly. Let sit while you prepare the pan.
- Heat a large cast-iron skillet over medium-high heat until shimmering. Add the oil and swirl to coat the bottom of the pan. The oil should sizzle lightly when the chicken is added.
- Add the coated chicken cubes to the hot skillet in a single layer, making sure not to overcrowd the pan. Let them sear undisturbed for about 2-3 minutes until the edges turn golden and crispy.
- Using tongs or a spatula, flip the chicken cubes to sear the other sides. Cook for another 2-3 minutes, until the cubes are golden brown all over and cooked through. The chicken should feel firm but juicy when pressed.
- Check the doneness by piercing a cube—juices should run clear, and the interior should be opaque. If using a thermometer, internal temperature should reach 75°C (165°F). Remove the chicken from the pan and transfer to a plate.
- If desired, squeeze fresh lemon juice over the hot chicken cubes to brighten the flavor. Serve immediately or incorporate into salads, wraps, or stir-fries for a quick meal.
Pro Tips for Perfect Chicken Cubes
- Use a hot pan to achieve a crispy crust quickly, about 190°C / 375°F.
- Don’t overcrowd the pan; cook in batches to keep the heat high and the chicken evenly seared.
- Pat chicken cubes dry before seasoning to promote browning and avoid steaming.
- Turn the cubes only once they release easily and have a golden edge, about 2-3 minutes per side.
- Add lemon juice or herbs at the end to preserve brightness and fresh aroma.
- For extra crispiness, toss cooked cubes in a little cornstarch before searing.
- Rest the chicken for a couple of minutes after cooking to let juices settle, keeping it moist.
Common mistakes and how to fix them
- FORGOT to pat chicken dry → Soggy cubes; pat thoroughly for crispness.
- DUMPED sauce in too early → Soggy texture; add at the end for crisp exterior.
- OVER-TORCHED the chicken → Dry, tough meat; cook on medium-high, watch closely.
- FAILED to heat the pan properly → Sticking and uneven browning; preheat until shimmering.
Quick fixes and pantry swaps
- When chicken sticks, splash a little water into the pan and gently loosen with a spatula.
- If chicken is overcooked and dry, rest it for 5 minutes to reabsorb juices.
- Dumped too much oil? Patch with absorbent paper, then wipe pan and start fresh.
- Over-torched? Shield with a lid or lower the heat and add a splash of broth to cool.
- When pantry runs low on fresh herbs, swap with dried herbs—use sparingly for flavor, not texture.
Prep, store, and reheat tips
- Prep the chicken cubes by seasoning and cutting them into uniform pieces. Store in an airtight container for up to 24 hours for optimal freshness and flavor development.
- Cooked chicken cubes can be refrigerated for 3-4 days. Keep in a sealed container to prevent drying out and absorption of other fridge odors.
- For longer storage, freeze the cubes in a freezer-safe bag or container for up to 3 months. Thaw overnight in the fridge before reheating.
- Reheat gently in a skillet over medium heat or in the oven at 180°C / 350°F until warmed through, about 5-7 minutes. Expect the exterior to regain some crispness, and watch for dry edges.
- The flavor can deepen slightly after sitting; a quick splash of lemon or fresh herbs before serving can brighten the dish again, especially after reheating.
Top questions about Chicken Cubes
1. Can I use chicken thighs instead of breasts?
Use boneless, skinless chicken breast for quick, tender cubes. If you want juicier meat, thighs work too, just adjust cooking time.
2. How do I know when chicken cubes are done?
Cook chicken cubes over medium-high heat until they turn golden and are no longer pink inside, about 6-8 minutes total.
3. Should I marinate the chicken before cooking?
Pre-season the chicken with salt and pepper, then sear in a hot pan. For extra flavor, add herbs or spices during cooking.
4. Do I need to dry the chicken before cooking?
Yes, pat the chicken dry before seasoning to ensure crispy edges. Wet chicken tends to steam rather than sear.
5. What temperature should I cook the chicken cubes at?
Keep the heat at medium-high to get a good sear. If the pan smokes excessively, lower the temp slightly and add a splash of oil.
6. How long can I keep cooked chicken cubes in the fridge?
Store cooked chicken cubes in an airtight container in the fridge for up to 3 days. Reheat in a hot pan until steaming and crispy again.
7. Can I freeze chicken cubes for later use?
To freeze, place the cooked or raw cubes in a sealed bag or container for up to 3 months. Thaw in the fridge overnight before reheating.
8. What’s the best way to check doneness?
Use a meat thermometer to check for 75°C / 165°F inside the cube. The outside should be golden and slightly crisp, with no pink remaining.
9. How can I make the chicken cubes crispier?
For extra crispiness, toss the raw cubes lightly in cornstarch before searing. This helps develop a crunchy exterior.
10. What if the chicken sticks to the pan?
If the chicken sticks, splash a small amount of water or broth into the pan and gently loosen with a spatula. Avoid forcing it to prevent tearing.
This recipe for chicken cubes is a simple reminder that good food doesn’t have to be complicated. Sometimes, just a few good ingredients and a bit of attention make all the difference. It’s perfect for those busy days when you want something reliable but still flavorful.
I keep coming back to this because it’s adaptable, forgiving, and honestly pretty satisfying to see those golden pieces come together. Whether you’re tossing them into a salad or serving them up as a quick snack, they always save the day in my kitchen.

Founded by Rachel Morgan, a proud home cook and foodie from Austin, Texas, this blog is all about transforming everyday meals into moments of joy.