
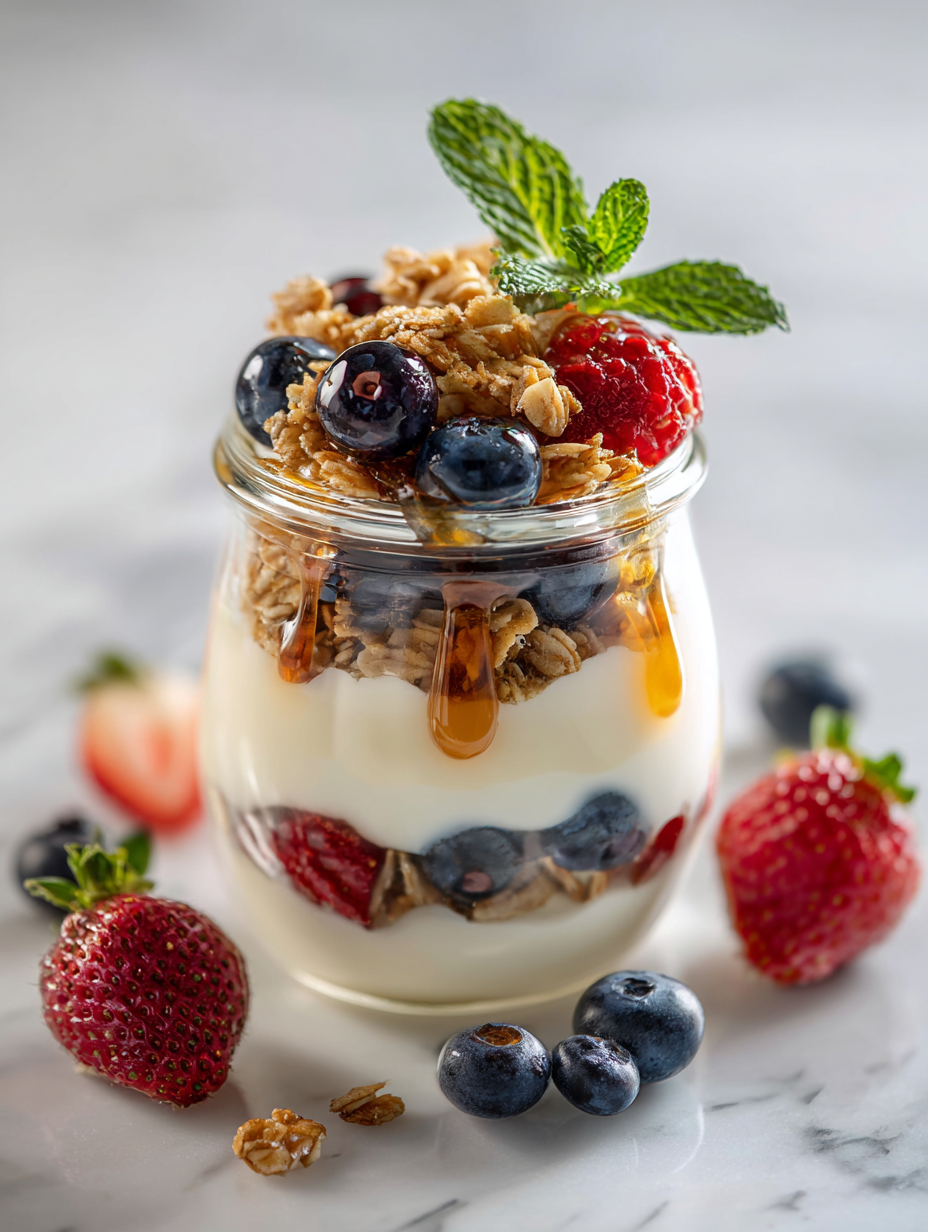
This yogurt snack jar is my go-to for mornings that feel too rushed for anything elaborate. It’s a tiny act of self-care, packed in a portable jar, perfect for grabbing on the way out the door. The best part? You can customize it with your favorite toppings or fruits, making it a small, personal treat that feels indulgent but is actually super simple.
I love how these jars turn a basic snack into a mindful moment. It’s not just about eating; it’s about slowing down enough to enjoy each spoonful. Plus, they’re easy to prep ahead—just toss everything in, and you’ve got a balanced mini-meal ready in minutes. It’s like a little ritual that keeps me grounded during busy mornings or quick breaks.
Focusing on how this yogurt snack jar can be a portable, personalized mini-meal that fits into busy mornings or quick breaks, turning a simple snack into a small act of self-care and mindful eating.
The story behind this recipe
- This recipe came about when I was cleaning out my fridge and found a lonely jar of yogurt that needed using up. Instead of tossing it, I grabbed whatever toppings I had—granola, honey, a handful of berries—and layered them in a jar. That moment of improvisation turned into my favorite quick snack, especially when I want something satisfying but light.
- I started making these snack jars for my kids’ school lunches, but honestly, I love how flexible they are. It’s a tiny project that feels like a little act of care. Plus, I get to experiment with flavors—sometimes spicy, sometimes sweet, always satisfying. It’s become a small ritual that keeps me grounded during hectic days.
- heading: The story behind this recipe
Ingredient breakdown: key components
- Greek yogurt: I enjoy the thick, creamy texture and tangy flavor, which makes the snack feel indulgent. Swap with coconut yogurt if you want dairy-free, but expect a milder tang.
- Honey or maple syrup: Adds a natural sweetness that balances the tart yogurt. Drizzle sparingly at first—you can always add more, but never take it out.
- Fresh berries: I love the burst of juice and bright color they bring; blueberries or raspberries work well. Frozen berries are fine, just thaw and drain excess moisture to avoid sogginess.
- Granola: Provides crunch and a toasty aroma that contrasts the smooth yogurt. Opt for a nutty, gluten-free version if you prefer, but be mindful of moisture absorption.
- Chia seeds: They swell and develop a gel-like texture, adding a slight crunch and richness. Use a teaspoon for a gentle boost or skip if you dislike the texture.
- Citrus zest: A splash of lemon or orange zest brightens the whole jar with a zingy aroma. Use fresh zest and avoid the bitter white pith for a cleaner flavor.
- Optional toppings: Nuts, coconut flakes, or a dollop of nut butter. Think of these as finishing touches that add texture and depth—don’t skimp on them.
Spotlight on key ingredients
Greek yogurt:
- I love its thick, velvety texture and tang that makes every bite feel rich. If you prefer dairy-free, coconut yogurt offers a milder, slightly sweet alternative.
- Berries: They burst with juice and vibrant color, adding a refreshing tartness. Frozen berries are fine—just thaw and drain excess moisture to keep your jar from getting soggy.
Granola:
- Honey: It’s the natural sweetness that balances the tang, adding a caramel-like aroma. Drizzle sparingly—too much can overpower the delicate flavors.
- Provides crunch and toasty warmth, contrasting the creamy yogurt. Look for options with nuts or seeds for extra texture and flavor depth.
Notes for ingredient swaps
- Dairy-Free: Swap Greek yogurt for coconut or almond yogurt. Expect a milder tang and a slightly thinner texture.
- Sweetener Options: Use agave nectar or brown rice syrup instead of honey. They bring different flavor notes but keep the sweetness.
- Fruits: Replace berries with sliced peaches or mango for a tropical twist. Fresh or frozen works, just drain excess moisture if frozen.
- Crunchy Toppings: Substitute granola with toasted nuts or sunflower seeds for a different crunch and richer flavor.
- Seeds: Chia seeds can be replaced with hemp seeds or omitted altogether. They add a gel-like texture and healthy fats.
- Zest: Lime zest can lend a sharper, more vibrant aroma compared to lemon or orange—use sparingly.
- Extras: Swap nuts or coconut flakes for cacao nibs or dried fruit for varied textural and flavor profiles.
Equipment & Tools
- Small jar with lid: To layer and store the snack, portable and easy to transport.
- Spoon: For scooping, spreading, and layering ingredients.
- Sharp knife: To chop nuts or zest citrus.
- Cutting board: A stable surface for prepping toppings.
Step-by-step guide to yogurt snack jar
- Gather your equipment: a small jar with a lid, a spoon, a sharp knife, and a cutting board. The jar should be wide-mouthed for easy layering.
- Prepare your toppings: wash berries, chop nuts if needed, and zest citrus if using. Keep everything within arm’s reach.
- Start with a base layer: scoop about 3/4 cup of Greek yogurt into the jar. Use the back of a spoon to smooth it out.
- Add a drizzle: pour 1 teaspoon of honey or maple syrup over the yogurt. Adjust sweetness to taste.
- Layer your toppings: add a handful of berries, sprinkle granola, and sprinkle chia seeds if using. Aim for 2-3 layers, keeping it colorful and inviting.
- Finish with a final layer of yogurt: spoon the remaining yogurt on top, smoothing it gently. Add a few berries or nuts as a garnish if desired.
- Seal the jar tightly with the lid. Give it a gentle shake or swirl to distribute flavors if you like, but avoid overmixing.
- Rest for a few minutes: let the jar sit in the fridge for at least 10 minutes if you want flavors to meld, or serve immediately for a fresh crunch.
- Serve directly from the jar or transfer to a bowl. Enjoy the contrast of creamy, tangy, sweet, and crunchy in each bite.
Seal the jar tightly and store in the fridge if not eaten immediately. For best texture, consume within 24 hours. Serve straight from the jar or transfer to a bowl for a more polished presentation.
How to Know It’s Done
- Colorful layers visible through the jar, no excess liquid pooling.
- Fruits are vibrant and slightly softened but not mushy.
- Yogurt is creamy and holds its shape without runny liquid.
Yogurt Snack Jar
Ingredients
Equipment
Method
- Start by washing and preparing your toppings: drain excess moisture from thawed berries, zest your citrus, and chop nuts if using. Keep everything within reach for easy layering.
- Scoop about three-quarters of a cup of creamy Greek yogurt into your small jar, using the back of a spoon to spread it evenly across the bottom.
- Drizzle a teaspoon of honey or maple syrup over the yogurt, gently swirling it in to add a touch of sweetness.
- Add a handful of fresh berries on top, creating a vibrant, juicy layer that bursts with color and flavor.
- Sprinkle a quarter cup of toasted granola over the berries, adding crunch and warmth to the layers.
- Sprinkle a teaspoon of chia seeds over the granola for added texture and healthy fats, if desired.
- Use a microplane or zester to grate fresh citrus zest over the layered ingredients, brightening the flavor with a zingy aroma.
- Add another layer of the remaining yogurt, smoothing it lightly for a clean, finished look on top.
- Garnish with extra berries, nuts, or coconut flakes if desired, then seal the jar tightly with the lid.
- Enjoy immediately for the freshest crunch, or refrigerate for up to 24 hours—just add crunchy toppings right before serving to keep them crisp.
Notes
Pro tips for perfect yogurt jars
- layering: Press ingredients gently to create distinct, colorful strata that look as good as they taste.
- flavor: Drizzle honey slowly while listening for a gentle drizzle sound to avoid over-sweetening.
- texture: Add granola just before serving to keep it crisp and prevent sogginess.
- aroma: Zest citrus directly over the jar for a burst of fragrant brightness that wakes up the palate.
- presentation: Use a small spoon to swirl ingredients slightly for an inviting, layered look.
- temperature: Chill the jar for at least 10 minutes to enhance flavor melding and set the layers.
- fix: If your yogurt is too runny, stir in a pinch of powdered gelatin or chia seeds to thicken.
Common Yogurt Snack Jar Mistakes
- FORGOT to check yogurt consistency → Use full-fat for creaminess, or skim for lightness.
- DUMPED ingredients without tasting → Always taste before layering, adjust sweetness or acidity as needed.
- OVER-TORCHED granola → Toast until golden, not dark; burnt granola turns bitter.
- MISSED layering order → Layer ingredients carefully for balanced flavor and texture in each bite.
Quick fixes and pantry swaps
- When yogurt is too runny, stir in a teaspoon of chia seeds for instant thickness.
- Splash a little lemon juice into your berries to brighten their flavor and preserve color.
- Patch a cracked jar with tape to prevent leaks during transport, then replace with a fresh lid.
- Shield the top layer with a piece of plastic wrap if layering gets messy or ingredients start to separate.
- If you forget to add toppings, sprinkle a pinch of cinnamon or nutmeg for instant flavor boost.
Make-Ahead & Storage Tips
- Prep ingredients like berries and zest a day ahead; keep refrigerated for fresh, vibrant flavors.
- Assemble the yogurt jars up to 24 hours in advance; store in a sealed container in the fridge to maintain freshness.
- The flavor deepens over time, so consider adding crunchy toppings just before serving to keep them crisp.
- Reheat is unnecessary—serve cold straight from the fridge for the best texture and flavor contrast.
- The yogurt mixture remains good for about 24-48 hours; after that, the texture may start to separate.
Top questions about Yogurt Snack Jar
1. Can I use dairy-free yogurt?
Use full-fat Greek yogurt for creaminess; dairy-free options like coconut yogurt are milder but satisfying.
2. How do I sweeten the yogurt?
Add honey or maple syrup to sweeten. Start small; you can always add more after tasting.
3. Can I use frozen berries?
Frozen berries work well—just thaw and drain excess moisture to keep the jar from getting soggy.
4. Should I add granola before or after storing?
Granola adds crunch; choose your favorite, and add just before eating to keep it crisp.
5. What do chia seeds do?
Chia seeds swell and develop a gel-like texture, adding richness. Use a teaspoon for a subtle effect.
6. How do I add citrus zest?
Zest citrus directly over the jar for a fresh, bright aroma that enhances the flavor.
7. What kind of jar should I use?
Use a small jar with a lid for easy layering and portability, perfect for on-the-go snacks.
8. Any tips for layering?
Layer ingredients carefully, pressing gently to create distinct, colorful strata in the jar.
9. How far in advance can I make this?
Prepare toppings ahead, assemble just before serving, and store in the fridge for up to 24 hours.
10. My yogurt is too watery, what can I do?
If the yogurt is too runny, stir in a teaspoon of chia seeds or gelatin for instant thickening.
This yogurt snack jar is more than just a quick treat; it’s a small act of care that fits into busy days without fuss. The combination of creamy yogurt, bright fruit, and crunch from granola keeps me grounded and satisfied. It’s a simple reminder to enjoy the little moments, even when time feels tight.
Whenever I make these jars, I appreciate how versatile and forgiving they are. They’re perfect for mornings, lunches, or lazy afternoons, and always feel like a little celebration of mindful eating. In a world that moves fast, these jars slow me down just enough to savor each spoonful.

Founded by Rachel Morgan, a proud home cook and foodie from Austin, Texas, this blog is all about transforming everyday meals into moments of joy.