
Getting a perfect sear on scallops is all about moisture control. I used to rush through drying them, thinking it didn’t matter much, but then I’d end up with steamed rather than caramelized surfaces. Once I slowed down, patted them thoroughly dry, and kept the moisture out, everything changed. That little step makes all the difference between a dull, gray scallop and one that’s golden-brown and juicy inside.
This recipe is my go-to for when I want something impressive but simple. It’s honestly like a small miracle how a few minutes in a hot pan can transform a humble seafood piece into something special. Plus, the process feels almost meditative — the crackle, the smell of browning butter, and that little moment when you flip them and see the perfect sear forming. It’s satisfying in a way that makes me want to cook scallops more often.
And I’ve learned that it’s not just about the sear. Proper moisture removal helps everything stick to the pan better, and that’s where the magic happens. No sticking, no slipping, just that beautiful, caramelized crust that seals in all the sweet, tender scallop meat beneath.
Focusing on the overlooked importance of the scallops’ moisture content and how properly drying them can make or break the perfect sear.
The overlooked moisture detail
- I remember the first time I got a perfect sear—smelled like toasted butter and a hint of caramel, it was pure joy.
- There’s a rush of pride when I see that golden crust form without sticking or tearing—like a tiny victory every time.
- Cooking scallops this way reminds me of summer nights by the coast, fresh and simple, yet so elegant.
- I used to rush this step, but now I savor the patience it takes to dry them thoroughly—magic happens in that quiet moment.
- Nothing beats the satisfaction of flipping them and watching the crust develop—such a small, perfect caramelized miracle.
The overlooked moisture detail
- I remember the first time I nailed a perfect sear on scallops—smelled like toasted butter and caramelized magic, it was a small victory that made me realize how much moisture control matters. It’s funny how a tiny step like drying them thoroughly can change everything from steamed to stunning. That moment stuck with me, and now I always start there, no matter how busy I am.
- This dish isn’t just about technique; it’s about capturing that fleeting moment when the scallop hits the pan and transforms. I love how it feels almost meditative—listening to the crackle, smelling that rich buttery aroma, and watching the crust form. It’s simple, honest, and so satisfying to get right, especially when serving friends or just treating myself.
- heading: The overlooked moisture detail
History and Trivia of Pan-Seared Scallops
- Pan-searing scallops became popular in French cuisine in the 20th century as a quick, elegant way to prepare seafood.
- The technique of searing seafood to develop a caramelized crust dates back centuries, originally in coastal Mediterranean regions.
- Scallops have been harvested and enjoyed since ancient times, with evidence of their consumption by the Romans and Greeks.
- The word ‘scallop’ comes from the Old French ‘escalope,’ referring to the shell’s distinctive fan shape, which chefs love for presentation.
Ingredient breakdown
- Scallops: I look for firm, dry scallops that feel slightly springy—moisture is the enemy here, so pat them thoroughly dry before hitting the pan.
- Salt: I prefer sea salt; it brings out the natural sweetness. Lightly season just before searing to avoid drawing out excess moisture.
- Butter: I use clarified butter or a mix with neutral oil—this helps achieve that golden crust without burning the fat and adds a rich, nutty aroma.
- Oil: I choose a high-smoke-point oil like grapeseed or canola. A hot pan needs a reliable, smoke-free oil for the perfect sear.
- Lemon: Bright, fresh lemon juice right after searing elevates the sweetness and cuts through the richness—don’t skip it.
- Herbs (optional): A sprig of thyme or parsley adds aroma, but I add these at the end so they don’t burn and turn bitter.
- Pepper: Freshly cracked black pepper just before serving adds a subtle warmth and crunch, balancing the sweet scallops.
Spotlight on key ingredients
Scallops:
- I look for firm, dry scallops that feel slightly springy—moisture is the enemy here, so pat them thoroughly dry before hitting the pan.
- Salt: I prefer sea salt; it brings out the natural sweetness. Lightly season just before searing to avoid drawing out excess moisture.
Butter and Oil:
- Butter: I use clarified butter or a mix with neutral oil—this helps achieve that golden crust without burning and adds a rich, nutty aroma.
- Oil: I choose a high-smoke-point oil like grapeseed or canola. A hot pan needs a reliable, smoke-free oil for the perfect sear.
Notes for ingredient swaps
- Seafood: Fresh scallops are best, but frozen will do in a pinch. Just thaw thoroughly and pat dry to avoid excess moisture.
- Butter: Use clarified butter or ghee if you want a higher smoke point and less risk of burning—still rich and nutty.
- Oil: Swap for avocado or grapeseed oil for even higher smoke points, especially if your pan runs hot.
- Lemon: Lime or vinegar can add acidity if lemon isn’t available, but they won’t have quite the same brightness.
- Salt: Kosher salt works well, but if you only have table salt, use half the amount to avoid over-salting.
- Herbs: Fresh thyme or parsley add aroma, but dried herbs can work if added at the end to prevent bitterness.
- Pepper: Black pepper is classic, but white pepper gives a milder heat if you prefer less visual contrast.
Equipment & Tools
- Heavy skillet (preferably stainless steel or cast iron): Provides even heat and a good sear surface.
- Tongs or a spatula: Handles flipping and turning the scallops carefully.
- Paper towels: Drys the scallops thoroughly before cooking.
- Lemon squeezer: Adds fresh citrus flavor at the end.
Step-by-step guide to pan searing
- Gather your scallops and ensure they are dry. Pat them thoroughly with paper towels, focusing on removing excess moisture from all sides, especially the flat surfaces, to prevent steaming.
- Set your pan on medium-high heat (around 190°C / 375°F). Add a mix of clarified butter and neutral oil—enough to coat the bottom lightly. Let it heat until shimmering but not smoking.
- Season the scallops lightly with sea salt just before searing. Do not salt too early, as moisture will be drawn out, making searing difficult.
- Place the scallops in the hot pan, flat side down. Do not overcrowd—give each enough space. Press gently to ensure contact with the surface. Cook for 2-3 minutes, until the edges are opaque and the surface is golden-brown.
- Flip the scallops carefully with tongs or a spatula. Cook for another 1-2 minutes. The second side should develop a rich, caramelized crust and the scallops should feel firm but still tender when pressed.
- Remove the scallops from the pan and transfer to a plate. Rest for 1 minute to allow juices to redistribute. Finish with a squeeze of fresh lemon and optional herbs for brightness.
- Serve immediately on warm plates, enjoying the contrast of the crispy exterior and tender interior.
Transfer scallops to a warm plate, rest for 1 minute, then drizzle with lemon juice and garnish with herbs if desired. Serve immediately to enjoy their crisp crust and tender interior.
How to Know It’s Done
- Golden-brown crust with slight caramelization on the surface.
- Scallops are opaque and firm but still tender when gently pressed.
- A slight jiggle indicates they are cooked through but not overdone.
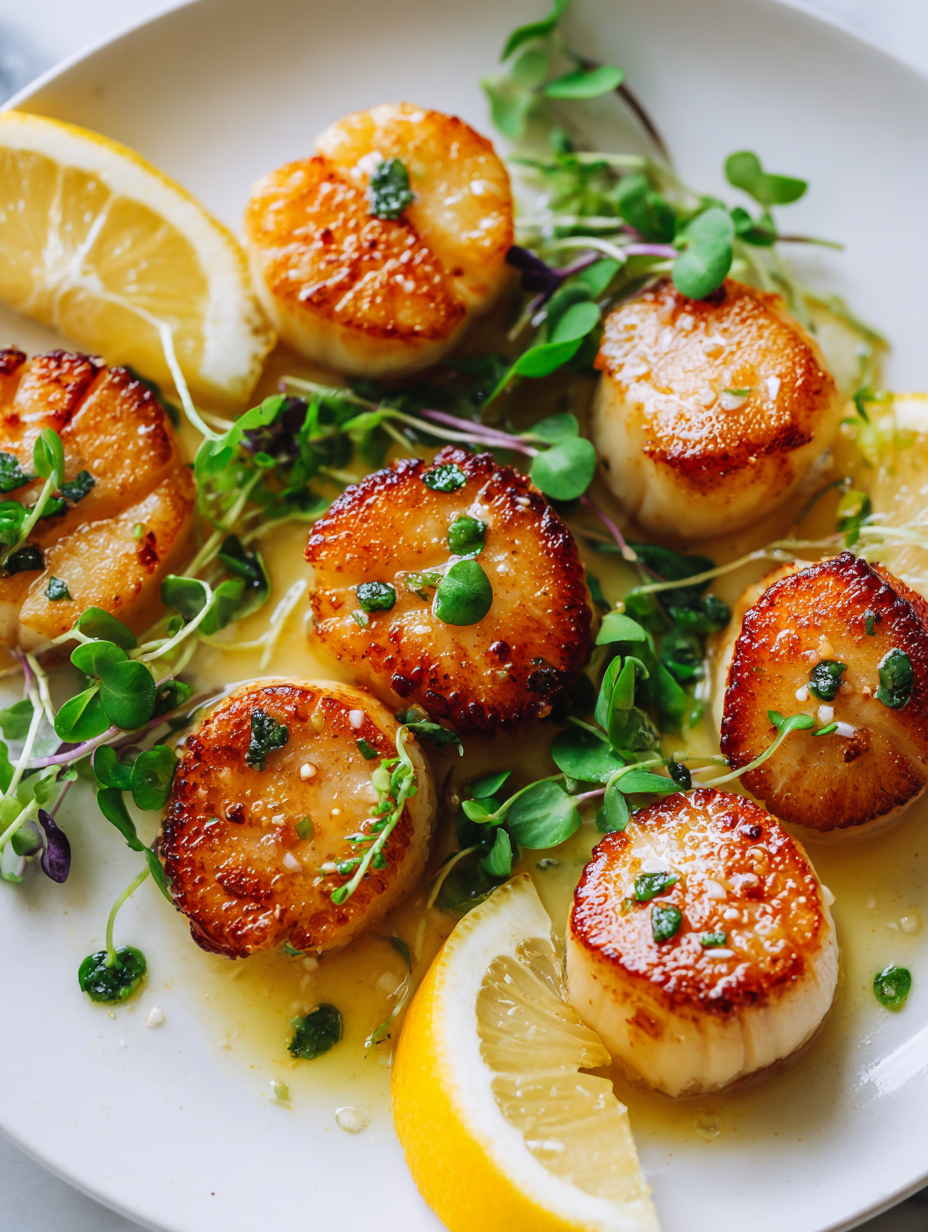
Perfect Pan-Seared Scallops
Ingredients
Equipment
Method
- Start by thoroughly drying each scallop with paper towels, pressing gently to remove excess moisture from all sides. This step is crucial for a good sear.
- Preheat your heavy skillet over medium-high heat until shimmering, about 2-3 minutes. Add the clarified butter or neutral oil, swirling to coat the bottom evenly. Wait until the fat is hot and just begins to shimmer.
- Season the scallops lightly with sea salt just before cooking—this helps draw out moisture and promotes a better sear. Place the scallops flat side down into the hot pan, ensuring they make good contact with the surface.
- Cook the scallops undisturbed for about 2-3 minutes, until the edges turn opaque and the underside develops a deep golden-brown crust. You’ll hear a gentle sizzling sound as they sear.
- Flip the scallops carefully using tongs or a spatula. Continue cooking for another 1-2 minutes until the second side is also golden and caramelized, and the scallops feel firm but still tender when pressed.
- Remove the scallops from the pan and transfer them to a plate. Immediately squeeze fresh lemon juice over the hot scallops, and sprinkle with cracked black pepper and herbs if using. Let them rest for a minute to let the juices settle.
- Serve the scallops immediately, enjoying their crispy exterior and tender, juicy interior with a bright burst of lemon and aromatic herbs for balance.
Notes
Pro tips for perfect scallops
- Dry thoroughly: Pat scallops dry with paper towels until no moisture beads on the surface, ensuring a crisp sear.
- Preheat pan: Heat your skillet until shimmering—about 190°C / 375°F—to get that perfect caramelization.
- Use enough fat: Coat the pan with a thin layer of clarified butter or high-smoke oil to prevent sticking and promote even browning.
- Don’t overcrowd: Leave space between scallops; overcrowding drops temperature and causes steaming instead of searing.
- Flip once: Wait for a deep golden crust before flipping; resist the urge to move them around prematurely.
- Finish with acid: Squeeze fresh lemon immediately after cooking to brighten the rich, buttery flavor.
- Rest briefly: Let scallops sit for a minute after searing; this allows juices to redistribute for maximum tenderness.
Common mistakes and how to fix them
- FORGOT to dry scallops thoroughly → Pat them dry, moisture causes steaming and poor sear.
- DUMPED oil in the pan → Use enough to coat; too much prevents crisping, too little causes sticking.
- OVER-TORCHED butter → Keep butter at medium-high, watch for browning, and adjust heat accordingly.
- DIDN’T rest scallops after cooking → Rest for 1 minute, juices redistribute for better texture.
Quick fixes and pantry swaps
- If scallops are wet, splash them with a little lemon juice to help dry surface quickly.
- When stuck, patch with a tiny bit of hot oil and gently loosen with a spatula.
- Splash a pinch of vinegar in the pan if butter burns too fast—calms the heat.
- When scallops overcook, sear a fresh batch with a quick, hot flash—rescue in 5 seconds.
- Pan too dry? Swap in a splash of neutral oil to shimmer and revive the sear quality.
Prep, store, and reheat tips
- Ensure scallops are thoroughly dried before storing; excess moisture leads to soggy texture upon reheat.
- Store uncooked scallops in an airtight container in the fridge for up to 24 hours; best enjoyed fresh for optimal texture and flavor.
- Cooked scallops can be refrigerated for up to 2 days; reheat gently in a hot pan to preserve their sear and avoid rubberiness, aiming for a quick, crackling reheat.
- Freezing scallops is possible but may affect texture; if frozen, thaw slowly in the fridge and pat dry before reheating for best results.
- Reheated scallops may lose their crisp crust; reheat in a hot skillet for about 1 minute per side until just warmed through, listening for that initial crackle.
Top questions about pan seared scallops
1. Why do my scallops stick to the pan?
Pat the scallops dry thoroughly with paper towels before cooking. Moisture on the surface makes them steam instead of sear, so take your time with this step.
2. How hot should the pan be?
Use a hot, well-preheated pan with enough oil or clarified butter. If the pan isn’t hot enough, scallops will stick and won’t develop that golden crust.
3. How do I know when to flip them?
Cook scallops in a single layer without overcrowding the pan. Wait until they develop a deep golden crust before flipping, about 2-3 minutes per side.
4. How can I tell if they are cooked?
Overcooking makes scallops rubbery. They’re done when they are opaque and firm, but still tender—about 3 minutes total for most sizes.
5. Should I add lemon during cooking?
Add lemon juice or fresh herbs immediately after searing to brighten the rich flavor. Serve right away for the best crisp exterior and tender interior.
6. How do I fix overcooked scallops?
If scallops are overcooked, gently reheat in a hot pan for about a minute, just until they shimmer and crackle again—avoid rubbery textures.
7. What oil is best for searing?
Use high-smoke-point oils like grapeseed or canola to prevent burning. Butter adds flavor but can burn quickly, so mix with oil or clarify it.
8. Can I prepare scallops ahead?
Store uncooked scallops in the fridge for up to 24 hours, pat dry before cooking. Cooked scallops last 1-2 days refrigerated—reheat quickly in a hot pan.
9. Can I freeze scallops?
Frozen scallops should be thawed slowly in the fridge, then thoroughly patted dry. Excess moisture causes steaming, not searing, so dry well before cooking.
10. What if my scallops stick to the pan?
If scallops stick, splash the pan with a little hot oil or lemon juice, then gently loosen with a spatula. Keep the heat high for a quick rescue.
Mastering this simple technique has made me more confident in the kitchen. There’s a real satisfaction in flipping those scallops and seeing that perfect crust form. It’s a recipe I come back to when I want something quick, impressive, and honestly, pretty foolproof once you get the moisture control right.
In the end, it’s about embracing the process—patting them dry, letting the pan do its work, and savoring that first crispy bite. These scallops remind me that sometimes, the smallest details—like moisture—make the biggest difference. They’re worth the extra attention, especially when you want a dish that feels just a little special.

Founded by Rachel Morgan, a proud home cook and foodie from Austin, Texas, this blog is all about transforming everyday meals into moments of joy.